8.5' x 11' Letter Tri-Fold Brochure Template Download
How to Make a Brochure From an InDesign Template
In Adobe InDesign CC, you have access to hundreds of ready-made templates, which you can adapt with your own text and images. This is a quick and easy way to create a professional-standard layout with minimum fuss and time.
If you're looking for more InDesign brochure templates, make sure to check out the wide selection on Envato Elements. Here's a selection of the best ones to choose from:
Here, we’ll walk through the steps of selecting and customizing a free InDesign template for a trifold brochure.
What You’ll Need to Create Your Brochure
To edit the template pictured, you’ll need a subscription to Adobe Creative Cloud and the InDesign CC app installed on your computer.
If you don't have access to InDesign CC, you can find a wide range of similar trifold brochure templates on Envato Elements and GraphicRiver.
To recreate the ‘Pet Vacay’ design pictured here, you’ll also need to download the following fonts and images from Envato Elements:
Install the fonts on your computer, and you’re ready to get started.
1. How to Load Your Template in InDesign
Step 1
Make sure you’re logged in to Creative Cloud and connected to the internet. Open InDesign CC and go to File > New > Document.
In the New Document window, click on Print at the top. You’ll see a selection of presets at the top, with a selection of templates below this.
Step 2
Scroll down the page to browse the range of templates on offer. Here we’re going to use the template called ‘Pop Brochure Layout’.
You can click on See Preview to look at a mockup of the design in detail. Click Download, and then Open.
Step 3
You may have a warning window that alerts you to missing fonts. In this case, we’re going to be changing the fonts anyway, so it’s nothing to worry about.
Otherwise, you can click Sync Fonts to sync the fonts over from Adobe Fonts.
Step 4
Some templates will contain handy tips for how to use the template.
In this case, you’re instructed to go to the Pages panel (Window > Pages) and, from the main menu, choose View Pages > By Alternate Layout.
There are two layouts contained in this template—one for a US Letter version of the brochure, and the other for an A4 size. We’re going to work on the Letter-sized version only, so click on the arrow to the right of ‘A4’ and choose Delete Pages.
Step 5
Expand the Layers panel (Window > Layers) to look at the layers that have been set up in the template.
In this case, the top TIPS layer has been locked.
Switch off the visibility of the TIPS layer.
Step 6
There may also be type styles set up in your template. To view these, go to Window > Styles > Character Styles / Paragraph Styles.
In this template, there are four character styles...
... and 11 paragraph styles.
If you click on a text frame on the layout, one of the paragraph styles will be highlighted, showing that the text has that style applied to it.
As we format the text, we can redefine these styles to apply the formatting across all instances of the style.
2. How to Reformat the Typography on Your Template
Switching up the look of the typography on your template is a great way of giving the layout an instant fresh look. Here’s how to do it.
Step 1
Working on Page 1 of the template, select the ‘HEADING’ text frame on the central third of the page.
From the top Controls panel or the Character panel (Window > Type & Tables > Character), change the Font to Maxim Sans Bold, Size 24 pt.
Step 2
In the Paragraph Styles panel, Right-Click on the highlighted ‘Title/Heading+’ style and choose Redefine Style.
This will apply the revised formatting to all the headers on the template.
Step 3
Select the body text frame at the bottom-left of Page 1 and adjust the Font to Bergen Sans Mono Regular, Size 8 pt.
Choose Redefine Style from the Paragraph Styles panel, as before, to reset the look of all the body text on the brochure.
Repeat the process for all other instances of text on the brochure, resetting the Font to either Maxim Sans or Bergen Sans Mono, and redefining the style for each.
3. How to Customize Color and Graphics on Your Template
Giving your template a color makeover is another technique for giving the design a unique spin.
Step 1
From the Swatches panel (Window > Color > Swatches), choose New Color Swatch from the panel’s main menu.
Create a CMYK swatch, with the values C=2 M=10 Y=100 K=0. Click Add and Done.
Repeat to create a second swatch, C=92 M=89 Y=41 K=35.
Apply the yellow swatch, C=2 M=10 Y=100 K=0, to the Fill Color of the central rectangle shape on Page 1, sitting on the Graphic/Design Elements layer.
Apply the blue swatch, C=92 M=89 Y=41 K=35, to the Font Color of all the text on Page 1.
Scroll down to Page 2, and apply the blue swatch to the Font Color of all the text on this page too.
Step 2
Scroll back up to Page 1 and select the image frame at the top-left corner of the page, which is on the Placeholders layer.
Go to File > Place and choose the dachshund image, before clicking Open.
Double-click inside the image frame to select the image directly and rotate the image a little, so that the dog’s paws are lined up with the bottom edge of the image frame.
Adjust the Fill Color of the placeholder image frame to [Paper].
Step 3
Select the circular shape at the bottom of Page 1, and go to File > Place, choosing the French bulldog looking up image. Open it.
From the top Controls panel, check the Auto-Fit box.
Hold Shift and drag to scale the circle up a little. The image will resize inside accordingly.
Directly select the bulldog image inside the frame, and Right-Click > Transform > Flip Horizontal.
Step 4
File > Place the other French bulldog image into the image frame on the far-right section of Page 1.
Step 5
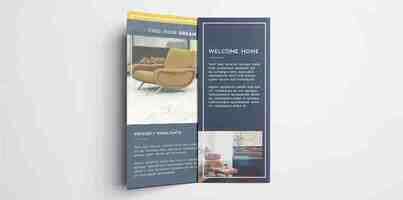
Head down to Page 2 of the document, and File > Place the Spanish dog image into the frame on the far-right section.
Place the jack russell terrier photo into the central frame.
Place the British longhair kitten image into the circular frame on the left side.
Step 6
Back on Page 1, select the yellow shape in the center of the page and Edit > Copy, Edit > Paste it, moving this over to fit the left-hand section. Extend the left edge so that it reaches the edge of the bleed on the left side.
Adjust the Fill Color of the shape to your dark blue swatch, and the Font Color of the text in the body text frame to yellow. Move the ‘HEADING’ frame down, and switch the Font Color to [Paper].
Step 7
Scroll down to Page 2 and Edit > Paste the yellow shape onto the page, positioning it over on the right third of the layout.
Paste again, moving this shape over onto the central section and changing the Fill Color to dark blue.
Adjust the color of the text and line elements above this to yellow, for contrast.
Paste a final shape onto Page 2, moving it over onto the left-hand section.
Step 8
You can now adjust the text content of your brochure. Manually type in the text, or Copy and Paste text over from a Word document.
You can tweak the size and position of text as you work. Make sure to redefine the Paragraph Styles to maintain consistency.
4. How to Export Your Brochure
With your brochure artwork finished, you’re ready to export it to a print-ready format.
Step 1
First, make sure to do a spell check (Edit > Spelling > Check Spelling). Then File > Save your work.
Go to File > Export. Name your file, and choose PDF (Print) from the Format menu, before clicking Save.
In the Export Adobe PDF window that opens, choose [Press Quality] from the Adobe PDF Preset menu at the top.
Step 2
Click on Marks and Bleeds in the window’s left-hand menu.
Check All Printer’s Marks and Use Document Bleed Settings. Then click Export.
Awesome work! You can send this press-ready PDF straight off to the printers.
Conclusion: Your Finished Brochure
If you want to show your brochure design to others before you commit to printing, why not drop your design into a Photoshop mockup, like this one?
If you're looking for more InDesign brochure templates, make sure to check out these top picks from Envato Elements:
This dramatic and moody brochure template would make a great fit for start-ups or creative agencies. With 40+ pages, there's plenty of scope for building a comprehensive brochure for your business.
A trifold brochure is simple, versatile and cheap to print. This trifold brochure template has a simple, modern design which would suit a variety of purposes.
Landscape brochures are compact and allow you to create layouts that are wider, making them a great pick for photo-heavy designs. This brochure template comes in three colorways, giving you lots of flexibility with the look of the brochure.
Looking for a brochure with a more formal look? This corporate brochure template has a polished, professional style which would suit law firms and financial businesses.
The pared-back, Scandinavian-inspired design of this landscape brochure template is simple and stylish. Perfect for creative agencies, freelancers, or retail brands.
Free InDesign Template
Real Estate Brochure Template
templates Brochures Real Estate Brochure Template Real Estate Brochure Template
Selling property is hard enough, but a stylish tri fold flyer design will help your real estate offering to stand out from the crowd. This print-ready InDesign template has been created by our team of in-house designers and is super simple to customize with your own content.
Looking for an inspiring concept for your real estate brochure? You’re in luck! This highly adaptable free template has all the ingredients of an awesome flyer—to edit it all you need is access to Adobe InDesign.
Unlimited Downloads: 1,000,000+ InDesign Templates, Mockups & Design Assets by
This InDesign template includes a ready-prepared layout; simply insert your own text and images. If you’d rather use this template as a starting point for your own design, all the elements can be edited or removed as you wish.
Flyer size:
8.5″ x 11″
TRI-FOLD FLYER
(Need a slightly different size? Learn how to resize this template )
Below you can preview the full flyer design, download the InDesign file and find a bunch of helpful tips on editing templates in InDesign.
Download this Template
Download this tri-fold brochure template for free (your download will include an INDD file for InDesign CS6 and an IDML version for opening in InDesign CS4, CS5 or CC):
Download Template (Free)
Help Working with InDesign Templates
We’ve put together a collection of helpful tips to make editing our InDesign Templates super easy. If you’re a newbie to Adobe InDesign it’s worth checking these out before starting work on your design.
How to Open an InDesign Template
Step 1. Download the file.
Unlimited Downloads: 1,000,000+ Fonts, Mockups & Design Assets by
Step 2. Our InDesign templates are packaged and saved as ZIP files. If you have a Windows computer Right Click > Extract All before opening the InDesign file.
Step 3. If you’re running InDesign CS6 open the INDD version of the file. If you’re working with InDesign CS4, CS5 or CC open the IDML version.
How to Work With Layers in Your Template
Our InDesign templates are organized into layers, which group similar elements together. The layers in your document can be controlled from the Layers panel (Window > Layers).
Pro tip: Try locking the YOUR IMAGES HERE layer to save time when editing text. This will prevent you from accidentally moving the graphics out of position.
How to Change the Colors
The color scheme of this template can be edited from the Swatches panel (Window > Color > Swatches).
Pro tip: Editing a swatch will automatically update all instances of that color across your document.
How to Add Your Own Text
The text across this design can easily replaced with your own copy. Simple use the Type Tool (T) to select the text box you wish to edit. You can then add your own fonts and formatting. Read more about formatting text in InDesign.
How to Add Your Own Images
You’ll notice when you first open the template that all the image frames have a placeholder image. You can insert your own images by selecting the image frame and using File > Place to select a replacement image. Read our beginner’s guide to working with images in InDesign.
Pro tip: Do your images look blurry? Make sure your display is set to high-quality (View > Display Performance > High-Quality Display). To see more accurately how your design will appear when printed go to View > Overprint Preview.
How to Resize Pages in InDesign
It’s simple to change the width of the spine in your template by using the Page Tool (Shift+P). Select the tool and then click onto the spine to select it. You can drag the sides of the page to preview your desired new size. Hold down Alt or Option while you drag to resize the page. Read more about resizing pages in InDesign.
How to Export Your Document for Printing
Once you’ve completed work on your template and you’re ready to print it you can head to File > Export. To create a print-ready file, choose Adobe PDF (Print) from the Format drop-down menu in the Export window. Make sure to include the bleed in your export options by checking Use Document Bleed Settings in the Export Adobe PDF window. Read more about prepping your designs for printing in InDesign.
How to Change the Fonts in a Document
You can format individual items of text using the Type Tool (T) and Controls panel, which you’ll find running along the top of the InDesign workspace. The fonts in most templates are not set as InDesign styles. However, it’s easy to create a Character or Paragraph Style using existing text formatting, and then edit this from the Styles panels (Window > Styles). Read more about editing Styles in InDesign.
Discover more advice for InDesign beginners on our Tutorials page. Or why not seek out inspiration about typography, layout design and much more right here.
8.5" x 11" Letter Tri-Fold Brochure Template Download
1. GENERAL. All sales are made pursuant to the terms and conditions set forth in this quotation, notwithstanding the provisions of any purchase order or other commercial form of Customer submitted to Cedar Graphics. Any terms or conditions of any purchase order or other form issued by the Customer, which are in addition to, modify, or are inconsistent with the terms and conditions of this quotation will not be binding on Cedar Graphics unless the Customer and Cedar Graphics agree, in a separate writing, to such additions or modifications.
2. NATURE OF TRANSACTION. The parties agree that this transaction is a Commercial Transaction constituting the sale of goods and is subject to and shall be governed by the provisions of Article Two of the Uniform Commercial Code as it has been adapted and amended by the State of Iowa, and modified by these Conditions of Sale and/or Quotation.
3. QUOTATION. A quotation not accepted within thirty (30) days is null and void. All prices are based on material costs at the time of quotation.
4. PROOFS. Pre-press proofs shall be submitted with original copy. Corrections are to be made on “Master Set,” returned marked “O.K.” or “O.K. with corrections” and signed by Customer. If revised proofs are desired, request must be made when proofs are returned. Cedar Graphics cannot be held responsible for errors under any or all of the following conditions: the work is printed per Customer’s O.K.; changes are communicated verbally; Customer has not ordered proofs; Customer has failed to return proofs with indication of changes; or Customer has instructed Cedar Graphics to proceed without submission of proofs. Unless specifically provided in quotation, press proofs will be charged for at current rates. An inspection sheet of any form can be submitted for Customer approval, at no charge, provided Customer is available at the press during the time of makeready. Lost press time due to Customer delay, or Customer changes and corrections, will be charged at current rates. Because of differences in equipment, processing, proofing substrates, paper, inks, pigments, and other conditions between color proofing and production pressroom operations, a reasonable variation in color between color proofs and the completed job shall constitute acceptable delivery.
5. ORDERS. Orders placed, verbal or written, cannot be cancelled except upon terms that will compensate Cedar Graphics for all loss incurred in reliance on the order.
6. PRICE/CHANGES. The price set forth in the quotation is based upon the specifications detailed therein. Any changes to such specifications that require additional production time or other additional costs will be charged in addition to the price set forth in the quotation. Upon acceptance of quote, performance by Cedar Graphics is expected to begin within a reasonable time frame fifteen (15) days). Material prices quoted are current to date. Increases in our cost of materials between date of quote and performance date by Cedar Graphics must be added to quote prices. Upon receipt of original copy or manuscript, should it be evident that the condition of the copy differs from that which had been originally described and consequently quoted, the original quotation shall be rendered void and a new quotation issued.
7. PAYMENT. Cash (or approved negotiable instruments, Cashier’s check, credit card) is required to be paid prior to work being done on the job unless Customer has been approved for credit terms. If Customer has credit terms, payment is due thirty (30) days from date of invoice. All other terms of payment must be approved in advance by Cedar Graphics Credit Department. Invoices not paid in full within 30 days from the invoice date will be subject collections and will be assessed any administration and collections fees at actual cost. Irrespective of any contrary language in Customer’s purchase order or any policy position of the American Association of Advertising Agencies, Customer shall be liable for all invoices regardless of whether or not Customer has been paid by its client or advertiser. In the event of default of payment – Customer agrees to be responsible for Cedar Graphics’ attorney and collection fees.
8. SALES AND OTHER TAXES. Customer shall also pay any sales, use, or other taxes now or hereafter imposed by any federal, state, or local taxing authority upon or with respect to the sale, other than taxes imposed on net income or personal property taxes. In the event such taxes are not included in the invoice from Cedar Graphics, but are later determined or alleged to be due by a taxing authority, Cedar Graphics may pay such taxes and the Customer will reimburse Cedar Graphics the amount thereof.
9. POSTAGE. For jobs that require mailing through the US Postal Service, Cedar Graphics will estimate postage costs prior to the mailing. Customer is required to pay postage to be received by Cedar Graphics at least 48 hours before the job is scheduled to be mailed. A delay in the payment of postage by Customer may cause a delay in the mailing of the job. Customer accepts responsibility for delays in mailing caused by lack of or delay in payment of postage.
10. GOODS RECEIVED FROM CUSTOMER. Customer-supplied materials delivered from Customer or its suppliers are verified with delivery ticket as to cartons, packages or items shown only. The accuracy of quantities indicated on such tickets cannot be verified by Cedar Graphics, nor can Cedar Graphics accept liability for shortage based on supplier’s tickets. Title for finished work shall pass to the Customer upon delivery to carrier at shipping point or upon mailing of invoices for finished work, whichever occurs first. All prices are FOB Hiawatha, unless specified to the contrary.
11. RESPONSIBILITY FOR SUBJECT MATTER. In furnishing copy and paraphernalia for printing, mailing or fulfillment, the Customer represents that such copy or paraphernalia does not infringe upon any copyright, is not libelous, and does not otherwise violate the rights of other persons or entities or constitute a violation of any statute, law, ordinance, or governmental regulation of any kind. Customer agrees to indemnify and hold Cedar Graphics harmless from all losses, damages, and expenses, including reasonable attorneys’ fees, which Cedar Graphics may incur or suffer as the result of any claims of such violation or alleged violation. If Cedar Graphics believes, in its sole discretion, that the content of Customer’s materials is in violation of this representation, Cedar Graphics may also refuse to print, mail, or otherwise perform this agreement without being in breach hereof.
12. CUSTOMER’S PROPERTY. Cedar Graphics will maintain fire, extended coverage, vandalism, malicious mischief and sprinkler leakage insurance on all property belonging to the Customer, while such property is in our possession. Cedar Graphics’ liability for such property shall not exceed the amount recoverable from such insurance. Customer’s property of extraordinary value shall be insured through mutual agreement.
13. CONFIDENTIALITY. Cedar Graphics will maintain in confidence all information furnished to Cedar Graphics by Customer provided that such information is identified, in writing, as confidential. Except to the extent necessary to enable Cedar Graphics to perform its obligations or to exercise its rights hereunder, Cedar Graphics will not make use of or disclose any of such information to any other person.
14. CUSTOM AND USAGE. No course of performance or any course of dealing or usage of trade shall vary the express terms hereof.
15. LIEN ON CUSTOMER PROPERTY. As security for payment of any sum due or to become due under the terms of the Conditions of Sale and/or Quotation, Customer grants Cedar Graphics a security interest in all paper and any other property owned by Customer and in Cedar Graphics’ possession and all work in process and/or undelivered work. Cedar Graphics shall have a right to retain possession of, and shall have a lien on, all paper and any other property owned by Customer and in Cedar Graphics’ possession and all work in process and/or undelivered work.
16. CUSTOMER ASSIGNED PRINT BUYER. Customer assumes financial responsibility for purchases, change orders, and job modifications made by their print buyer, selected print broker or advertising agency personnel. All additional charges associated with the production of a print project will be Customers’ responsibility. Customer is responsible for communication of such decisions made by print buyer, selected print broker or advertising agency personnel.
17. NON-WAIVER. No waiver by Cedar Graphics of a breach of any provision hereof shall be deemed a waiver of future compliance therewith.
18. PLACE OF SALE. This agreement is made and entered into in the State of Iowa for goods, materials and services to be provided and sold by Cedar Graphics and purchased by Customer in the State of Iowa.
19. QUANTITY. Variations in quantity of 10 percent over or under ordered quantities shall constitute acceptable delivery and performance. Within this range, Cedar Graphics shall bill and the Customer shall pay for the actual quantity delivered. Any exception to this condition must be communicated in writing by Customer.
20. DELIVERY TO CUSTOMER. Where production schedules are not adhered to by the Customer, final delivery date(s) will be subject to renegotiation. Where, for the convenience of the Customer, Cedar Graphics arranges for shipment and incurs freight charges, such freight charges shall be billed to the Customer. In the event any freight company, or agent or trustee thereof, later asserts freight charges to be properly due in addition to those originally billed, the Customer shall reimburse Cedar Graphics to the extent of such additional charges lift gates, obstacle in delivery, duties and taxes, etc.).
21. FORCE MAJEURE. Cedar Graphics shall not be liable for delays or non-performance occasioned by causes beyond its control, including without limitation, acts of God, strikes, lockouts, fires, inability to obtain materials, breakdowns, delays of carriers or suppliers, and governmental acts and regulations.
22. LIMITATION OF LIABILITY. Cedar Graphics shall not be liable for any claim, loss, injury, liability, or damage caused by delay in any performance pursuant to this agreement. In no event shall Cedar Graphics’ liability for any matter or thing whatsoever, based upon, relating to, or arising out of this agreement, including liability for negligence, include any special incidental or consequential damages, even if Cedar Graphics shall have been advised of the possibility or likelihood of such potential loss or damage. With respect to any damages which allegedly arise out of the performance or breach of this agreement, Cedar Graphics’ liability shall in no event exceed an amount equal to the amount actually paid by customer to Cedar Graphics pursuant to this agreement. If Cedar Graphics furnishes technical or other advice to the customer with respect to the subject matter of this agreement, the customer assumes all risk of such advice and the results thereof, ad Cedar Graphics shall not be liable for such technical or other advice.
23. LIMITATION OF ACTIONS. All claims for alleged defects shall be deemed waived unless made in writing, along with samples demonstrating the complaint, within fifteen (15) days after receipt of goods. All such claims must be sent to the appropriate party at Cedar Graphics. Failure to make such claim within the stated period shall constitute irrevocable acceptance and an admission that the materials fully comply with terms, conditions and specifications. No action regardless of form arising out of the transactions under this agreement may be brought in a court of law or equity by Customer more than one (1) year after the cause of action has occurred.
24. LIMITATIONS OF WARRANTIES. Cedar Graphics warrants only title to the goods and their conformity to the specifications contained herein. Cedar Graphics makes no representation or warranty of any kind, express or implied, as to merchantability, fitness for particular purpose, or any other matters with respect to the subject matter of this agreement, and all implied warranties of merchantability and fitness for a particular purpose are hereby disclaimed.
25. DEFAULT. The following shall constitute a default under the Conditions of Sale and/or Quotation: (1) Customer breaching or failing to observe or perform any of its obligations pursuant to the Conditions of Sale and/or Quotation; (2) Customer becoming insolvent, dissolving, making an assignment for the benefit of creditors, or the filing of an involuntary or voluntary bankruptcy petition against it or by Customer; and (3) Cedar Graphics deeming itself, in good faith, insecure. 26. REMEDIES. In the event of default, Customer agrees to promptly cure the default. Upon default, Cedar Graphics can, at its option and without notice, demand immediate payment of all obligations under the Conditions of Sale and/or Quotation. In addition to cure of the default, Cedar Graphics has the discretion to determine if a deposit, prepay, or both, is warranted upon any default. If Customer fails to timely cure any default, Cedar Graphics may immediately, without notice, terminate all of Cedar Graphics’ obligations under the Conditions of Sale and/or Quotation. In the event of default, Customer agrees to pay reasonable attorney’s fees and costs of collection of Cedar Graphics.
27. COMPLETE AGREEMENT. The terms and conditions set forth herein supersede all other proposals, oral or written, and all previous negotiations, conversations, or discussions between the parties to this agreement. Customer understands and agrees that no agent, employee, or representative of Cedar Graphics has authority to bind Cedar Graphics to any affirmation, representation or warranty concerning the subject matter of this agreement which is not set forth herein, and that any affirmation, representation or warranty which is not set forth herein shall not constitute a warranty.
28. MEDIATION AND ARBITRATION. In the event of any controversy or claim arising out of or relating to this agreement, or a breach thereof, the parties hereto shall first attempt to settle the dispute by mediation, administered by a neutral mediator. If settlement is not reached within sixty days after service of a written demand for mediation, any unresolved controversy or claim may be settled by arbitration upon agreement of the parties, administered by a neutral arbitrator. The number of arbitrators shall be one (1). The place of arbitration shall be Cedar Rapids, Iowa. Iowa law shall apply. Judgment on the award rendered by the arbitrator(s) is binding and may be entered in any court having jurisdiction thereof.
29. CHOICE OF FORUM. This agreement shall be governed in all respects by the laws of the State of Iowa. In the event that a settlement is not reached through mediation and the parties do not wish to arbitrate Customer consents to the jurisdiction of the District Courts of the State of Iowa for the litigation of any disputes arising hereunder.