A brief guide to marketing data attribution models
It’s one thing to know how you’re doing against your metrics. But even if you’re knocking it out of the park, if you don’t know why you’re doing well, you won’t be able to replicate your success. That’s why, at Zapier, we use attribution to understand how customer actions result in certain business outcomes.

Attribution is a way for us to see how much each of our activities — across marketing, product, support, and more — is influencing the customer journey. It gives us a holistic view of how each touchpoint — from a blog post to an email to the product itself — contributes to user behavior.
To say attribution models are complex and nuanced would be an understatement: it took us years to build and execute a robust attribution model at Zapier.
But by understanding the more common attribution methods available to you, you can figure out how to use your data to help your company grow.
Types of attribution methods
I’m going to focus on three attribution methods here: first-touch, last-touch, and linear. There are plenty of others to choose from, but these are a great place to start.
First-touch attribution
First-touch attribution means that all the credit for a conversion (e.g., signup, purchase, whatever your business uses) goes to the first way the customer ever interacted with your brand. Did they first land on a blog post on your website? Did they click on a paid ad? Did they find your homepage from search?
Of course, this is a customer’s first trackable exposure to your brand. (If you find a way to automatically track that one time you told your uncle Carl about something, please let me know.)
In the image below, we’re looking at the journey of a customer who interacted with Zapier six times before signing up:
(1) They landed on a blog post, (2) then they visited the site directly by typing in the URL, (3) then they clicked on an ad, (4) then they found a landing page on our site from Google, (5) then they clicked on another ad, (6) and then they visited the site directly again.
It was during that last interaction (visiting the site directly) that they signed up.
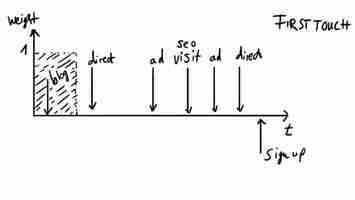
When looking at it through the lens of first-touch attribution, even though the customer had a bunch of interactions before signing up (and even if that all happened over the course of a week or a month or a year), the initial blog visit still gets all the credit.
When to use first-touch attribution
First-touch attribution will tell you how someone learned about your brand. That means it’s great at telling you how well your top-of-funnel campaigns and efforts are doing. So, for example, if your blog is bringing in most of your converting traffic, you might put more resources into it.
But because it fails to account for everything after that first touch, it usually makes the most sense when there are shorter sales cycles (or conversion cycles).
Last-touch attribution
Last-touch attribution does the opposite: it gives all the credit to the customer’s last interaction before the conversion event. So using the same example, the direct visit right before they signed up now gets all the credit for the customer’s conversion — regardless of everything else they did before it.
One thing to keep in mind about last-touch attribution: it’s possible you’re going to get a lot of direct visits as your last touch. Direct visits are ones that don’t have a clear source outside of your website. It happens by a user either typing in the URL, clicking a bookmark they saved, or clicking another link that passes no source information along with it.
Now, our marketing and product teams spend a lot of time thinking about engagement: how best to get new visitors interested in re-visiting our pages. If we’re successful in engaging those users, they keep coming back to Zapier, sometimes coming directly on their own (e.g., typing zapierom into the address bar), no longer needing our help.
That’s a good thing. But when we focus on analyzing that engagement, we want to spend time looking at the user journey before they made a habit of coming back on their own — that is, before their journey began to have lots of direct touches.
To enable this kind of analysis, we look at our attribution data without the last direct touches. This means eliminating all the events after the last non-direct visit.
That helps us focus on what it was that got people to want to come back to our site on their own. In the example above, the last-touch credit would now be given to an ad.
When to use last-touch attribution
Last-touch attribution is best used for mid-funnel or bottom-funnel campaigns — spots where you expect someone to convert from.
You can also default to last-touch attribution if you’re not sure what else to use. It’s the most common attribution method, and it’s simple: a person clicked this ad and signed up . Easy.
Just keep in mind that it will underrepresent top-of-funnel campaigns.
Linear attribution
So we’ve given credit to the first interaction and the last interaction, but what about everything in between?
That’s where linear attribution (a form of multi-touch attribution) comes in. Linear attribution is built on the assumption that every interaction is equally important leading up to a conversion event (and therefore gets the same weight).
In other words, every interaction contributes 1/number_of_interactions to the conversion.
Instead of just knowing the first thing users saw on your website (first-touch), or the last thing they did before converting (last-touch), you can now see multiple touches in one thread.
Using the same example, we now give each of the six interactions equal weight (each one gets one-sixth, or 17%, of the credit). That means the blog gets 17% credit, ads get 34% (because the user saw two ads), and so on.
But that’s an oversimplification and misapplication of multi-touch attribution. The goal isn’t to give out credit — instead, it should be used to deepen your understanding of how customer journeys lead to business outcomes.
That’s why, even though linear attribution might seem more “fair,” it’s by no means a panacea for all attribution questions. It definitely yields some of the most understandable and interpretable outcomes of all various possible multi-touch models, but it’s still a relatively simplistic assumption powering the attribution logic (it’s unlikely that every interaction held the same weight for the user).
As they say, all models are wrong, but some are useful.
When to use linear attribution
Linear attribution builds a much fuller picture of how various efforts contribute to conversions: for marketing attribution, it’s the most robust in determining the effectiveness of your full marketing mix.
But the trade-off is that it weights all touchpoints equally: an ad that a user clicked a month ago will be given just as much weight as the email that the same user opened the morning they signed up. If that’s not nuanced enough for you, there are other models that give different weights to different touchpoints depending on their position in the user journey.
I won’t get into those here, but this article on multi-touch attribution is a great place to start if you want to know more.
At Zapier, we are always trying to do what’s best for our customers. That means that different teams will use different data models to be sure they’re using what’s most relevant for the question they’re looking to answer.
If you have strong building blocks of data and flexible modeling, you’ll be able to do the same.
This article by Lukas Toma was originally published on the Zapier blog and is republished here with permission. You can read the original article here .
Startups can’t always rely on internal tech talent — here’s when to outsource

Here’s how you should onboard developers
This article was originally published by Michiel Mulders on ult by Honeypot , a Berlin-based community platform for developers. For the latest updates, follow ult by Honeypot on Twitter , Facebook , Instagram , Linkedin , and YouTube .

Wow-a! It’s always fun when a new developer joins your team. But wait, you are tasked with onboarding this developer. How do you get started? What’s the most important information you should share to get the new colleague on board? What’s the most efficient process to introduce this developer to the code?
Onboarding a developer is not an easy task. Still, too many development teams take this lightly while it’s a crucial step to make the developer feel comfortable and enjoy their role. How would you feel if nobody helped you and you don’t have a clue what you are doing?
So, to avoid this awkward situation, let’s take a look at the steps needed to provide a smooth onboarding process. This blog post serves as a checklist that you can tweak to your team’s processes, tools, and codebase.
Smoothen the job setup: The basics
The first thing you should do is make sure that all basic things are covered. That includes providing a laptop configured by your IT department, setting up all necessary accounts, and providing access to the tools the developer will need to carry out their tasks.
Obviously, make sure the developer can access team communication to ask questions in case something doesn’t work or they get stuck. This allows the developer to briefly introduce themselves to the rest of the team or company.
Once that is cleared, you can get started with the team onboarding.
Team onboarding: Building connections
Although the developer might have introduced themselves via the team chat, it’s still important to organize one-on-one meetings to meet developers individually. I prefer personal connections, getting to know each person behind their profile pictures on Slack or Discord. The one-on-one meetings’ goal is to have an informal chat about hobbies, interests, and a bit about the company or role itself. It’s a great way to build relationships, which are especially important in remote companies. Such a meeting can be short; a 10-minute or a 15-minute conversation is long enough.
Moreover, make sure to set up introductory meetings with the HR team as well to explain HR processes such as sick leave, holiday requests, or business expenses. If the developer works across multiple departments, it’s beneficial to introduce them to the different department leads.
Development processes: Meetings, tools, and workflows
It’s evident that you want to provide the developer with a high-level overview of the following development-related processes:
Meeting types
Development tools
Development processes
Code review process
These processes give the developer a better idea of how the team functions and organizes itself. Don’t expect the developer to remember everything you’ve explained to them. It’s best to refer to internal documentation that explains each process. If you don’t have these processes documented, make sure to provide a summary of the development processes as a reference.
Let’s get coding!
To provide a smooth onboarding, provide the developer with simple coding tasks that expose them to different areas of the codebase. It’s essential to slowly build up knowledge about different areas of the codebase. Preferably, give the developer tasks that have a real impact and are part of the development sprint. This approach gives them a stake in the team’s daily operations. Don’t forget to regularly check in with the developer and provide them with fast feedback.
The overall goal is to learn more about:
Overall architecture
Coding standards
Testing strategy
Define an onboarding roadmap
While the developer is gradually learning about the codebase, you should offer them some structure via an onboarding roadmap. This roadmap should span at least 3 to 4 weeks, preferably even more.
The goal of an onboarding roadmap is to have different checkpoints to keep track of the developer’s progress and to identify the waterholes. It also helps the onboarding mentor to adjust the tasks based on the developer’s progress.
Note that each onboarding roadmap is individual. For instance, you’re mentoring a developer that wants to join the P2P team. Therefore, you need to design an onboarding roadmap that focuses more on this area of the code base and P2P-specific knowledge. For example, prepare a list of resources the developer should read to better understand the team they’re about to join.
In the end, the onboarding roadmap produces a developer who doesn’t require further active assistance from an onboarding mentor to function in their designated development team. For that reason, make sure to clarify the outcome first when designing the onboarding roadmap and communicating this goal with the developer you’re mentoring.
Tip: Schedule pair programming sessions
Pair programming sessions are worth gold!
It’s a great way to boost the developer’s knowledge by pairing them with an experienced developer from their team. On top of that, pair programming reduces the barrier to ask questions and allows them to build a trust relationship. Besides coding, pair programming also helps onboarding developers faster to processes, tools, and development workflows.
What works best?
The earlier someone can contribute to the codebase, the better. The best way to learn more about the code is by actively contributing to it. Here, it’s important to gradually increase the difficulty of the tasks. It’s best to provide easy tasks initially so you don’t discourage or overwhelm the developer in the beginning.
In general, you want to avoid stressing your new colleague. New developers may take more time on simple tasks you’ve assigned them. Be supportive and provide them with feedback to accelerate their growth process. It won’t help if you break them down or pressure them. You want to create a friendly and supportive environment in which they can grow.
Don’t make the mistake of not creating an onboarding roadmap. I’ve seen companies who set up all the basics and then leave the developer to browse code and documentation without any clear goal. Reading code can work for some developers, but it’s definitely not the most optimal approach to learn about the codebase. Active learning is still one of the best methods to quickly build up knowledge.
In the end, it’s in your and the company’s best interest to onboard the developer as quickly as possible. You will see the effects of a lacking onboarding for months in terms of productivity and support needed. A good onboarding should teach the developer all relevant processes, tools, and workflows to start contributing value to the company and development team as early as possible.