Get to Know InDesign’s Three Frame Types
Stop InDesign from converting graphic frames to text frames
A feature I love about InDesign is the ability to click any graphic frame with the text tool and begin typing in it immediately. However, not everyone likes their graphic frames converted to a text frame automatically.
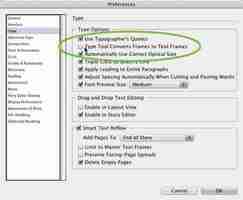
For those who wish to turn the feature off, simply visit your InDesign preferences (Command + K) and select Type in the source list on the left. Then uncheck the box labeled “Type Tool Converts Frames to Text Frames.”
How to Work With Images and Graphics in InDesign
How To Work With Images and Graphics in Indesign

An excerpt from How Do I Do That In InDesign by Dave Clayton.
They say a picture paints a thousand words, and it can also be said that in InDesign, you can still add a thousand words when using images! Because that’s what InDesign is for! Of course, you can make a document with only images if you want to. One important thing to know about images in InDesign is that you can build documents with images that are linked from source files, or you can embed them into the document. I use linked images 99 percent of the time. This means that the original image file is stored in a location outside of InDesign, and when you “place” the image in your document, you create a link to that original file. If you break the link by moving the original file, you get a warning, and if you make changes to the original, you get a warning. InDesign is great at telling you when something is wrong. When you embed images in your InDesign document, you increase the file size of the document, but everything stays together. In this chapter, we’ll look at how to place images, check links, resize and adjust images, check image resolution, and set image preferences. You can also add cool special effects without having to jump over to Photoshop (but it’s really easy to do that from InDesign if you need to). We’ll look at how to add images into text, use blend modes to create effects, and use images to reflow text in a document. Then there’s how to use CC Libraries to manage your images, how to work with Adobe Bridge, and a bunch of other tips and tricks. Because InDesign works so seamlessly with Photoshop, Illustrator, and the Creative Cloud, it’s not difficult to make something incredible. Just pick up any photo book and see how beautiful and well laid out it is—this is what InDesign brings to you in terms of design capability!
InDesign Fun Fact #7
InDesign is the successor to PageMaker, which was acquired by Adobe when they purchased Aldus in 1994. I was almost 30 in 1994. I feel very old now, as I used PageMaker back in the olden days!
How Do I Decide What File Type To Use For My Graphics?
InDesign is pretty flexible when it comes to the file formats that can be placed into a document. The obvious ones are a given: AI, EPS, PDF, and PSD. InDesign
also accepts TIFF, JPG, and PNG. You can easily replace each format with any other format, and you can even edit any of them outside of InDesign and have them update in your document (see page 177).
How Do I Place An Image?
There are a few ways to place an image. We’ll run through the menu option first. You can start by creating a frame on the page to place an image into, but if you skip that step and go straight to placing the image, a frame is automatically created for it—InDesign is clever like that! With your document open, go to File > Place (or File > Place from CC Libraries) and select your chosen graphic or image (photo). Once you click Open, you’ll see a small thumbnail of the image floating with your cursor. Now just click-and-drag from your starting point outward until you reach the image size you want, and then release. Don’t worry if you get a little triggerhappy and click once on the document and your image is placed at full size. You can easily resize it by pressing-and-holding Command-Shift (PC: Ctrl-Shift) while dragging a corner of the frame inward or outward. This will resize both the image and the frame. Another way to place an image is to drag it from a folder onto your document. Just like before, you’ll have a little floating thumbnail with your cursor, and you can click-and-drag to place the image at whatever size you wish. You can also copy and paste an image into your document, but I do not recommended this method because when you do so, the original image file will not be linked to the document and you can run into issues further down the line.
How Do I Resize An Image?
All images in InDesign are enclosed within a frame. This frame determines how much of the image you can see, so when you resize the frame you’ll notice that the image isn’t resized with it. To resize both the frame and the image, press-and-hold Command-Shift (PC: Ctrl-Shift) as you click-and-drag a corner point of the frame inward or outward. (The Shift key constrains the image while the Command [PC: Ctrl] key ensures that the frame and image are resized proportionally.) If you want to resize from the center, you also need to hold down the Option (PC: Alt) key. So to resize a frame and image proportionally from the center outward, you need to press-and-hold Command-Option-Shift (PC: Ctrl-Alt-Shift) as you click-and-drag from the center point. Think of it as a finger workout!
TIP: PREVIEW THE IMAGE AS YOU RESIZE IT
When you use the method described above, you won’t see the image resize until you release your mouse (you’ll only see the frame resize). However, if you want
to see a live preview of the image as you resize it, just hold down your click for an extra couple of seconds before you start dragging. This is called the “Patient User Mode”—Terry White and Scott Kelby taught me that!
How Do I Fit My Image To My Frame (Or Vice Versa)?
InDesign’s Frame Fitting controls allow you to manually fit your content to its frame, or fit your frame to the content within it. To apply a Frame Fitting option, select the frame, and then go to Object > Fitting and select one of the options, or click on one of the Frame Fitting icons in the Properties panel or Control panel. Keep in mind that you always have the option to adjust the content or frame after the fact—these options are to help you get there quickly. The following options are available:
Fill Frame Proportionally: The image will fit in the frame as best as possible, with some areas of the image falling outside of the frame. The frame will be filled.
Fit Content Proportionally: The entire image will appear within the frame, but there will be white space if the image and frame do not have the same aspect ratio.
Fit Content to Frame: This will stretch the image to fill the entire frame. The image is not resized proportionally and can look awful.
Fit Frame to Content: The frame is resized to fit the content. If the placed image is bigger than the document the image will suddenly fill the page. This option is useful only if the image is smaller than the document into which it’s being placed.
Center Content: This shows the center section of the image at whatever size the frame is, unless the image fits the frame perfectly when placed.
Content-Aware Fit: The image fills the frame and is placed with what InDesign deems to be the optimum part of the image showing (see next tip).
Get to Know InDesign’s Three Frame Types
Here is a quick rundown of the three frame types offered within the popular InDesign® page layout program.
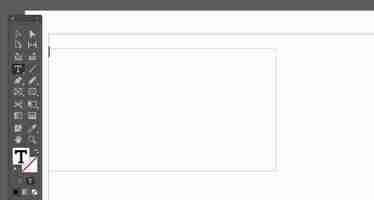
Graphic Frames: When you use one of the Frame tools (those are the ones with an “X” in the middle of them), InDesign creates a graphic frame. The X means exactly the same thing in both InDesign and XPress: a graphic goes here. When you use File > Place, select an image and click (or drag) on an empty part of your page, InDesign creates a graphic frame and places the image within it.
Text Frames: The only way to create an empty text frame is to drag with the Type tool. You can also create a text frame by using File > Place and importing a text story. And it’s possible to convert another type of frame, which I discuss under Object Styles.
Unassigned Frames: This is the least understood of InDesign’s frames. All the Path and Shape drawing tools — including the Rectangle tool (that’s the rectangle with no “X” in it) and the Pen tool — draw unassigned frames. These are frames that, by default, are not meant to include text or graphics. They have no content. You might use these for drawing a shape on your page, a background color or part of a logo, just as though you were drawing in Illustrator®.
Object Styles: When you create a text frame, for example, InDesign automatically assigns the [Basic Text Frame]; that is, unless you create your own custom Object Style and make it the default. You can change the default by dragging the icon to your style.