How Long Does it Take to Learn After Effects?
How to Learn Adobe Illustrator for Free
Adobe Illustrator is a very powerful tool that many artists rely on worldwide to create vector arts. One of the most frequently asked questions is about the difference between Adobe Photoshop and Adobe Illustrator; well, the difference is very simple, Adobe Photoshop is used to create bitmaps which is very suitable for photo manipulation (it’s worth noting that bitmaps loses quality when they’re scaled), while Adobe Illustrator is used to create vector graphics which don’t lose quality when they’re scaled.

There are free alternatives to Adobe Illustrator and Inkscape is the most widely known and used of these alternatives. There are many reasons for why you should be interested in learning Adobe Illustrator; first, it can help you create vector art for your website, game or any other creative project you’re working on. It can also help you find a part/full time job, shutterstock and 99designs are just two of the outlets that you can use to sell your artwork.
The aim of this post is to present and compare between free online sources that beginners can rely on to learn Adobe Illustrator, the sources stated here are full-structured courses that beginners can follow along so you won’t find a link to a single article or a reply in a forum post, you won’t also find a million source to learn Adobe Illustrator and that’s also confusing. It’s worth noting that this article is addressing Adobe Illustrator CC only.
Getting Started with Adobe Illustrator from Scratch
Adobe TV
Adobe TV is the first free online source where beginners can learn Adobe Illustrator. You don’t need to register to have access to the course, just go to the website and you’re ready to go. The course covers the majority of the topics that a beginner should know; it also covers some of the intermediate and advanced topics.
Structure: the course is divided into 11 sections; each section is divided into lessons, the lesson is a video tutorial that covers certain topics in Adobe Illustrator.
Interface: The interface is very simple as seen below, the lessons are listed under each other, you click on the lesson you’re interested in and you’re ready to go.
Now, the pros and cons:
Pros
Free. The course is well-structured for beginners. The course covers some of the intermediate and advanced topics in Adobe Illustrator.
Cons
The course isn’t well organized. The course is presented by many instructors which is inconsistent and might be problem for some.
Verdict: This outlet would be the first place that you should visit to start learning Adobe Illustrator, I’d recommend that you start from the lesson entitled “How To Get Started With Adobe Illustrator CC – 10 Things Beginners Want To Know How To Do” in the “Essential Tasks” section.
Udemy is the second free source where beginners can learn Adobe Illustrator through video tutorials; you can learn literally anything on Udemy for free or for a fee (depending on the course provider). To join Udemy just register using your email. Go to the search bar and type what you want to learn (Adobe Illustrator in our case); of course you should choose the free courses and at the time of writing this post the following were present:
You can choose one of these courses and start it. Each course is divided into lessons (depending on the instructor); I’ve tried the “Getting Started with Illustrator CC” course and the instructor was good.
Structure: The “Getting Started with Illustrator CC” course is divided into 2 sections and each section is divided into lessons (22 lessons in total), each lesson covers certain topics in Illustrator.
Interface: The interface is quite simple just click on the lesson you want and the video tutorial will start.
Pros
Free. The course is well-structured for beginners.
Cons
The tutorial is only suitable for beginners, there are no free courses for intermediate and advanced users.
Verdict: The course is a good source for beginners, but it only coves the very basics of Adobe Illustrator. It’s the place to go to if you just want to get a general idea about Illustrator.
Adobe Creative Cloud
Adobe creative cloud is the third online outlet where beginners can learn Illustrator for free. You don’t need to register to have access to the video library, just go to the website and you’re ready to go. The course doesn’t only cover beginner’s topics but it also covers intermediate and advanced topics.
Structure: The course is divided into 6 groups, each group is divided into sections and the sections are divided into lessons, each lesson covers a certain topic in Adobe Illustrator.
Interface: The interface is very simple, just click on the topics you’re interested in and you’ll be directed to the video tutorial page.
Now, the pros and cons:
Pros
Free. The course is well-structured for beginners. The course covers some of the intermediate and advanced topics in Adobe Illustrator.
Cons
The course is organized in such an abysmal way that really ruins the effort made in creating these video tutorials, one of the examples of the abysmal organization is that you can find the “Setting up a new document” tutorial after the “Understanding layers and stacking order” tutorial!
Verdict: The course is well-structured but abysmally organized which ruins the entire experience for beginners; of course if you’ve used any of the Adobe products before the organization problem won’t be much of an issue for you.
Vector Diary
Vector Diary would be the fourth free outlet where you can learn Adobe Illustrator through a text and photos guide (similar to a walk-through). You don’t need to register to have access to the training, just go to the website and you’re ready to go.
Structure: The course is divided into 4 weeks (sections), each weak is divided into days (lessons) that covers certain topics in Adobe Illustrator.
Interface: The interface is very simple; the lessons are listed under each other you just click on the topic you’re interested in and you’ll be directed to its page, where you can read more about it.
Now, the pros and cons:
Pros
Free. Well organized and structured for beginners.
Cons
There are no video tutorials available, so that might be a problem for some.
Verdict: This is an excellent source for any Adobe Illustrator beginner; it’s very suitable for those who can’t follow along video tutorials. Beginner can also rely on this outlet to revise certain topics in illustrator.
Bottom Line
The recipe to start learning Illustrator for free:
You should start from the course entitled “How To Get Started With Adobe Illustrator CC – 10 Things Beginners Want To Know How to Do” in the “Essential Tasks” section at Adobe TV. If you just want to get an overview about Illustrator then Udemy is your pace to go. If you prefer written tutorials or you want a source that you can revise from then Vector Diary is the outlet for you.
Remember that the first step is always the toughest step, and the aim of this post is to provide you with resources that will help you take your first step in Adobe Illustrator.
Like this: Like Loading...
Learn Adobe Illustrator Day 1
Learn Adobe Illustrator Day 1 – What *IS* A Vector Anyway?
Hello! I’m Jennifer and welcome to this crash course in Adobe Illustrator. I’ve been teaching Illustrator since 2002 and I use it every day for creating my illustration and design work.
This course is for you if you are newbie interested in learning the fundamentals of Adobe Illustrator or if you are an Illustrator old-timer who may not have used the program for a while. Over the past 14 years, I have helped people get over some of the bumps in the road that we all face when learning this vector drawing software. Illustrator is not just for professional artists and designers, but for anyone who has an interest and wants to create beautiful graphics and design, at any level of expertise.
Everyday, for the next twenty days (except weekends – we all need a rest) I will post a short, bite-sized, step by step lesson with lots of images, which I hope you will find useful. Please feel free to leave comments and to ask questions and I’ll do my best to answer them. Let’s get started on Day 1 of Learn Adobe Illustrator!
So what is this Adobe Illustrator software you speak of?
Illustrator is the best known and most used vector drawing program on Earth, and possibly other planets we’re not yet aware of. It’s used to create logos, packaging, print work, web graphics, maps, signage, and really any type of graphic art that you can think of. Vector based art is recognisable by its smooth, clean, crisp lines which can be scaled up or down without any loss of quality. (Of course, we may not always want the super-clean look, so you can add texture to rough it up a bit too).
The first version of Illustrator was shipped out in 1987 and was initially only available for the Mac. Over the next (nearly) 30 years, Adobe has steadily added new features. For this introductory course, I am using Illustrator CC but you will find that many of the tools and techniques we look at are still applicable on recent versions of Illustrator. If you don’t already have a copy of the software you can download a 4 week trial version for FREE here –
One of the most important concepts that separates Illustrator from a program like Photoshop is that of creating vector artwork as opposed to pixel-based artwork. Let’s take a brief look at how they differ.
Vectors Vs Pixels
All computer images are either pixel-based – as in photos from your camera or pictures that you work with in Photoshop, or vector-based. Pixel-based images are made of tiny blocks of color (pixels), created at a certain resolution (a specific number of pixels per inch).
The resolution for an image that’s destined for professional printing is usually set to 300 pixels per inch (300 ppi). The resolution for an image created for the screen is usually set to 72 ppi, a much lower resolution than for print. When you enlarge a raster image, those tiny blocks of colour start to look jagged around the edges and you lose the nice smooth edges. This results in what designers refer to as a pixelated image. If you enlarge a pixel-based image too much, the image quality degrades noticeably.
A vector image is a mathematical description of shapes, fill, colors, strokes, gradients, and blends. And while that might sound a bit scary if you’re not into maths, you don’t have to worry about that stuff at all, it simply means a vector image can be resized any amount without degrading the quality at all.
Even though Illustrator is primarily a vector application, you can combine both vector and raster elements in your projects if necessary. You could, for example, bring in an image from Photoshop or another program and add it to the design or artwork that you’re creating in Illustrator.
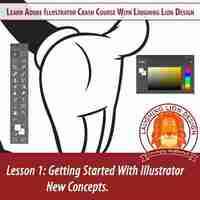
Mickey Mouse copyright Disney
The image on the left is vector artwork, the image on the right is a rasterized (pixel-based) image. Both have been magnified, notice how the raster file looks very jagged (or pixelated) around the edges.
Now that you have an understanding of the difference between vector and pixel based artwork, let’s have a look at how to create a new document in Illustrator.
How To Set Up A New Document, Destined For Print, In Illustrator
When you open Illustrator, the first screen you see will look something like this:
1. If you’ve already been using Illustrator, you’ll see a list of files you’ve worked on most recently. If you haven’t used Illustrator before, this area will be blank. To create a new document you can either click on File > New or you can click on the New button on the left side of the page. Either way you will see the same New Document dialog box.
2. In the “New Document” dialog box shown below, make the following settings (most of the settings suggested here are not critical at this point and can be modified later – nothing is set in stone).
You can name the document, but note this does not save the file! Some people will leave this as Untitled as a reminder to Save later.Choose the “New Document Profile” called “Print.”
This automatically sets the options shown below, with a letter-sized board, CMYK color mode, and high-resolution raster effects (300ppi). The letter-size is a standard American size, but you can change yours to A4 which is the near-equivalent size used by countries using the metric system.
Set the “Number of Artboards” to 1.
Artboards are like drawing boards. A single document can have multiple artboards (up to 100, depending on size). We’ll talk about them in more detail later.
Artboards are like drawing boards. A single document can have multiple artboards (up to 100, depending on size). We’ll talk about them in more detail later.
You can can choose Portrait or Landscape by clicking on the small icons beside the Orientation label.
You can add a bleed to your document (if it’s required) by typing in a value in the Bleed fields. By default they are set to be whatever value you type into the first field (Top) – so when you type in a number in the Top, the others will fill in automatically.
Click OK. A blank document window opens, ready for you to work your creative magic and start hurling vector paths and shapes around.
TIP: After you’ve made a new file You can change the document color mode at any time from RGB to CMYK and vice versa by choosing File > Document Color Mode > RGB Color.
Ok, so now you have a document open you can start to play. I suggest trying out the Paintbrush Tool and the Pencil Tool . They are probably the easiest ones to get going with and we’ll discuss them in more detail farther down the road.In the next lesson we’ll look at the Illustrator Interface and Workspace and some preferences you can set up to make your life easier when using Adobe Illustrator.
All comments and questions are welcome below in the comments section! If you know other people who might find this useful, please share this post. Thank you very much.
How Long Does it Take to Learn After Effects?
Let's take a look at the process of learning this essential animation tool.
One question we get all the time at School of Motion is 'How Long Does it Take to Learn After Effects?' While I definitely understand the sentiment behind the question, the School of Motion team firmly believes that becoming great at motion design isn't about mastering any piece of software. That's part of it, sure, but ultimately a great motion designer is a storyteller and problem solver. You just so happen to use After Effects to solve the problems.
That detail may seem small, but it makes a world of a difference and unfortunately many artists learn this lesson the hard way after years of wasted time and energy.
So in the following article I am going to try to honestly answer how long it takes to learn After Effects and shed some light into the process of becoming a Motion Designer. I hope you find this to be helpful and fun.
How Long Does it Take to Learn After Effects?
If you sat down and devoted most of your working hours to learning After Effects you could confidently learn After Effects in about 8 weeks. This will only happen if you can focus on important motion design concepts (workflows, design, organization, color, etc.) and not flashy stuff that you will never actually use. Keep in mind that learning After Effects is a life-long commitment. There will always be more and more to learn.
While there are lots of options to learning After Effects (see below), our After Effects Kickstart course takes the guess-work out of learning After Effects. In the 8-week course you will actually be doing real-world projects and getting feedback from professional Motion Designers.
Here's a quick course overview from Nol Honig, a motion design master and the instructor of After Effects Kickstart.
Websites for Learning After Effects
Here are a few of our favorite sites for learning Adobe After Effects.
School of Motion is the world's best motion design school. At School of Motion we pride ourselves in learning essential animation concepts, not just the tricks. From free tutorials to in-depth courses we have motion design training for artists of every skill level.
Adobe After Effects is one of the more useful places to brush up on After Effects techniques. By going straight to the source you can learn essential concepts and discover new features directly from the Adobe team.
MotionWorks provides After Effects tutorials, tips, and training with a rich collection of free courses for users of all skills.
Motion Array is one of the best places to have your After Effects questions answered. They also have a great collection of After Effects tutorials.
Creative Cow has been hosting After Effects content for decades now. The 'Cow' is a good tutorial resources full of all of the nerdy After Effects concepts you could want.
ActionVFX is another great place you can look to for quality After Effects tutorials. This is a VFX heavy company that can teach you all about how to composite action stock footage.
Video Copilot has a basic training resources section that can be really useful for beginners. Keep in mind that Video Copilot is VFX-heavy website. They also have a lot of free downloads and tools.
If you're looking for a fun challenge check out our 30 Days of After Effects Series. This course was designed to be a fun deep-dive into some essential After Effects concepts.
We also have a free 10-day course called 'The Path to MoGraph'. The series is a deep-dive into the real process of creating motion design in the 21st century. In the course you'll get a tour of four incredible motion design studios. You'll also get a quick guided tour of After Effects, Photoshop, Illustrator and more. It's the best place to start your motion design journey.
Tips for Learning After Effects
Now that you have a few amazing resources for learning After Effects. Here are some tips for becoming an After Effects master.
Design Before Your Animate: While you may be tempted to just hop in and start keyframing, the best motion designers create styleframes (artboards) before they open After Effects. This will allow you to think about the story your are trying to tell.
While you may be tempted to just hop in and start keyframing, the best motion designers create styleframes (artboards) before they open After Effects. This will allow you to think about the story your are trying to tell. Don't Try to 'Hack' After Effects: There are a million tutorials out there about 'hacking' After Effects through 3rd party plugins, confusing workflows, and effects-heavy tricks. Don't fall for this.
There are a million tutorials out there about 'hacking' After Effects through 3rd party plugins, confusing workflows, and effects-heavy tricks. Don't fall for this. Master the 12 Principles of Animation: Learn the 12 principles of animation that form the foundation of motion design work. Memorize them. You're going to use them every single day on your motion design projects.
Learn the 12 principles of animation that form the foundation of motion design work. Memorize them. You're going to use them every single day on your motion design projects. Learn Photoshop & Illustrator First: Focus on your design skills by learning Photoshop and Illustrator first. In an ideal world you'll learn After Effects AFTER you learn these essential design applications.
Focus on your design skills by learning Photoshop and Illustrator first. In an ideal world you'll learn After Effects AFTER you learn these essential design applications. Practice! Practice! Practice! Watch as many tutorials and pick up as many techniques as you can. Look for tutorials from industry professionals who have impressive portfolios or design.
Watch as many tutorials and pick up as many techniques as you can. Look for tutorials from industry professionals who have impressive portfolios or design. Originality is Not the Goal: There is a false perception out there that every motion design project should be original. This is simply not the case. Use other people's work as inspiration for your projects and you'll see your work quickly improve. Good projects don't happen in a vacuum so always be on the lookout for new ideas to inspire you. There's no shame in trying to recreate something you find awesome, just be sure to credit your original source. If you want to learn more about this artistic approach check out 'Steal Like an Artist'. It will change your life.
There is a false perception out there that every motion design project should be original. This is simply not the case. Use other people's work as inspiration for your projects and you'll see your work quickly improve. Good projects don't happen in a vacuum so always be on the lookout for new ideas to inspire you. There's no shame in trying to recreate something you find awesome, just be sure to credit your original source. If you want to learn more about this artistic approach check out 'Steal Like an Artist'. It will change your life. Keep With It! Don’t give up after a few days. Your work is going to be terrible for a long time. After Effects is a beast of a program and will take time to learn. Don’t compare yourself to Beeple, it took him 11 years to get where he's at today.
Don’t give up after a few days. Your work is going to be terrible for a long time. After Effects is a beast of a program and will take time to learn. Don’t compare yourself to Beeple, it took him 11 years to get where he's at today. Do More than VFX Tutorials: VFX tutorials are fascinating, but chances are you will probably create a heck of a lot more explainer videos than VFX shots early in your career. Instead of VFX, focus on learning the core concepts surrounding good motion design. If you ever need an explosion in your project there are plenty of tutorials out there to get you up to speed.
VFX tutorials are fascinating, but chances are you will probably create a heck of a lot more explainer videos than VFX shots early in your career. Instead of VFX, focus on learning the core concepts surrounding good motion design. If you ever need an explosion in your project there are plenty of tutorials out there to get you up to speed. Learn the Skills Clients Are Looking For: Look and listen for what clients need. Focus on creating Explainer Videos, Commercials, Lower Thirds, Graphs, Graphics, Intros, Outros, Logo Animation, etc. These are far more likely to pay your bills.
Look and listen for what clients need. Focus on creating Explainer Videos, Commercials, Lower Thirds, Graphs, Graphics, Intros, Outros, Logo Animation, etc. These are far more likely to pay your bills. Share Your Work: Sometimes sharing your work can be just as challenging as the work itself. It takes a special kind of vulnerability to share work online, but one of the best ways to get feedback is to get your work out there. You never know what projects may arise from a simple instagram share.
Sarah Beth Morgan is a great example of an artist who uses Instagram to share her work (featured above).
It's Time to Learn After Effects
I hope you're feeling inspired to take the dive into the world of After Effects. If you want to learn more about After Effects check out the tutorials page here on School of Motion. On the page you'll find 30 Days of After Effects along with dozens of other motion design tutorials.
If you're ready to take the ultimate After Effects challenge, check out After Effects Kickstart here at School of Motion. In the 8-week course you'll learn the essential skills you need to navigate and use Adobe After Effects.