How to add bullet points to text in Adobe Illustrator
The Two Types of Text in Adobe Illustrator
Creating text in Illustrator can be done a couple of different ways.
You can create point text or paragraph text. The difference is whether you click and drag on the page using Illustrator’s Type tool, or if you just click on the page using Illustrator’s Type tool.
If you click and drag, you make paragraph text. As you drag, you define the right and left margins. The text will wrap to the next line as you near the right margin.
If you need to increase or decrease the font size, you select the text, as in any other program, and use the Font size tool on the Control Panel.
However, if you just click, you make point text. There is no right margin to force word wrap. You must use a hard return (Enter Key), or a soft return (Shift + Enter Key), to wrap the text to the next line.
The great thing about point text is how you resize the text. You use Illustrator’s Selection tool and resize the Bounding Box. As you increase or decrease the width or height of the Bounding Box, the font will also increase or decrease horizontally, vertically, or both, fitting exactly where you need it to fit.
Meet Adobe Certified Instructor Ron Marsh
New Horizons Learning Group offers Adobe Certified instruction from instructors like Ron Marsh and more. Learn more tricks and shortcuts with training.
30 Illustrator Text Effects Tutorials
Vandelay Design may receive compensation from companies, products, and services covered on our site. For more details, please refer to our Disclosure page
Adobe Illustrator provides designers with an excellent opportunity to create amazing effects with text. And best of all, your work will be in vector format so it can be scaled to any size and remain sharp.
This article features 30 of the best Adobe Illustrator tutorials for working with text. While there are more tutorials available for working with text in Photoshop, I think you’ll see from this selection that there’s plenty of potential for text effects in Illustrator.
Adobe Illustrator Text Tutorials
From this selection of tutorials, you’ll learn a wide variety of different techniques, and you’ll be able to create text effects of all different styles. Regardless of what style of text effect you need, you’re almost guaranteed to find something that can help within this selection of tutorials.
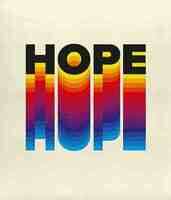
This tutorial from Chris Spooner teaches a simple process to create this ’70s-’80s inspired text effect. You could use this to create a poster, album cover, or even a t-shirt design. It’s a fun effect, and even beginners can handle it.
This 3D gold text is perfect for flyers and product advertisements, but you could also use it for many other purposes. This one is a little more complex and will take some time to complete (2-3 hours). This one is for you if you’re a moderate to advanced Illustrator user looking to learn a fantastic new technique.
This tutorial shows how to use the Extrude & Bevel tool to create this awesome, brightly-colored 3D text. Experiment with different fonts, colors, and settings to see what you can come up with.
Here’s another retro ’70s-inspired text effect (try it with one of these ’70s fonts). In addition to the striped effect, the tutorial shows how you can easily add texture to complete the effect. This one is perfect for merchandise, packaging, and other designs with a retro feel.
This tutorial starts by using the brush tool to create hand lettering. The gradient and shadow that you’ll add make the text stand out. This more advanced tutorial may be difficult for beginners, but experienced Illustrator users will love it.
Chris Spooner shows how you can give text a 3D look with some creative shading. Of course, you’ll need a font with some loops or overlaps (check this list of cursive fonts). I love the end result with texture and the subtle 3D look.
This retro text effect is perfect for posters and other designs that feature large text. You’ll be creating custom lettering, so it’s a lot of fun and a great technique to learn. The concepts covered here can be used in your designs for many different purposes, including logo design.
You can use this technique to give a 3D appearance to any text. The example uses a basic sans serif font, but you could use the same approach with a different type of font to get a much different look.
UNLIMITED DOWNLOADS: 50+ Million Add-Ons & Design Assets
DOWNLOAD NOW
Rather than starting with an existing font, this tutorial shows how to use shapes to create the origami text effect. Of course, you can follow the tutorial and create the text effect shown above. But you can also get creative with the shapes and create something of your own.
This effect works with live text, which means you can change the words or letters without needing to recreate the effect from scratch. That’s a huge advantage and you can save the effect to quickly use it any time you want.
We have a collection of chalk fonts you can use for this type of effect, but it’s always helpful to know how to create an effect from scratch. If you can’t find a font that has the exact chalk effect you want, you can follow this tutorial to create your own custom text effect.
This shiny chrome effect can be helpful for ’80s and ’90s-themed designs. You’ll use a combination of gradient fills and outlined text to get this fantastic chrome look.
This tutorial uses the BoldenVan font, but you could use any other comic book font for a similar look. You’ll learn how to create the background from scratch.
Here’s a fun Halloween-inspired text effect that’s sure to stand out. You can use it for posters, book covers, or Halloween-themed designs.
This intermediate-level tutorial shows how to make a basic 3D text effect that could be used for various purposes. It uses gradients and drop shadows to create a beautiful effect.
This beginner-level tutorial shows how to create a realistic sketch effect with any font, and it takes only a few minutes. You’ll have a lot of fun applying this effect to different fonts and checking out the results.
This tutorial is similar to the previous one in creating a sketched or doodled text effect. You can use this technique for construction-related designs, including brochures, flyers, advertisements, and logos.
This text effect is perfect for eco-friendly designs. If you’re creating a poster, brochure, or even a logo for a “green” company, use this approach to create a design that helps with branding.
I love this custom type treatment that can be used for many different purposes. This technique will be useful if you’re designing a t-shirt, album cover, or product packaging.
This tutorial is pretty simple, and you can experiment to create your own custom effect. This is ideal for creating logos or giving a custom look to text in any of your designs.
Neon text is helpful for retro-themed designs. This tutorial shows how to transform a basic sans serif font into something more unique.
This tutorial has been around for a while, but it’s a good one. This unique 3D effect can be used for designing posters, book covers, children’s designs, and more.
If you design logos, you’ll appreciate this technique. The end result is a unique design, and you can certainly tweak the steps in the tutorial to create something of your own.
This beginner-level tutorial covers a topic that will be useful in many of your designs. Instead of teaching a specific effect, the article covers the options available for putting text on a path, and how you can use them.
This tutorial is Christmas-themed, but you could use the same technique for other types of designs. The end result is knitted text that looks surprisingly realistic.
Fans of The Big Bang Theory will love this one. It’s a relatively simple process but fun to use when the opportunity arises.
You’ll need the Fibre vintage font to follow along with this tutorial. You’ll add a print texture and the overprint to create the end look you see above.
This paint roller technique can be fun for using in the designs of posters, book covers, and more. In addition to the “text,” you’ll also learn how to create the paint rollers from scratch.
We’ve featured several tutorials for working with 3D text, and here’s one more. This one shows how to create a comic-style text that you’re sure to love.
To follow this tutorial, you’ll need the Street Hustle graffiti font, Splatter & Smear Brushes, and the Vector Brick Wall Textures, all from Envato Elements. With the help of these resources and the techniques covered in the tutorial, you’ll have graffiti text that adds a fun element to your design.
For more tutorials, please see:
How to add bullet points to text in Adobe Illustrator
In today's article, you'll learn how to add bullet points to text, properly format a bulleted list and create a new paragraph style to speed up work with similar text objects in the current and new documents.
This article does not require any plugins or additions to Adobe Illustrator. Astute Graphics has published this to help answer one of the top questions vector designers face each day.
Although Adobe Illustrator does not have functions to create bulleted lists, a simple sequence of actions allows you to do that.
Step 1
Take the Type Tool (T) and create a text area, and paste a few paragraphs of text. For these purposes, I used Lorem Ipsum text.
For users of CC2018 onwards, please note that Ai now fills text boxes with Lorem Ipsum by default. Users of CS6 and older CC users however, would still need to use an external tool such as Lorem Ipsum or the Lorem Ipsum Generator.