How to Blend in Adjustments Using Layer Masking in Photoshop
Convert to Smart Filter in Photoshop
It’s always a big plus (at least for me) if we can work non-destructively in Photoshop. What is it non-destructive editing? Non-destructive editing means that we can apply edits to our image and without permanently changing the pixels. You can always come back and make changes or remove the edits.
One of my favorite non-destructive features is the Smart Filter Layer. Converting a layer to a Smart Filter layer I can apply filters, non-destructively to my image. If I want to adjust my filter, delete or hide it, I can do it at any time (as long as all layers are not merged or flattened, and the document saved as a PSD file).
Note: Lens Blur, Flame Picture Frame, Trees, and Vanishing Point— don’t work with layers converted to Smart Filter layers.
To convert a layer to Smart Filter > Click on a layer you want to convert to a Smart Filter layer chose the menu Filter > Convert to Smart Filters (image 1)
or > Right-click on a layer > Convert to Smart Object 9 Image2)
Image 1
image 2
The layer you applied the Smart Filter or converted to a smart object looks like any other layer, but at the right lower corner of the thumbnail you can see a smart filter/smart object icon.
Now it’s time to apply a filter. I will apply the Camera Raw Filter. You can see in the image below that a Camera Raw icon was added to my layer under Smart Filters.
If you want to adjust a filter > double click on the filter’s name and you will be redirected back to the filter.
To edit a filter blending mode > double- click on Edit filter blending option
Now I can change the filter’s blending mode
Also, I can change a filter’s opacity value.
Note: you can apply multiple smart filters to the same layer. You can reorder, and duplicate smart filters.
To hide a single Smart Filter, click the eye icon next to the Smart Filter. To show the Smart Filter, click in the column again.
To hide all Smart Filters applied to a Smart Object layer, click the eye icon next to the Smart Filters line.
To show the Smart Filters, click in the column again.
Right-click on a smart filter and choose any option from the drop down menu (if needed)
P.S. Photoshop creates a Smart Filter with a filter mask already applied > White box in a smart filters raw
It’s very helpful if you wants to hide parts of the applied filter.
Double-click on a Smart Filter mask to display the Properties Panel.
To hide part of an applied Smart Filter > click on a Smart Filter’s mask icon > choose any brush and black color > paint over the area you want to hide. If you painted more than you wanted > change color of your brush to white and paint areas back.
Topaz Labs
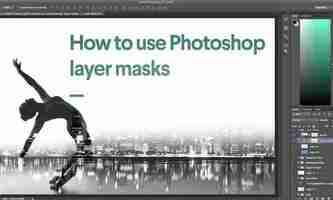
How to use Photoshop layer masks
Photoshop layer masks offer advanced control over image transparency, one of the most basic functionalities of Photoshop. Because of their fundamental nature, every Photoshop user should have a working understanding of layer masks and how to use them. They open huge doors to creative possibilities and help Photoshop users knock out simple tasks as well!
What is a Photoshop layer mask?
—
via A Plane Ride Away
Photoshop layer masks control the transparency of the layer they are “worn” by. In other words, the areas of a layer that are hidden by a layer mask actually become transparent, allowing image information from lower layers to show through.
To use a simple analogy, Photoshop layer masks work similar to masquerade ball masks. These masks hide some areas of a persons face and reveal others—often the eyes, nose and mouth. Similarly, Photoshop layer masks can be used to hide and reveal sections of a layer.
Why use layer masks?
I mean… can’t I just use the eraser tool to remove parts of an image? The answer is yes! However, if you do those parts of the image will be lost forever. That method resides in what we consider a destructive workflow.
Layer masks, on the other hand, leave the original layer pixel data untouched. This means you can play with the transparency in a multitude of ways without harming the layer content or creating an irreversible mess. With that said let’s jump in!
Layer mask tutorial
—
Photoshop provides a complete set of functions for handling layer masks. Let’s start by adding a layer mask to a layer.
First, select the layer you want to mask (in this example Layer 1), then click the layer mask button as highlighted above. Alternatively, you can navigate to Layer > Layer Mask > Reveal All (we’ll get to the other options later). As seen in the example above, a white rectangle appears to the right of the image thumbnail.
Despite the fact that we’ve added a layer mask, nothing has visibly changed on the canvas. The reason for this has to do with the contents of the layer mask. That’s right, layer masks hold pixel data too! In fact, they can be thought of as layers in their own right, existing in a parallel universe.
Currently, the layer mask in our example holds entirely white pixels, as seen in the layer mask thumbnail. This means the areas of a layer mask that hold white pixels allow the same pixel area of their corresponding layer to show through.
Layer mask filled with black
What happens if we replace the layer mask’s white pixels with black pixels? Simply click the layer mask thumbnail, then click Edit > Fill. Let’s choose black. Instantly we see that the layer mask thumbnail turns black, and the corresponding layer disappears from the canvas – revealing the clouds in Layer 2!
Contrary to our previous example, which uses a layer mask filled with white pixels, layer masks filled with black pixels create full transparency in the corresponding pixel area of the layer which is masked.
Can you guess what happens if we fill half the layer mask with white and half with black? That’s right! Half the image becomes visible while the other half stays transparent. In this case, we would see half clouds and half bird.
Layer mask filled with gradient
Layer masks don’t end with black and white. In fact, layer masks can hold any form of grayscale pixel information. Let’s see what happens if we fill the layer mask with a gradient ranging from black to white!
Press G to switch to the gradient tool, then select the layer mask by clicking on its thumbnail. Finally, let’s drag the gradient tool across the canvas. As you can see, the thumbnail fills with a gradient from black to white and the corresponding layer smoothly transitions between full opacity and full transparency.
In essence, the clouds in Layer 2 are “showing through” the areas of Layer 1, which have become transparent as a result of the gradient layer mask.
Layer mask filled with photographic content
Let’s not stop there! If layer masks can hold any grayscale information, why not try to mask a layer with something photographic? In this example, we will try using a textural image of plaster to mask the word “Fade”, which we’ve set in a vintage cursive font.
To start, let’s create a layer mask on the “Fade” layer. Next, copy the contents of the plaster layer by clicking its thumbnail, then pressing Ctrl/Command + A to select all, then Ctrl/Command + C to copy.
To paste this image into the layer mask on the plaster layer we need to enter into the “parallel universe” of the layer mask and we do that by holding alt/option then clicking the layer mask thumbnail.
Now, the canvas displays the contents of the layer mask. Cool, huh? Paste in the plaster image by pressing Ctrl/Command + V.
To escape this “parallel universe” (isn’t this fun?), simply click the layer thumbnail (the capital “T” symbol). Great! Now “Fade” has a plaster texture that lets some of the colored background show through.
You can fine tune the layer mask by clicking the layer mask thumbnail again and selecting Image > Adjustments > Brightness & Contrast. Perfect! What we love about this technique is that it lets the layer below, in the case a warm orange color fill, show through the textural variance.
The chain-link
You may also be wondering what that chain-link is doing between the layer thumbnail and layer mask thumbnail? Quite simply, this chain-link means that if you move the layer image on the canvas, the layer mask will move around with it.
This can be incredibly useful. For example, if you’ve carefully cut out the background of an image and need to reposition it on the canvas. Otherwise, you might be experimenting, trying to find the perfect area of a pattern to “let through” a layer mask. In this case you would want to disable the chain-link. That’s easy! Just click it.
Conclusion
—
Now you should feel like you have a better understanding of layer masks! Bringing this tool into your workflow will make you a better Photoshop user based on your increased facility to enter into new creative possibilities!
How else have you used Photoshop layer masks? Comment below!
How to Blend in Adjustments Using Layer Masking in Photoshop
A Post By: Jim Hamel
In a recent article called: Getting Started with Layer Masks in Photoshop – a Beginners Tutorial, I showed you the basics of layer masks and why they are such powerful tools. Layer masks are essentially what gives Photoshop layers much of their power. They allow you to tell Photoshop exactly where you want your changes applied, and to what degree.
In that article, I also showed you how to use layer masks in pictures where you had a defined edge to the areas you wanted to change. Photoshop has a lot of great tools that allow you to make selections, which you can then use to define the mask.
But what about pictures where you have a soft edge? Or where you want to blend in the effect gradually? That’s what I will cover in this article. It will pick up where the prior article left off, so if you haven’t seen that one yet, check it out. Once you have reviewed the basics of layer masks in that article, come back here and we will get started.
Step 1: Create an Adjustment Layer
The first thing to do is make the changes you want to the image, which will then be blended into the selected areas later. To make those changes, I am going to create a Curves adjustment layer. As mentioned in the prior article, Curves adjustment layers are one of the most powerful tools in Photoshop. They allow you to selectively effect brightness, contrast, and/or color. To create one, just select Layer > New Adjustment Layer > Curves. You can also click on the Curves icon in the adjustment layer panel. Don’t worry though – we are not going to do anything complicated with the Curves Adjustment layer.
Of course, you don’t have to use a Curves adjustment layer to make adjustments to your picture, you can use any of the adjustment layers offered by Photoshop. If you are more comfortable with Levels, use that. If you want to change the brightness levels, there are Exposure and Brightness/Contrast adjustment layers. If you want to make changes to color, you can use the Hue/Saturation or Vibrance adjustment layers. I consider Curves to be one of the most powerful tools in Photoshop, so that is what I use, but you can use whichever one you want, or you are most comfortable using.
Step 2: Add in the Effect
Once your Curves adjustment layer is created, just add the effect that you want. Remember that a white mask is automatically applied to all adjustment layers – so it reveals everything – but we will change that in a second.
I want to add contrast, therefore I will just scoot in the endpoints of my curves adjustment layer. You can also drag the line up or down in places. The idea is to steepen the curve where you have a lot of pixels. Doing so adds contrast, which is what we want.
You don’t need to do anything fancy here. Go ahead and add the effect to a greater extent than you will want it in your picture. In other words, overdo it. Don’t worry if the picture doesn’t look quite right.
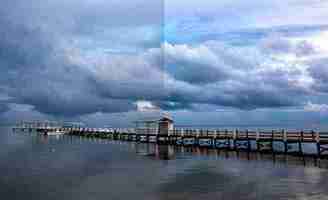
In addition, don’t worry that the effect is occurring across the entire picture at this point. We will make the changes apply selectively in just a second. For now, just look at the area of the picture where you want the effect to be applied and add it in accordingly. For example, in this picture below, my change is added to the entire picture, even though it results in effects I don’t want (like blowing out the sky on the right). We will fix that in the next step.
Step 3: Brush it in
Now comes the part when you limit the areas where your changes apply to the image.
Start by masking off the entire image, just press CTRL/CMD+I to do so. You will notice that two things happen. First, the effect you just added to your picture is hidden, it’s as if you never made any changes (don’t worry, the changes are still there, they’re just hidden). Second, the box next to the adjustment layer you created turned black. The box represents the layer mask. As we discussed in the last article, a white layer mask means the changes show through to the image (which is why you saw the effect of the changes when the layer mask was white). A black layer mask means the effect does not show up on the picture. Since our layer mask is now black, the effect does not apply anywhere in the picture.
Now we can begin the process of adding the effect in gradually. To do so, we will use the Brush tool. You can select it from the list of tools on the left side of your screen (tool panel), or you can just press B to call it up. While you are at it, go ahead and press the D key on your keyboard. This will ensure that the brush is set to its default foreground color, which is white, which is what you want since you will be adding the effect to the picture.
If you just left the brush as is, when you used it to paint in your picture, it would add the effect 100%. That is not what you want here. You want to add the effect in gradually, so it blends in. Therefore, go to the top of your screen and find Opacity. Pull the Opacity to the left until it is in the range of 5% to 15%. In my case I will use 10% (you can also just type 15 on your keyboard and it will apply to the opacity of the brush while that tool is selected). The lower the opacity, the less the effect gets added with each brush stroke – and the more gradual the change. If you have the patience to keep the Opacity very low (some people go as low as 2-3%), you will be rewarded with very gradual changes.
Now you will just paint in the effect. Before you do so, also make sure that the hardness of your brush is set to 0%. You want as soft a transition as possible. In addition, use as large a brush as your picture allows. The larger the brush, the softer the transition. The easiest way to change the size of your brush is with the square bracket keys. The left bracket [ makes the brush smaller while the right bracket ] makes it larger.
Now just click in the areas where you want the effect applied. You will have to do this multiple times because you have the opacity set very low. That is okay though, be patient. By doing it this way you are ensuring that it’s blended in gradually. You can also add the effect more in some places and less in others. Just click a few more times where you want the effect to be the most visible.
Step 4: Check Your Work and Adjust
You can check your work by clicking the eyeball next to the layer. When you turn off the layer, Photoshop will show your image without your effect added. Click the eyeball again to see your progress and turn the layer back on.
If you found you overdid the effect, you can always back it off. You do so by turning the color of your brush from white to black. Remember that white reveals the adjustments, black hides them. You could undo the effect by stepping backward (Edit > Step Backward), but the easiest way to do so is just press the X key (that switches the foreground and background colors so you now have black on top). Now when you use your brush it will be removing the adjustment you created. Remember that your opacity percentage applies whether your brush is painting with white or black. When you are done removing the adjustment, press the X key to go back to a white brush and continue adding the effect where you want it.
You can also go back and adjust your Curve after you have brushed it in. In fact, you should get in the habit of checking the curve your originally set. Once you have used your brush tool, the histogram will show only those pixels within the selected area (where you painted white). In general, you will want to make sure that the steepest part of the curve corresponds with the part of the histogram where you have the most pixels. Make a tweak to your curve to make sure it looks how you want.
Step 5: Repeat
Another great thing about this technique is that you can do it over and over again. It’s not uncommon to see photographers with a long list of layers, where they have made adjustments to specific parts of the image. You can use this technique to change the brightness values of the picture, making parts lighter or darker. You can also change the contrast, as we did above. You can even change the colors by going into the individual color channels of the Curves adjustment layer. Of course you could also use the brushing techniques above on a Hue/Saturation adjustment layer.
Here I used the same process that was set forth above to brighten the water. I created another Curves adjustment layer, turned the layer mask black, and then brushed in the effect with brush set to white at low opacity.
Other Changes to Your Image
In this particular image, I also wanted to sharpen the pier without sharpening the rest of the image. To do this, I will use the High Pass Filter (which is a remarkably powerful sharpening tool) and apply a layer mask to limit the effect to the pier. This will demonstrate the use of this layer masking technique outside the context of adjustment layers, which we have been using so far.
First, let’s quickly walk through the use of the High Pass filter. To sharpen with the High Pass filter, first duplicate the layer (CTRL + J). Then change the blending mode to Overlay (don’t worry about how this makes your image look). After that, call up the High Pass filter (Filter > Other > High Pass). This will result in a small dialog box where you set the amount. Here I will go with an amount of about 4, which I find is pretty typical. Press ok and the effect will be applied to the entire image. This is a pretty handy sharpening technique, but we’ll make it better by applying it only to a specific area (the pier).
To do this, we’ll add a layer mask and use the same brushing technique. Since we are not starting with an adjustment layer, we will need to add a layer mask. Just click on Layer > Layer Mask > Hide All, which will create a black layer mask. After that, select your brush (press B), set the color to white (press D for default), and set your opacity. Whereas you had been using a very low opacity earlier, in this case you can use a much higher Opacity. Brush in the effect just on the pier and watch it become sharper.
Conclusion
Although this technique is fairly simple, it is a pro move. I know photographers that edit their photos with nothing but a series of Curves adjustment layers where they blend in the effect in this manner. Give it a shot on some of your photos and I believe you will like the results.