How to Create Advanced Isometric Illustrations Using the SSR Method
This is the second part of a series of tutorials I'm doing about creating isometric illustrations in Adobe Illustrator. If you missed that first tutorial, I suggest you start with Working with Orthographic Projections and Basic Isometrics. Let's get started!
Get inspired! Create epic designs with Isometric Illustrations from Envato Market.
Find more vector isometric tutorials and resources, over on our popular article:
Isometric
22 Illustrator Tutorials for Creating Isometric Illustration
Sean Hodge
Introduction
In the last tutorial, I covered how to make an isometric grid and build simple blocky shapes on it. In this tutorial, I'm going to talk about another method of creating isometric shapes that doesn't require a grid and is much more useful if your objects are complex or curvy.
When creating a complicated isometric illustration, it's best to begin by breaking down your object into its simplest parts. This will help to make the project more approachable. It's possible to make the most complex objects entirely on an isometric grid using the method I discussed in the last tutorial. There is another method that is much more useful for creating curvy or complex isometric objects in Adobe Illustrator. I'm going to call this method scale, shear, rotate, or SSR.
The basic idea behind the SSR method is that by using tools in Adobe Illustrator, you can place an object onto an isometric plane without using a grid. This method is most useful for curvy or complex objects, but it will work for anything. I'll begin simply by making an isometric cube. Follow the steps below for the SSR Method.
Follow along with us over on our Envato Tuts+ YouTube channel:
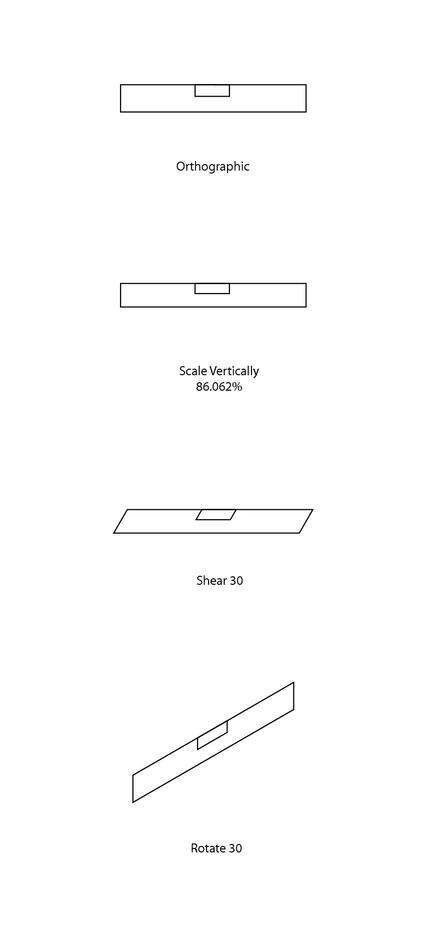
1. How to Create an Isometric Cube
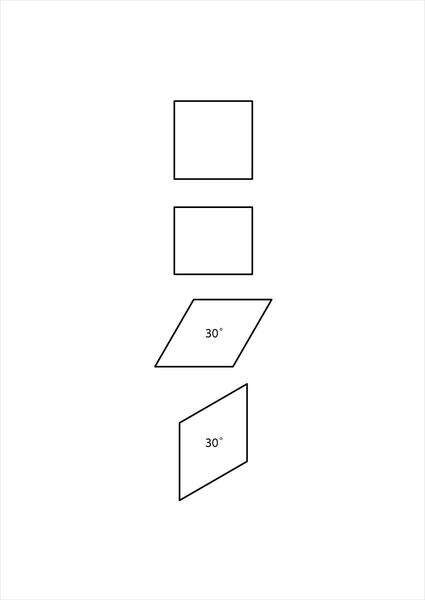
1.
Step 1
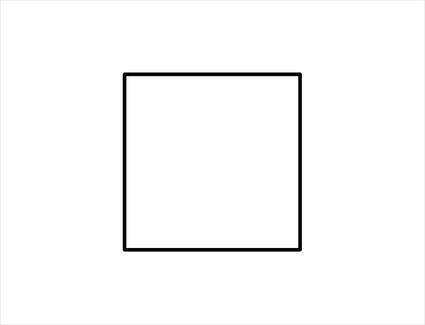
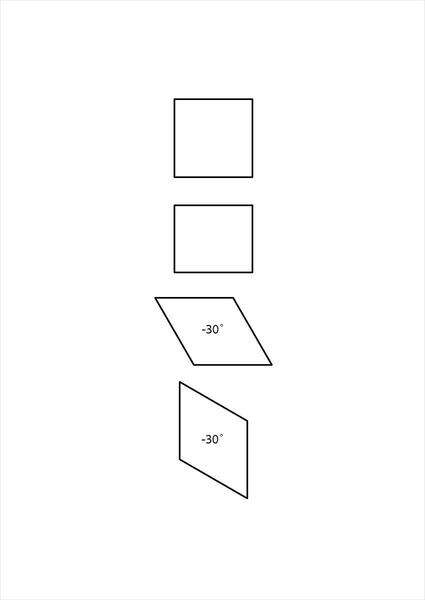
Create a 4-inch square with your Rectangle Tool.
Step 2
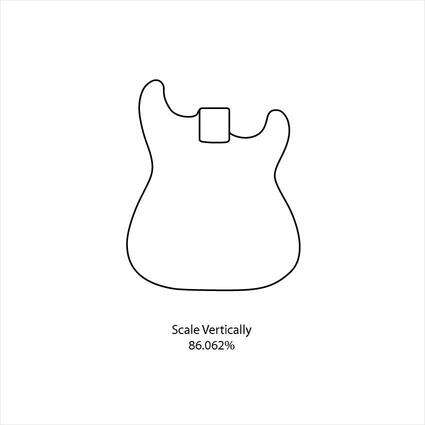
With the square selected, double-click on your Scale tool. Scale the square 86.062% vertically.

Step 3
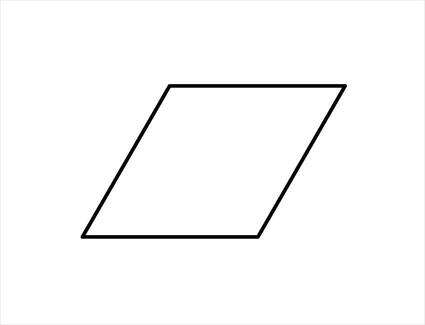
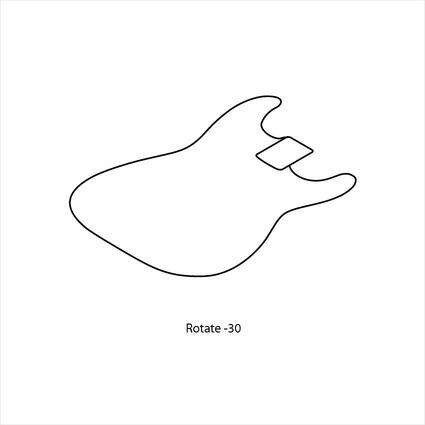
With your object selected, double-click on the Shear tool and shear the object 30 degrees.
Step 4
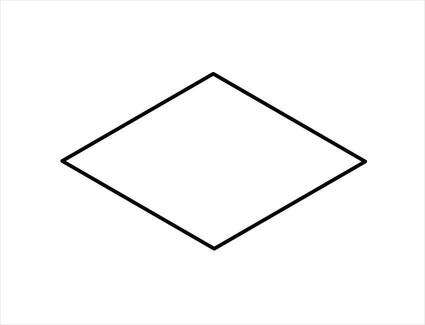
With the object selected, double-click on the Rotate tool and rotate it -30 degrees. You have now created the top of your cube.
Step 5
To create the left side of the cube, begin with a 4-inch square. Scale vertically 86.062%, Shear -30 degrees, and Rotate -30 degrees.
Step 6
Use the Selection Tool (black arrow) to line up the front corner with the top of the cube.
To create the right side of the cube, begin with a 4-inch square. Scale vertically 86.062%, Shear 30 degrees, and Rotate 30 degrees.
Step 7
Next, move the pieces into place with your Selection Tool. You have now created an isometric cube without using a grid.
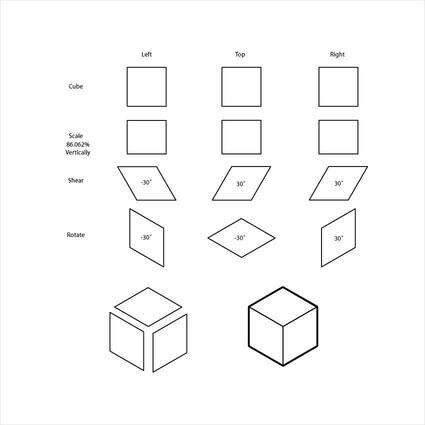
The power of this method becomes apparent when you try to create an object that would be very difficult to construct on a grid. This method only works if you have a set of orthographic projections to work with.
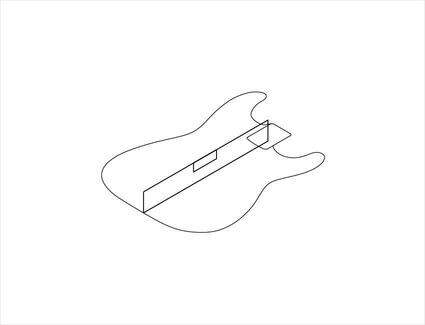
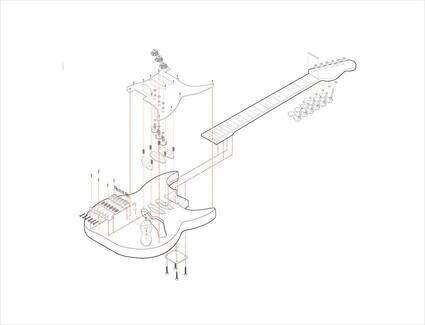
2. How to Make a Stratocaster Using the SSR Method
2.
For this example I'm going to build the body of a guitar. To make this complex shape in isometric using only a grid would be a challenge. The complex curves and compound shapes would be very difficult to recreate accurately.
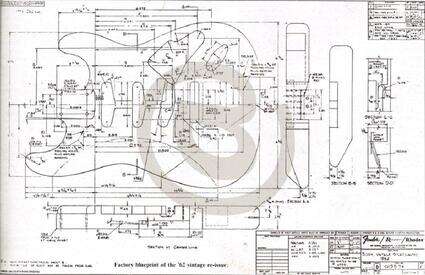
Step 1
There are many ways to make an orthographic projection, depending on your object. You can look online for a set of blueprints, you could trace a photo, and if you own the object you could take it apart and measure it. Use whatever method works best for your project.
One quick Google search, and I've found the perfect set of factory blueprints for the "62 vintage re-issue Fender Stratocaster." These blueprints are much more detailed than I need, but you can be as precise as you'd like for your own projects. Having too much information about your object is never a bad thing.
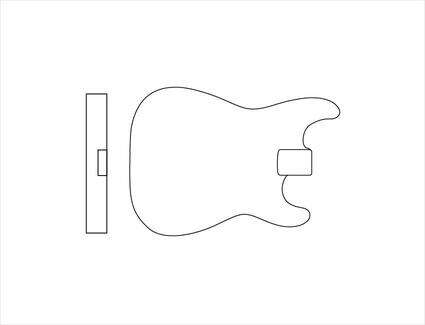
Step 2
Trace your blueprints. I'm going to trace just the information I need to complete my isometric, and I'm going to simplify parts of the design.
Step 3
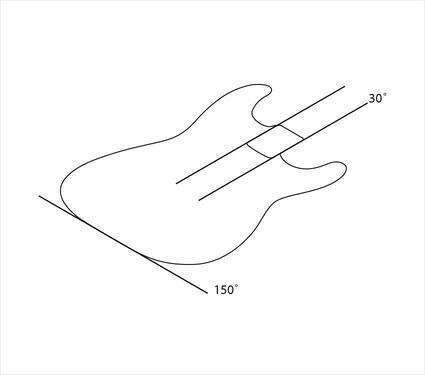
Once you've chosen your orientation, you can scale, shear, rotate (SSR) your bottom plane.
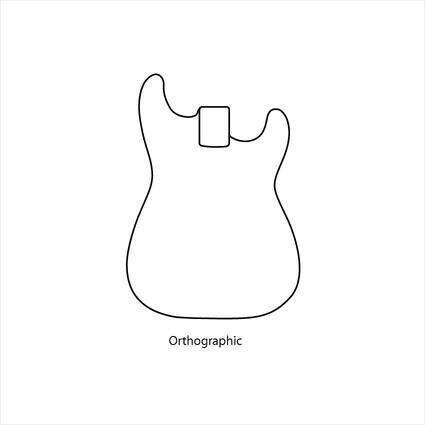

You can check your work by comparing any edges that in the orthographic are 90 degrees or 180 degrees. These edges will now fall onto an isometric grid; they will either be on the 30-degree or 150-degree angle.
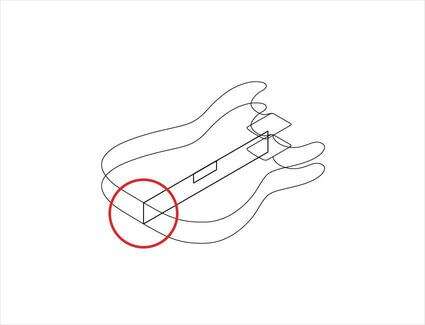
Step 4
Now that you've created your base, you have something to work from. If you take the side view of the orthographic and scale, shear, rotate (SSR) it onto the isometric plane, you can figure out the thickness of the guitar body.
Step 5
Line up the bottom edge of the guitar body with the corner of the orthographic side view.
Step 6
Next, you want to copy the outline of the guitar body and move it up to the top edge of the side view. To do this, use your Selection Tool and click and drag on the edge of the outline. Before letting go, engage the Option key to make a copy. You should also use the Shift key to constrain the movement. Holding the Shift key while moving the shape will ensure it stays lined up with the original.
Step 7
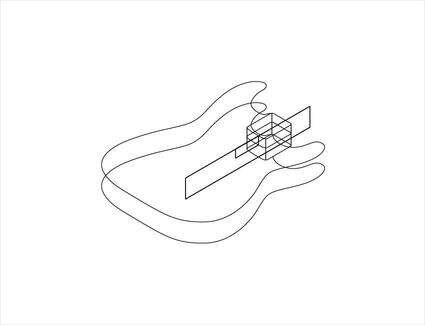
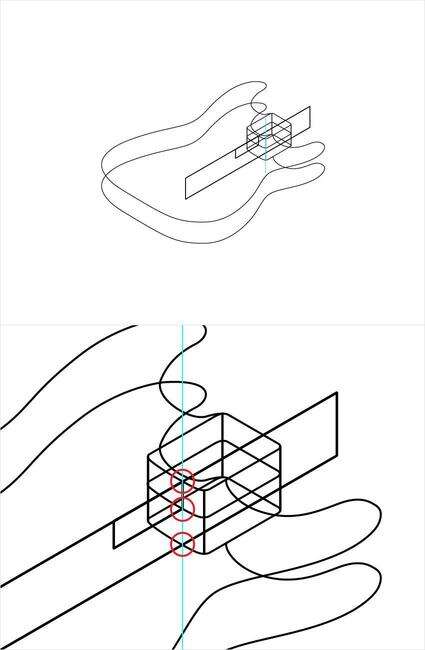
Now, you've blocked out the top and bottom planes of the guitar body. The next step is to cut out the spot where the neck is inset. Start by connecting the top and bottom planes of the neck opening so that it's easier to see the area that you are working on.
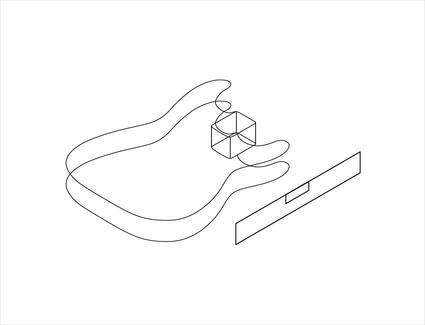
Step 8
Using the side view, you can mark off how deep the neck cutaway goes into the body. You now have three planes: the top, bottom, and depth of the cutaway.
Step 9
The next step is to use the Scissors tool to cut away all the excess lines you don't need anymore. This is often the hardest part for an artist new to technical drawing. All the overlapping lines and shapes can be overwhelming. But if you take your time and start with the big, clear shapes, it will help to clean up the more complex areas.
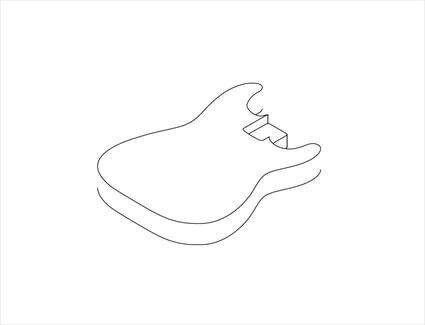
Step 10
After clearing away all the lines you don't need anymore, connect your corners and finish the shapes.

Add some line quality, and you're finished.
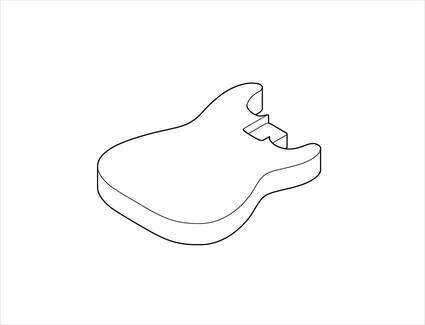
Conclusion
You have now finished the body of the guitar. You could continue and complete the entire guitar—the same steps would apply for each part. This is an example of an exploded isometric of a Stratocaster I did a few years ago with this method.
Isometric Generators From Envato Market
Need a faster way to create an isometric illustration? Then check out our awesome selection of Isometric Generators available on Envato Market.
SmartIcon Generator 2 - Isometric 3D Icons
Designing an isometric icon takes incredible skill. Cut out the hassle by using this isometric generator instead! This generator allows you to create 3D icons in seconds by creating the basic shape first before choosing a direction and style. It's really that simple!
Isometric Illustration - 3D Generator
Creating 3D isometric illustrations from shapes and vectors can be a lot easier when you're using a generator. Check out this isometric illustration generator and create your own isometric designs with only one click! It's that fast!

Isometric Screen Generator
Isometric generators can also be used to add a bit of dynamism to your UI and web design presentations. All you need is a screenshot of your design, and this isometric screen generator will do the job.

Want to Learn More?
Learn more about isometric vector art with these tutorials and resources:
Illustration
How to Create a Detailed Isometric Building in Adobe Illustrator
Diego Barrionuevo
Vector
How to Make Isometric Art Food Icons in Adobe Illustrator
Diana Toma
Isometric
How to Create Isometric Gambling Assets in Adobe Illustrator
Yulia Sokolova
Illustration
How to Create a Cute Robot Game Sprite using SSR in Adobe Illustrator
Michelle Todd
Illustration
Playing With Isometric Projection in Inkscape to Make a Minecraft Scene
Aaron Nieze
Text Effects
How to Create an Isometric Text Effect in Adobe Illustrator
Andrei Marius
Inkscape
How to Create a Pixel Heart With Inkscape
Nick Saporito
Isometric
Quick Tip: How to Create an Isometric Grid in Less Than 2 Minutes!
Iulius Curt
Isometric
How to Create a Minecraft Character in Affinity Designer
Andrei Stefan
Tools & Tips
Quick Tip: How to Draw Isometric Circles in Adobe Illustrator
Diego Barrionuevo