How to Fix Skin Discolorations in Photoshop
How Do I Fix Discoloration in Photoshop?
How Do I Fix Discoloration in Photoshop?
Discoloration in photos can occur for a number of reasons, but the most common is due to a lack of white balance. White balance is the process of adjusting the colors in your photo to create a more natural looking image.
If your photo has a yellow or orange tint, this is likely due to an incorrect white balance. Fortunately, Photoshop offers a number of tools that can help you fix discoloration in your photos.
The first tool you can use to fix discoloration is the white balance tool. This tool can be found in the color correction section of Photoshop.
To use this tool, simply follow these steps:
1. Click on the area of your photo that should be white. Photoshop will then adjust the colors in your photo to create a more accurate white balance.
2. If you’re not sure which area of your photo should be white, you can try clicking on different areas until you find one that looks best.
Another tool you can use to fix discoloration is the hue/saturation tool. This tool can be found in the same section as the white balance tool.
To use this tool, simply follow these steps:
1. Adjust the hue and saturation levels until the colors in your photo look more natural. You may need to experiment with different settings to find ones that work best for your photo.
PRO TIP: Discoloration in Photoshop can be caused by several factors, including incorrect color settings, outdated drivers, or corrupted color profiles. If you experience discoloration in Photoshop, we recommend checking your color settings first. If that doesn’t fix the problem, try updating your drivers or reinstalling your color profiles.
2. If neither of these tools seem to be helping, you may need to try something more drastic. One option is to convert your photo to black and white. This will remove all color from your photo, but it can sometimes make discoloration less noticeable.
3. To convert your photo to black and white, go to the image menu and select ‘Mode.’ Then select ‘Grayscale. ‘
4. Another option is to desaturate your photo. This will remove some of the color from your photo, but not all of it.
5. To desaturate your photo, go to the image menu and select ‘Adjustments.’ Then select ‘Hue/Saturation.’ Adjust the saturation level until you’re happy with the results.
If you’ve tried all of these methods and still can’t seem to fix the discoloration in your photo, you may need to consult with a professional photographer or graphic designer. They will likely have additional tips and tricks that can help you achieve better results.
Color Away Discoloration with Photoshop
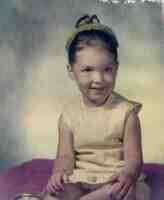
Do you have any photos that have spots and splotches of color on them that was never part of the original photo? Fellow NAPP member Bob Byington had such a photo and asked me if I could help him to get rid of the spots, yellow stains which, as he said, “looked like mustard.” Bob was kind enough to let me use his question, and his photo, today. Thanks Bob!
With this particular photo, the first thing I did was a color correction. Yes, you can do it without, but the color cast is yellow, so it can disguise the spots. If you correct the overall color, you’ll be more apt to see all the problem areas that will just show up when you do finally correct the color. I did a Levels Adjustment to correct the color, adjusting each color channel (Red, Green and Blue) separately by moving the shadow and highlight (black and white) sliders until they’re within the histogram.
Now the discolorations should stand out more and will no doubt be in more places than you thought.
Take your Eyedropper color selector tool and sample an area next to a discolored area.
Make a new blank layer. Change the Layer Blend Mode of the layer from Normal to Color. Paint in the discolored area nest to where you made your selection. If the area you’re painting starts to look to bright, or too gray, use the Eyedropper and select a color closer to that area. Keep painting. If the layer was set back to Normal Layer Blend Mode, it would look a little like “My First Paint By Number”, but that’s okay!
When you think you’re done, take a look at the overall color of the photo. In this instance, I loved the rosy skin color on the right of the little girls face, but the left side wasn’t so rosy. I sampled some of the rosy skin color and painted over the areas I thought needed a little pinking up on a new blank layer. I changed the Layer Blend Mode to Color and lowered the Opacity to 40%. This also helped to blend any more little discolorations on the face.
Keep an eye out for any more discolorations as you work on the rest of the photo. Some will be small enough to take care of with the Healing Brush, Clone Stamp or Patch tools, but don’t hesitate to sample and use the Color Layer Blend Mode as much as you need to.
Author Disclaimer: No one technique is ever “the best” for every situation. Every photo is different and different methods should be explored to find which the best in that particular situation is. That being said, let it be known that I attempt to try and teach many different ways of doing things. If I employ one way and it seems to you, the reader, that another way may have worked as well or better, rest assured that the techniques being used are done so in the interest of creative exploration, not nescient omission. ~JS
How to Fix Skin Discolorations in Photoshop
Maybe it’s a birthmark, a chapped cheek, or a bruise. Whatever the skin discoloration, this technique is a Go-To for me when I’m editing photos.
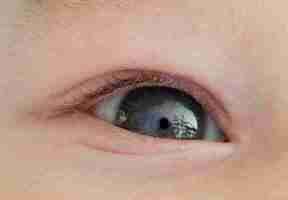
In this example, we have a photo with a slight birthmark on the eyelid:
Here is the fix:
1. Create a blank layer above your image
2. Select your eyedropper tool (Shortcut key is ‘I’)
3. Use the eyedropper to ‘sample’ an area of skin that you want to replicate the color of (the ‘normal,’ non-red skin)
When you click the skin, your foreground color will change to the color you’ve chosen…
4. Select your Brush tool (Shortcut is ‘B’). Play around with the numbers. I usually use 20% opacity and 20% flow or 15% opacity and 40% flow. For this example I’ve used the latter.
5. Begin painting on your blank layer in small strokes over the birthmark (or other discoloration). The reduced opacity and flow really helps it all appear natural. Here is the after:
This technique works well on any discolored area if the Patch tool isn’t doing the trick. Give it a try next time!! Thanks for stopping by!