How To Place Text Behind An Object In Photoshop

In this tutorial, I show you how to easily place text behind an object in a photo with Photoshop! This effect is used everywhere you look, from magazine covers to movie posters, and usually involves placing some text behind a person's head. As we'll see, creating the effect in Photoshop is easy. All it takes is an image, some text, a quick selection and a layer mask! Let's see how it works.
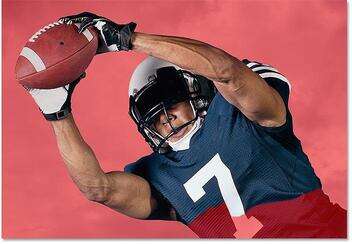
Here's what the final "text behind object" effect will look like when we're done:

The completed effect.
Let's get started!
Download this tutorial as a print-ready PDF!
How To Place Text Behind An Object
For this tutorial, I'm using Photoshop CC but every step is compatible with Photoshop CS6.
Step 1: Open your image
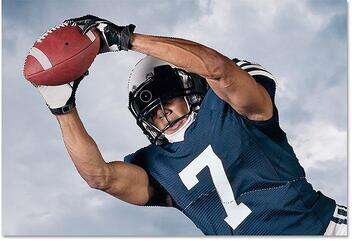
Start by opening the image where you want to add some text. I'll use this image that I downloaded from Adobe Stock. I'm going to place some of my text behind the football player:

The original image. Photo credit: Adobe Stock.
Step 2: Add your text
Add your text to the image and position it in front of the object. If we look in my Layers panel, we see that I've already added some text, and I've added a drop shadow just to make the text easier to see. I'll turn the text on in the document by clicking the Type layer's visibility icon:
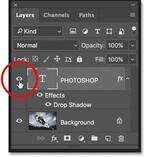
Turning on the Type layer in the Layers panel.
And now we see the word "PHOTOSHOP" sitting in front of the image:

Adding the text.
Step 3: Duplicate the Background layer
Back in the Layers panel, the image is sitting on the Background layer. Click on the Background layer to select it:
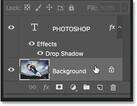
Selecting the Background layer.
Make a copy of the layer by going up to the Layer menu in the Menu Bar, choosing New, and then choosing Layer via Copy. Or, you can quickly duplicate a layer from your keyboard by pressing Ctrl+J (Win) / Command+J (Mac):
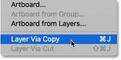
Going to Layer > New > Layer via Copy.
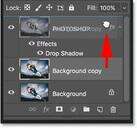
A copy of the Background layer appears between the original Background layer and the Type layer:
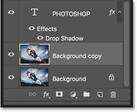
The Layers panel showing all three layers.
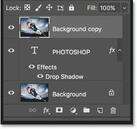
Step 4: Drag the copy above the Type layer
We need to move the new layer above the text. Click on the "Background copy" layer and drag it above the Type layer:
Dragging the "Background copy" layer above the text.
When a highlight bar appears above the Type layer, release your mouse button to drop the layer into place. This will temporarily hide your text from view:
The layer has been moved above the Type layer.
Step 5: Choose the Quick Selection Tool
Next, we need to select the part of our subject that's going to appear in front of the text. Photoshop has lots of great selection tools to choose from, but in most cases, the Quick Selection Tool is the easiest. I'll choose it from the Toolbar:

Choosing the Quick Selection Tool.
Step 6: Select the area that will hide the text
Click and drag with the Quick Selection Tool to select the areas you need. In my case, I want my text to appear behind the player's head and part of his jersey, and also behind his arms and the football, so I'll click and drag inside all of these areas to select them. If the Quick Selection Tool selects an area outside of your subject, press and hold the Alt (Win) / Option (Mac) key on your keyboard, and then click and drag inside the area to deselect it. You'll usually need to go back and forth between selecting and deselecting areas with the Quick Selection Tool until your selection looks good:
The areas of the subject that will hide the text have been selected.
Viewing the selection in Quick Mask mode
To make the selected areas easier to see, I'll temporarily switch to Photoshop's Quick Mask mode by pressing the letter Q on my keyboard. In Quick Mask mode, the areas around the selection appear as a red, or rubylith, overlay. And here we see that I've selected only the areas that will appear in front of the text. I'll press Q on my keyboard once again to exit out of Quick Mask mode:
Viewing the selection in Quick Mask mode.
Download this tutorial as a print-ready PDF!
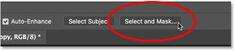
Step 7: Refine the selection with Select and Mask
In most cases, your initial selection will suffer from rough, jagged edges. To smooth them out, click the Select and Mask button in the Options Bar. Note that Select and Mask is only available in Photoshop CC. If you're using Photoshop CS6, you'll want to click the Refine Edge button. Refine Edge offers most of the same controls for refining selections as Select and Mask:
Opening the Select and Mask workspace.
Changing the View Mode
In the Select and Mask workspace or the Refine Edge dialog box, click the View Mode thumbnail:
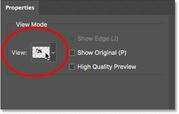
Changing the View Mode.
Change the view to On Layers:
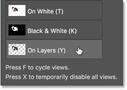
Selecting the On Layers view mode.
This lets us preview how the selection currently looks in front of the text. And here we see that things are already looking great, at least from a distance:

Previewing the selection with the text visible behind it.
A closer look
But if I zoom in for a closer look, we find some rough edges, especially around the glove and also around the helmet:
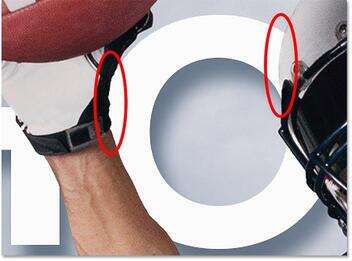
The edges don't look as good when viewed up close.
Smoothing out the edges
To smooth out the edges, I'll drag the Smooth slider to the right, to a value of around 10:
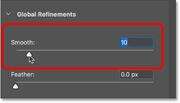
Smoothing out the jagged edges.
And now those same areas look much better:
The result after dragging the Smooth slider.
Learn more about refining selections in Photoshop
There's much more to refining selections in Photoshop than what I can cover in this tutorial. To learn more, see my Select Subject in Photoshop CC 2018 and my Selecting Hair with Refine Edge tutorials.
Step 8: Output the selection as a layer mask
Now that we've cleaned up the selection, the final step is to output the selection back into Photoshop as a layer mask. In the Output Settings area, change the Output To option to Layer Mask, and then click OK:

Outputting the selection as a layer mask.
Back in Photoshop, a layer mask thumbnail appears on the "Background copy" layer in the Layers panel:
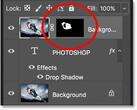
Photoshop converted the selection into a layer mask.
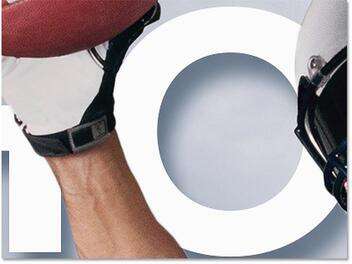
And in the document window, we see the final effect with our text sitting nicely behind our subject:

The final effect.
And there we have it! That's how to easily place text behind an object with Photoshop! Check out our Photo Effects section for more Photoshop effects tutorials!