How to restore your old photos for free or with Photoshop
A Guide to Fix Damaged Photos in Photoshop: Step-by-Step Solutions
Lets face it there are times when while transferring, editing, or downloading our images, they can get damaged. While there are so many possible reasons for image corruption, there are only a handful of ways to fix them. For instance, one of the best ways to repair a damaged picture is by using Adobe Photoshop. Dont worry even if you have no prior technical experience, you can fix damaged photos in Photoshop. Here, I will provide a step-by-step tutorial for repairing damaged images via Adobe Photoshop.

Part 1: Adobe Photoshop 101 - Things to Know
Developed by Adobe, Photoshop is one of the most popular raster graphics editing tools that work on Windows and Mac. While the tool was first released in 1988 by Thomas and John Knoll, the software has become the industry standard not only in raster graphics editing, but in digital art as a whole. Also, it has certainly undergone a lot of development in the last few years.
There are tons of readily available and AI-integrated features in Photoshop that you can use to repair an image. It can edit and compose raster images in multiple layers and supports masks, alpha compositing and several color models including RGB, CMYK, CIELAB, spot color, and duotone.
Photoshop utilizes its own PSD and PSB file formats to support those features. In addition to raster graphics, it has limited abilities to edit or render text and vector graphics (especially through clipping path for the latter), as well as 3D graphics and video. Its set of features can be expanded by plug-ins; developed and distributed programs independent of Photoshop that run inside and offer new or improved features. For instance, you can reduce the noise on your photos or treat some damaged areas. From altering its saturation to vibrancy, there are so many things that you can do in Photoshop to get the desired editing results.
Part 2: A Stepwise Solution to Fix Damaged Photos in Photoshop
Since Adobe Photoshop can be a bit overwhelming for beginners, you might find it hard to navigate its features. Therefore, I would recommend following this simple approach that can help you fix damaged photos in Photoshop.
Step 1: Open a Damaged Photo in Adobe Photoshop
At first, you can just install and launch Adobe Photoshop on your system and make sure the photo you wish to repair is saved on it. Now, just can either drag and drop the photo on its interface or go to its File Open feature to browse and load the damaged image on Photoshop.
Step 2: Make Basic Adjustments: Crop, Straighten, and Rotate
After loading the image on Adobe Photoshop, you can make all the needed adjustments to improve its quality.
For instance, you can first go to the 'Crop' icon from the sidebar. Now, you can simply select the area that you wish to keep (and what you want to remove).
Furthermore, you can also right-click the image you want to edit and click on the Ruler tool. This will let you straighten your image by getting grid lines on Photoshops interface.
You can also go to its Menu Image and choose to rotate the image at any defined or arbitrary angle. There are also options to flip the image vertically or horizontally here.
Step 3: Reduce Noise in the Image
Once you have made all the minor changes in your image, you are all set to fix damaged photos in Photoshop. One of the major issues that people encounter is the presence of unwanted noise in their photos. To fix this, you can just go to Photoshops 'Menu Filter Noise' and click on 'Reduce Noise' button.
This will open a new pop-up option that you can use to regulate the amount of color and luminance noise in your photos. Photoshop will automatically reduce the noise from your photos for the selected level and will let you preview the results.
Step 4: Make Color Adjustments and Corrections
If you have scanned an old picture, then chances are that its overall coloring could be saturated. Thankfully, Adobe Photoshop lets us manually correct the coloring of the image or use its automatic color correction feature.
To do this, you just have to go to the 'Adjustment Layer' icon in the Layers panel and click on the 'Photos Filter' option. You can also find it under the Image Adjustments Photo Filter field.
Afterward, you can just click on the 'Filter' menu from the side and simply choose any dominant color to adjust. You can choose warming or cooling filters to adjust the overall tone of the image. If you want, you can also click on the color square to pick a color for the custom filter.
Now, you can just adjust the slider to change the coloring level for the image.
Step 5: Try to Heal the Damaged Spots in the Image
Your photos can also have different spots that could be damaged or pixelated due to numerous reasons. Thankfully, Adobe has come up with an inbuilt healing brush that can help you fix damaged photos in Photoshop without much effort.
Once the image is loaded on Photoshop, you can go to the sidebar and click on the healing icon. From here, you can pick either the spot healing brush tool or the standard healing brush tool.
After selecting a healing tool, your cursor in Photoshop would be changed. You can now increase or decrease the size of the brush and gently move it on the damaged spots. Adobe Photoshop will now automatically heal the area by merging it with the surrounding pixels.
Step 6: Improve the Damaged Background and Other Elements
At times, the overall background of an image can also be damaged or have some unwanted spots. To fix this, you can simply use the 'Patch' tool in Adobe Photoshop.
You can just go to the sidebar options in Photoshop and click on the Patch Tool under the Healing option. Now, as the icon would be changed to a tassel, you can just select the area in the background (or any other element) to improve.
After selecting the area, you can choose to overlay it on any other element in the image. This would let you fix any damaged section in the image or even remove anything from the background.
Step 7: Work on its Tone and Vibrancy
Lastly, to fix damaged photos in Photoshop, you can alter the overall saturation, tone, hue, and other effects in the image. You can just go to its Menu Image Adjustments and click on options like Color balance, Hue, Saturation, Exposure, or Vibrancy.
This will open a dedicated pop-up feature that you can use to manually adjust the overall tone and vibrancy of the image.
Step 8: Export the Restored Image from Photoshop
Thats it! Once you have worked on your image, you can export it from Photoshop in a preferred format. Just go to its Menu File Export option and choose to save the image to any desired location in the format of your choice. You can also choose to export an entire layer or save layers separately.
Part 3: Extra Solution: Repair Damaged Pictures in an Easier Way
As you can see, we have to go through so many steps to fix damaged photos in Photoshop. Though, if you are looking for a simple alternative and dont want to undergo so much technical hassle, then use Wondershare Repairit.
It is a popular video and photo repairing application that features two dedicated repairing modes (Quick and Advanced). The application is known to yield positive results in several situations like a corrupt photo, pixelated images, missing meta components, and so on. Heres how you can automatically fix your corrupt photos with Wondershare Repairit.
Step 1: Load the corrupt photos on Repairit
To start with, just launch Wondershare Repairit on your system, go to the Photo Repair section, and click on the 'Add' button to load your images.
After loading your images, you can check their details on the native interface of Repairit and can start the repairing process.
Step 2: Repair your corrupt photos
As you would click on the 'Repair' button, the application would perform a quick scan to fix all kinds of minor issues. After completing the scan, you will be notified.
You can now click on the thumbnail of any image or an eye icon to get a dedicated preview of the picture.
In case there is a serious issue with your images, then the quick repair scan might not yield positive results. Now, you can click on the Advanced Repair feature from the bottom panel.
To perform an Advanced Repair, you are needed to load a sample image (picture of the same format as the corrupt file and shot on the same device). While it would take more time, the results of the Advanced Repair will be better.
After completing the Advanced Repair feature as well, you can get a preview of your images on Repairit.
Step 3: Export your repaired images from Repairit
Lastly, you can just select the images of your choice and click on the Save button. Subsequently, Wondershare Repairit will let you export the selected images to any location of your choice.
Following this basic drill, you can fix multiple corrupt or damaged photos using Wondershare Repairit.
Now Its Your Turn!
Im sure that after following this guide, you would be able to fix damaged photos in Photoshop. I would recommend following the listed steps one by one on Photoshop to get the best results for image restoration. Though, if you cant seem to get the expected results with Photoshop or if there is a severe issue with your images, then you can try Wondershare Repairit. I have included its stepwise tutorial here as well that you can follow to repair all kinds of corrupt or damaged photos quite easily.
How to Fix Damaged Photos in Photoshop
Summary: This blog post shares how you can fix color, brightness, and other noise in your damaged pictures in Photoshop. It also outlines a specialized photo repair software to fix severe corruption in pictures of any format.

Your yearning to shoot pitch-perfect photos may go unfulfilled due to a shortfall in the camera’s imaging calibre or other technicalities of the craft. Probably, your camera settings were not up to mark or there wasn’t sufficient lighting at the time of shoot. Due to these reasons, photos may turn out grainy, blurry, dark with strange spots, dull, or have other shortcomings.
Photoshop is a great solution for such issues in photos- it can fix damaged photos and make them look better.
In this blog post, we’ll share the key features of Photoshop that you can use to fix the color, brightness, and other noise in your damaged pictures. We’ll also outline a specialized photo repair software that can fix severe corruption in images including RAW file formats.
How to fix damaged photos by using Photoshop
Photoshop can fix damaged and distorted photos. The raster graphics editor reduces color and luminance noise along with correcting other flaws such as red eye, blemishes, spots, etc. in the photos.
Watch this video to know how to repair a damaged photo in Photoshop
Use the below methods in the latest Photoshop CC, CS6, CS5, and lower versions.
Methods to fix damaged photos in Photoshop:
Use Noise reduction filters Use Lab Color Mode Use Photoshop retouch & repair tools
Use Noise reduction filters
What you can fix: Spots, grains, dots of red, green, and blue, color fringing, halos, shadows, pixelation, luminance noise (black, white, and grey dots), banding etc. in photos
Colored artifacts or distortion in your photos mostly occur due to wrong camera or light settings. Noise filters in Photoshop are the best way to remove such color issues in the images.
Photoshop offers two mode to reduce noise in the pictures – basic and advanced. If you don’t get satisfactory results in the basic mode, try the advanced version.
How to reduce Noise in Basic mode in Photoshop
In the top bar select and follow Filter > Noise > Reduce Noise
Zoom in and out the area from where you want to reduce noise with the + / – button below the image preview
On the right pane, select Basic
Adjust the Strength, Preserve Details, Reduce Color Noise, and Sharpen Details sliders. Try various combination settings to get the balanced picture
Preview the results after check-in the Remove JPEG Artifact box
box Click OK on top
Note: Some Photoshop filters that you can use to reduce various types of noise in photos – Despeckle, Dust & Scratches, Reduce Noise, Sharpen, and Sharpen Edges.
How to reduce Noise in Advanced mode in Photoshop [
In the top bar select and follow Filter > Noise > Reduce Noise
Select Advanced
Select Per Channel tab
tab Select the Channel one by one and adjust the Strength and Preserve Details sliders for each
one by one and adjust the and sliders for each Preview the changes and click OK
2. Use Lab Color Mode
What you can fix: Luminance noise – brightness issues, black, white, and grey dots in the photo
Luminance noise affects the brightness in the photos. It occurs due to inappropriate light and ISO settings during the shoot.
How to reduce Luminance Noise with Lab Color Mode
In Photoshop menu, go to Image>Mode>Lab Color
Go to Layers, create a copy of layer by dragging the current image background layer to the Create New Layer icon seen below
create a copy of layer by dragging the current image background layer to the icon seen below Go to the Channels tab, create a copy of Lightness channel by dragging the current channel to the Create New Channel icon seen below. Name the new channel so as not to confuse with the original one while making changes.
tab, create a copy of Lightness channel by dragging the current channel to the icon seen below. Name the new channel so as not to confuse with the original one while making changes. Channels tab has the Lightness channel (for brightness) and channel a and b (for colors). Click on the Lightness channel, adjust the respective values to reduce the luminance noise
3. Use Photoshop retouch & repair tools
What you can fix: The old damaged photos, blemishes, spots, red eye, etc.
Photoshop offers a variety of retouch and repair tools to improve and enhance the damaged photos. You can easily fix imperfections such as red eye, spots, blemishes, scratches, etc. in your pictures. The retouch and repair tools are boon for photographers who need to repair their client’s old damaged photos.
Some of the efficient Photoshop retouch and repair tools are Clone Stamp tool, Healing Brush tool, Spot Healing Brush tool, The Patch tool, Red Eye tool.
How to use Clone Stamp tool
The Clone Stamp tool lets you to copy one area of an image over another of the same image, which has the same color mode.
Select the Clone Stamp tool
Drag it over the area of the photo you want to repair
How to use Healing Brush tool
The Healing Brush tool fixes imperfections. You paint with the sampled pixels from an image or pattern like in Clone Stamp. Additionally, the Healing Brush matches the texture, lighting, transparency, and shading of the sampled pixels to the pixels you are going to repair.
Select the Healing Brush tool icon
Click the brush sample and set brush options (Mode, Source, Aligned, Sample, and Diffusion)
Set the sampling point by placing the pointer over an area of the photo
The sampled pixels are blended with the existing pixels
How to use Spot Healing Brush tool
The Spot Healing Brush removes spots, blemishes, circles, and anomalies in your photos. It is similar to the Healing Brush but doesn’t require you to specify a sample spot. It automatically samples from around the retouched area.
Select the Spot Healing Brush tool from the toolbox
Choose a brush size in the options bar
Choose Replace to preserve noise, grain, and texture at the edges of the brush stroke
Choose a Type option in the options bar (Proximity Match, Create Texture, Content-Aware)
Select Sample All Layers in the options bar. Deselect Sample All Layers to sample only from the active layer.
Click the area you want to repair
How to use the Patch tool
The Patch tool repairs a selected area with pixels from another area or a pattern. It matches the texture, lighting, and shading of the sampled pixels to the source pixels.
Select the Patch tool icon
Drag in the image to select the area you want to repair
Select Source in the options bar
To adjust the selection, shift-drag in the image to add to the existing selection
Adjust the Diffusion slider
Position the pointer inside the selection and drag the selection border to the area you want to patch
Release the mouse button
How to use Red Eye tool
The Red Eye tool removes the common red eye issue in your photos.
Select the Red Eye tool in the RGB Color mode
Draw a box around the red eye in the image. Red eye is fixed.
Note: You can visit to know in detail how each can be used to repair your damaged pictures.
Easy way to repair damaged and corrupt pictures
Use Stellar Repair for Photo – a DIY photo repair software
What you can fix: Repair corrupt and damaged photos including grainy, blurry, broken, pixelated, with grey bands, or giving errors. Fix issues like corrupt headers, JPEG file data, invalid JPEG file structure, etc.
Stellar Repair for Photo provides a fast and easy way to repair corrupt, broken, or damaged photos. The best thing about this photo repair tool is that it can repair RAW file formats of all popular camera brands like Nikon, Canon, Sony, Fuji, Olympus etc. Unlike Photoshop, the software can repair multiple photos at a time. You don’t need to juggle with the functions or settings to get the desired results.
How to restore your old photos for free or with Photoshop
Learning how to restore old photos is a great, family-pleasing skill to have – and whether you're looking to do it for free or with Photoshop, it's never been easier. In this guide, we've picked out our favorite free options for web browsers and smartphones, detailing their strengths and weaknesses. And for Photoshop fans, we've also created a simple step-by-step guide to restoring old photos using Adobe's software.
Old family photos can help to bring our family histories back to life. But unless you’re using archival methods to store your old photos, they'll probably have been damaged to varying degrees over decades of less-than-perfect storage.
The good news is that there are now plenty of smartphone apps and websites using AI that will restore photos for you automatically, and in some cases, for free. And if you’re a Photoshop user, you can achieve professional results in just five easy steps once you’ve digitized your photos.
How do you digitize old photos before restoring them? There are three main methods, and all work exceptionally well. The easiest is to take a shot of the old photo using your smartphone using an app like Google Photoscan. Or if you’d like a larger, higher-quality version you can use a mirrorless camera or DSLR. A kit lens will work just fine, but if you have a macro lens this will be even better.
The final way to digitize old photos is to use a flatbed scanner, but since these aren’t as popular as they once were, many people no longer have access to them. Once you’ve digitized your photos, it’s time to restore them using either free AI tools or by taking a more manual approach in Adobe Photoshop. Here are the best options for both routes, so you can get your photos ready to display on your laptop, TV or the best digital photo frames.
How to restore old photos for free online
VanceAI (opens in new tab) is an AI-powered photo editing website where you can take advantage of a wide range of editing tasks including image sharpening, noise reduction, portrait retouching, photo restoration and much more.
There are limitations on its free version. Each editing task requires 0.2 credits, while downloading an image requires one credit, with three free credits available each month at a size limitation of 1996 pixels (16.9cm at 300dpi) on the long edge of the output file. A small VanceAI watermark is also added to the image.
(Image credit: Future)
To take advantage of higher resolution output files with no watermark, you have to subscribe to a credit plan. These include a pay-as-you-go option where 100 credits cost $26.99 or a monthly plan where 100 credits cost $9.90 and unused credits roll over for up to five months while subscribed. There's also an annual subscription where 100 credits cost $5.94 with the five-month rollover. So, quite expensive overall.
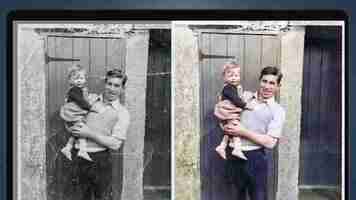
Still, the results of image repair and enhancement are good overall, with a focus on enhancing faces. They’re best, as you’d expect, with less damaged photos. With more damaged photos, the AI doesn’t always clone/heal well and important features can be lost, such as one of the toddler’s eyes in one of the photos tested. Colorization didn’t work with any images tested, but using the website is extremely easy since you only have a few options to consider.
Visit VanceAI (opens in new tab)
How to restore your old photos with an app
Face Restore is an AI-powered photo restoration app (available for both Android and iOS) that can repair scratches and colorize black-and-white photos. And like VanceAI, there’s a focus on faces where the AI processes faces in the image more than other areas. You can then download the whole image or download close-ups of faces detected in photos. Restoration is easy to use and you’re guided through each step.
Image 1 of 2 (Image credit: Future) (Image credit: Future)
You can subscribe to remove ads, otherwise the app says that 5-30 second ads have to be viewed to perform processing steps. During testing, though, each task performed required viewing a 30-second advert. It’s not too bad because you can simply put your phone down and do something else while you wait. Alternatively, you can subscribe for $9.99 / £8.99 / AU$15.49 per month or $39.99 / £35.99 / AU$60.99 per year. With the free ads-based version, output images are limited to 1280 pixels (10.84cm at 300dpi) on the long edge.
Results are most effective with images that exhibit only minor damage/scratches. More prominent damage repair can, in some instances, result in pixelation and mismatched cloning in these areas. Like VanceAI, the results aren’t as good as what can be achieved in Photoshop (see below), but using the app is extremely easy and for less damaged and damage-free images it’s highly successful. Colorization, on the other hand, isn’t great and results here can be quite patchy.
How to restore old photos in Photoshop
The best way to restore old photos is to manually clone and heal damage in Photoshop. There are currently a couple of useful automated tools such as the Dust & Scratches Filter which makes removing small cracks quick and easy, and the Colorize Neural Filter to automatically color black and white images.
The Colorize Neural Filter does a reasonable job but can leave patches of black and white. So, if you select the option to ‘Output as new color layer’, you can easily fill the uncolored patches by painting with the Brush Tool and sampling the correct color from other parts of the color layer.
A Photo Restoration Neural Filter (opens in new tab) is due to be released in Photoshop soon, but it's currently only in beta. For now and possibly still in the future, manual restoration remains the best option for removing damage and blemishes alongside adjusting brightness, contrast and discoloration. Here's how to do it.
(Image credit: Future)
1. Crop & adjust
Take a shot of the photo you want to restore using your camera or a smartphone (for example, with the Google Photoscan app (opens in new tab)) and then import it into Lightroom. Here you can crop the area around the photo out and make basic adjustments such as increasing contrast with the Tone Curve and using the Highlights, Shadows, Whites and Blacks sliders if required. Output your photo as a 16-bit TIFF for the best quality for cloning and healing.
(Image credit: Future)
2. Use Dust & Scratches
Open the digitized photo in Photoshop, press Ctrl/Cmd+J to duplicate the Background Layer, then go to Filter>Noise>Dust & Scratches. Move the Radius slider to the right until fine cracks disappear, but don’t go too high. A Radius of five pixels was perfect for this photo. Next, use the Threshold slider to recover some sharpness lost by the Radius slider. For this photo, Threshold was set to 10 levels.
(Image credit: Future)
3. Fix cracks, tears and blemishes
Larger cracks, tears and blemishes will need to be cloned manually, so press Ctrl/Cmd+Shift+N to create a New Layer and name it ‘Spotting’. Select the Healing Brush Tool and set the Hardness to 50% and use the left and right square bracket keys to adjust the size. Hold down Alt/Option and left click to sample close to a problem, then left mouse click and paint over cracks, tears and blemishes.
(Image credit: Future)
4. Levels and Sharpen
Create a Levels Adjustment Layer and drag the black-and-white points inwards to increase contrast, then adjust the midpoint to control brightness. Next, press Ctrl/Cmd+Shift+Alt/Option+E to merge visible Layers to a New Layer, then go to Filter>Sharpen>Unsharp Mask. You’ll need strong settings, so for this image Amount was set to 255%, Radius to 3.5 Pixels and Threshold to 10 levels.
(Image credit: Future)
5. Colorize with Neural Filters
Go to Filters>Neural Filters>Colorize. Make sure Auto color image is checked and Photoshop will colorize the photo. You can then use the sliders to adjust the color balance if it’s not quite right and can also use the Color artifact reduction and Noise reduction sliders if required. If you check Output as new color layer, the colors will be added to a Layer that can be touched up if necessary.