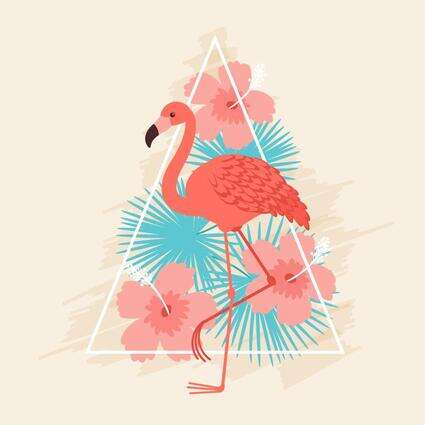
How to Use Brushes in Adobe Illustrator to Create a Colorful Flamingo
Adobe Illustrator is great for its brushes, but what's even greater is that you can create your own.
In today's tutorial, I will show you how to create your own Illustrator brush and how to do some shading using the same brush. You will learn how to create a flamingo on a
tropical background. We will use basic shapes and warp effects, and
we'll use the same brush for the feathers, leaves, and flowers.
Did you know that the Pantone color of 2019 is Living Coral? According to Pantone, this color welcomes and encourages lighthearted activity, symbolizing our innate need for optimism and joyful pursuits, and embodies our desire for playful expression. That's why our flamingo will be in that beautiful coral color. If you would like to learn more about the color and what Pantone colors are, check this article.
If you'd like to have some ready-to-use animal photos, browse PhotoDune or Envato Elements for their amazing collections.
If you would like to check tutorials on how to create Illustrator brushes, please browse these:
Illustration
How to Create a Bouquet of Spring Flowers in Adobe Illustrator
Nataliya Dolotko
Digital Painting
How to Create a Vintage Floral Arrangement Painting in Adobe Illustrator
Nataliya Dolotko
If you would like to know how to create other birds, please check these tutorials:
How to Create a Quick Pelican in Adobe IllustratorDo you like pelicans? Learn how to create one in Adobe Illustrator in this quick tutorial.
Nataliya Dolotko
06 Sep 2018
Animals
How to Create a Seamless Vintage Nautical Life Pattern in Adobe IllustratorIn this tutorial, you will learn to create marine life wallpaper in vintage style. You will use the Pencil Tool to draw different elements and learn to make...
Nataliya Dolotko
23 Jul 2014
Patterns
How to Create an Autumn Composition With a Sparrow in Adobe IllustratorThe sparrow is a perky little bird, resident of cities around the world. Let’s create this adorable little feathery creature together.
Nataliya Dolotko
17 Nov 2015
Autumn
How to Create a Quick Spring Banner in Adobe IllustratorLearn how to create this simple and easy banner for your website or blog. Welcome spring with two cute birds sitting on floral branches!
Nataliya Dolotko
10 Apr 2015
Spring
And now, when you know everything about Pantone colors, checked up on
all of the pages of PhotoDune and Envato Elements, or you just don't care
about all that stuff and came here to learn something new, let's begin!
Looking for Illustrator Brushes? Check out the following recommended free resources:
Illustrator Brushes
A Huge Compilation of 40 Free Illustrator Brushes
Sonali Vora
1. How to Create the Flamingo
1.
Step 1
After you've opened your AI, create a new document.
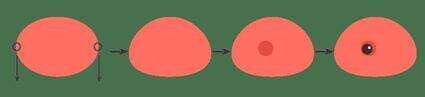
To create the flamingo, let's start with the head. Take the Ellipse Tool (L) and draw an ellipse (fill color R=255, G=112, B=98). Then, we want to deform it a little: hit the Direct Selection Tool (A) and select its left and right anchor points. Using the Down Arrow key on your keyboard, move those two anchor points down.
Take the Ellipse Tool (L) again, to draw the eye. Create a circle. Hold the Shift key while drawing to form a nice even circle. Change its fill color to R=229, G=76, B=65.
Draw a new circle inside the previous one and change its color to R=71, G=40, B=40.
After that, add a tiny white circle for the highlight, as that will complete the flamingo's eye.
Step 2
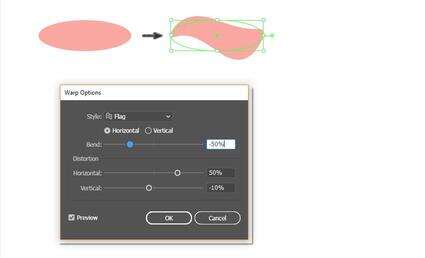
Now we're going to create the beak. Add a long, horizontal ellipse using the Ellipse Tool (L). Make sure its fill color is R=252, G=168, B=162.
While keeping the ellipse selected, go to Effect > Warp > Flag. In the new dialogue window, enter the options you see below and then press OK. Expand the shape (Object > Expand Appearance).
Place the beak under the flamingo's head (Control-X, Control-B). Rotate the head with the beak to the left, which is how a flamingo usually holds its head.

Step 3
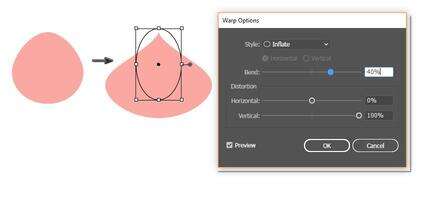
Normally, a flamingo's beak is more complicated, so we are going to add some more detail. Draw a vertical ellipse with the help of the Ellipse Tool (L). While keeping it selected (just make sure you selected it by using the Selection Tool (V)), go to Effect > Warp > Arc. In the new dialogue window, enter the options you see below and press OK.
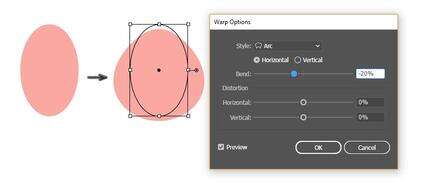
Then go to Effect > Warp > Inflate and enter the new options you see in the image. After that, expand the shape (Object > Expand Appearance).
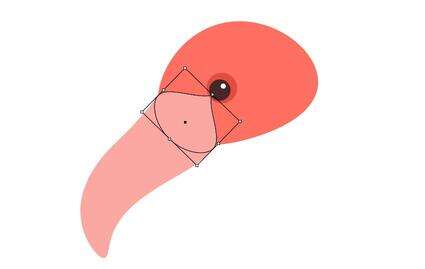
Place this shape on the flamingo's head as shown below, just under its eye.
Step 4
It's not done yet! The last thing we want to add to the flamingo's beak is this dark part on the tip. So add an ellipse (fill color R=71, G=40, B=40) overlapping the tip of the beak.
Now, be careful: select the beak which is located under the head and create a new copy of it (Control-C, Control-F). Don't take off the selection yet, and while holding down the Shift button, select the dark brown ellipse you created before. Press the Intersect button on the Pathfinder panel (Window > Pathfinder). You'll end up with a similar image to the one below:

Step 5
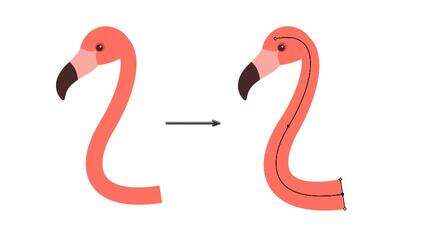
To draw the neck, we will use the Pencil Tool (N). But first, let's adjust it: double-click on this tool and in the new dialogue window that will pop up, move the Fidelity slider way to the right, until it reaches Smooth. Close the new window by clicking OK. Make sure you deleted the fill and set the stroke color to R=255, G=112, B=98.
Now you can draw the neck using the Pencil Tool (N) and it should look like a reflected letter "S".
But you can see that the neck is very thin, and we want to make it thicker where it connects to the body. So take the Width Tool (Shift-W) and, while the neck is selected, stretch the end of it where the neck meets the body.
Step 6
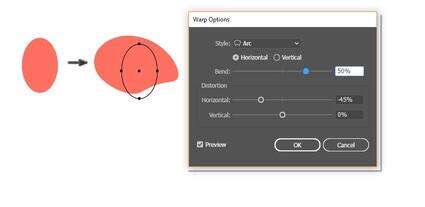
Next is the body. Delete the stroke color and set the fill color to R=255, G=112, B=98. Draw a vertical ellipse. Then go to Warp > Effect > Arc, and enter the options you see below. Expand the shape.
Connect the body to the lower end of the flamingo's neck.

Step 7
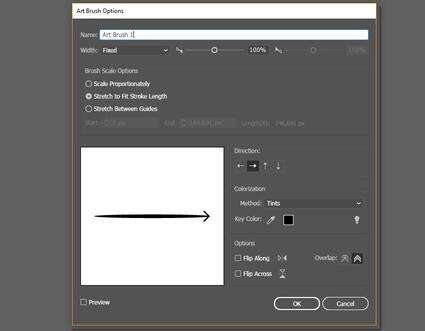
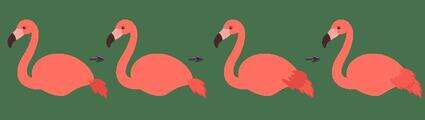
In this step, we are going to create the feathers on the flamingo's tail. But first we want to create a special Illustrator brush for it. I really like this brush, because it's universal and you can create anything using it.
Make sure you have a black fill color, and then draw a thin horizontal ellipse. After that, grab this ellipse and drag it to the Brushes panel (Window > Brushes). A new dialogue window will pop up, where you want to check Art Brush, OK. Then a new window will pop up again. Enter the options you see in the second image.

Here are the options of the new Illustrator brush:
Let's prepare our new brush to draw the feathers. Make sure you have no fill color and set the stroke color to R=229, G=76, B=65. Using the new Art Brush you just created, start to draw the feathers on the flamingo's tail as shown below.
Change the stroke color to R=247, G=91, B=79 and draw some new strokes over the previous ones. The new strokes should almost cover the old ones.
Then change the stroke color to R=229, G=76, B=65 again, and draw some new darker strokes that cover the previous strokes just a little bit.
Change the stroke color to R=247, G=91, B=79 and draw some new lighter strokes over the darker ones, almost covering them.
Step 8
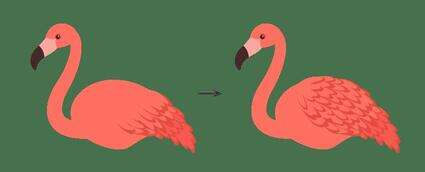
Using the same method and the same Illustrator brush, draw new feathers that are related to the wing. Notice that now you should incorporate a new stroke color R=255, G=112, B=98, the same as the body color.
Step 9
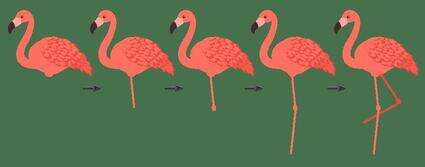
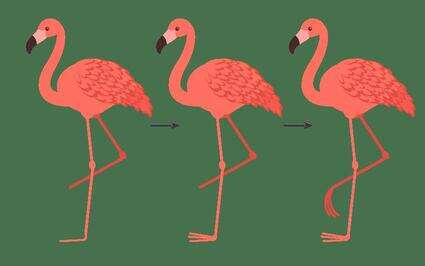
Make sure you have no stroke color and set the fill color to R=255, G=112, B=98. Create a small ellipse under the flamingo's body where the leg will be connected.
Now let's draw the leg. In order to change the fill color to the same stroke color, press Shift-X. Then take the Line Segment Tool (\) and draw a long line for the leg. The leg will probably be very thin, so you should go to the Stroke panel (Window > Stroke) and increase its Weight. Note that the line should be slightly rotated to the left.
Change the stroke color to the fill color with the same shade, or simply press Shift-X. Add a tiny ellipse for the flamingo's knee, which is inverted.
Make the fill color your new stroke color (Shift-X) and add a new line using the Line Segment Tool (\) for the lower part of the flamingo's leg.
Using the same method, create another leg. This new leg should be darker (R=229, G=76, B=65).
Step 10
We're almost at the end! Now we want to create the toes.
Draw a rounded rectangle using the Rounded Rectangle Tool and the stroke color R=255, G=112, B=98. Then hit the Scissors Tool (C) and click on the two sides marked in the image below. You just cut off one part of the rounded rectangle. Delete its upper part, as you don't need it. You need just the lower part, for the flamingo's toe.

Step 11
Place the flamingo's toe under its leg. Add two more toes. Check if the stroke weight of the leg and toes look good.
Using the Arc Tool and the stroke color R=229, G=76, B=65, create the toes on the other leg.
Our flamingo is done!
2. How to Create the Background Using an Illustrator Paintbrush
2.
Step 1
Let's create the background. Hit the Rectangle Tool (M) and click on your artboard. Enter Height and Width 850 px. Set its fill color to R=247, G=237, B=223.

Step 2
To create a triangle, hit the Polygon Tool and click on your artboard. Enter Sides 3 with any Radius in the new window. Change its stroke color to white with no fill.

Step 3
Let's add some grunge to our background. Set the stroke color to R=244, G=229, B=208 with no fill. On the Brushes panel (Window > Brushes), open the Brush Libraries Menu and go to Artistic > Artistic_Paintbrush. There you can select Brush 2, which looks like a real paintbrush stroke. Using the Illustrator brush, draw some grunge strokes. The strokes should be diagonal and barely have to go beyond the borders of the triangle (but, honestly, you can draw your strokes however you want:). Make the strokes thick by increasing their Weight.
In the end, place the triangle over the paintbrush strokes (Control-X, Control-F).

Step 4
Select all your paintbrush strokes: first, select one of them, and then go to Select > Same > Stroke Color. After that, in the Transparency panel (Window > Transparency), change their Blending Mode to Multiply and lower their Opacity to 50%.

3. How to Create Tropical Plants Using the Illustrator Art Brush
3.
Step 1
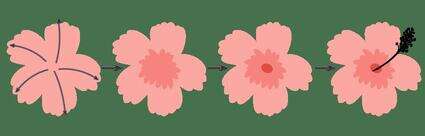
Remember the new Illustrator brush you created to draw your flamingo's feathers? We'll now use it again. Change the stroke color to R=252, G=168, B=162. Following the directions of the arrows in the image below, draw the petals of the flower. Notice that one petal has a few strokes.
After that, on the Transparency panel, change the Blending Mode of the stroke to Multiply and lower its Opacity to around 60%. Decrease the stroke Weight on the Stroke panel. Then draw some shading in the middle of the flower using the same Illustrator brush.
Increase the Opacity of the stroke to 100%, increase the stroke Weight, and draw the center of the flower, which is typical for a hibiscus.
The last part is the stamen. In the image, the stamen is in black, so you can see it better, but it needs to be in white. We will use the same brush again. It's pretty versatile, right?
The stamen starts from a long thin stroke, and then lots of even thinner branches move away from the main stroke. After that, add a few thicker ellipses again using the same brush.
Group the whole flower for your convenience (right-click > Group).
Step 2
Create two more copies of the hibiscus and spread them around. In the end, place the triangle over the flower (Control-X, Control-F).

Step 3
The last element for our illustration is that tropical leaf called Chamaerops. First, change the stroke color to R=93, G=199, B=208, and using the same Illustrator brush as we used for the flowers, draw a few strokes to indicate the shape of the leaf. Then add more strokes, or leaves.
Change the stroke color to R=42, G=170, B=173 and add the stalk.
Group the whole Chamaerops leaf so that you can easily move it later on.

Step 4
Create two more copies of this leaf and spread them around. Make sure your triangle stays on top of everything.

Step 5
And finally, place the flamingo in the middle of the background, and our illustration is done!

Conclusion
You just did a very good job! I hope it wasn't too complicated for you, but if you still have some questions, feel free to leave them in the comments section below and I'll be happy to help you!
Congratulations to those who passed this tutorial through with me. You've learned how to create a flamingo, how to create and use existing Illustrator brushes, and how to create tropical flowers and leaves.
See you in my next tutorial!