How To Use Photoshop’s Image Processor
How to Use the Hand Tool in Photoshop
What is the Hand Tool?
Adobe Photoshop features a large variety of tools that you can use while working with images or creating your own graphics from scratch. One of them is the Hand tool. Although many Photoshop users may not ever touch this tool, it is a helpful application that can assist you in getting your work done a lot faster. Generally, the Hand tool is viewed more as a function than an actual tool. This is because you rarely need to click on it to use it. To activate it, all you have to do is hold down the spacebar when you are using any other tool. When you do this, the cursor automatically changes to the hand icon.
What Does the Hand Tool Do?
The Hand tool allows you to move your image around its window by dragging. The tool is useful for maneuvering around an image to focus in on specific details within the picture.
Most Common Uses
This tool is most commonly used for getting a closer look at a specific detail in an image. It is also frequently used along with the Zoom tool. When you use the Hand tool, you can bring a specific detail into closer focus by centering the part of the image with which you are working. This tool is also good to use when you have already made edits to an image and want to get a closer look at the changes you have made. You can use it to pull the area previously edited into the center of the image for focus and then use the Zoom tool as well to get a better look at the changes. After you have viewed what you want to see, you can decide whether to save it as is or make further edits to the photo.
Helpful Features
In general, the features of the Hand tool in Photoshop are used to maneuver a portion of an image to center it and bring it into focus. The tool makes it easier for you to work on one specific area at a time and is particularly useful when you are working with a smaller image and need to zoom in. By viewing small details, you can make needed corrections to an image, such as if you have a photo of two people and their eyes come out red.
When to Use the Hand Tool
The tool is good for examining any changes that were made to an image. However, it is not the kind of tool you would use for editing as it only moves parts of an image around for viewing.
The best way to get used to the function of the Hand tool in Photoshop is to play around with it while using the program. Check out our helpful Photoshop tutorial videos to learn more about mastering this powerful software.
How to Use Photoshop to Draw on a Movie
1. Launch Photoshop, then click "File" and "Open" to view your files and folders.

2. Double-click a video file and wait as Photoshop adds a preview image of the drawing canvas. The Animation panel appears at the bottom of the main window and displays various video controls and a video layer. Click that layer to select it.
3. Click and drag the blue time indicator icon located near the top of the Animation panel. The preview advances forward when you drag the indicator to the right, and moves backward when you drag it to the left.
4. Drag the indicator to the location in the video on which you wish to draw.
5. Click "Layer," "Video Layers" and "New Blank Video Layer." Click one of the Brush tools and draw on the video. Click the “Play,” “Pause” and “Rewind” buttons to preview the video.
How To Use Photoshop’s Image Processor
Photographers often want to make changes across a group of images, and the process is much more efficient if it can be done automatically. Frequently, this includes resizing or reformatting to a different file type, but it might also include color, contrast, sharpness and almost any other adjustment under the sun. While Photoshop’s actions and batch processing tools are useful for this, as Lightroom can be as well, one simple, single-screen approach is to use the Image Processor in Photoshop or Bridge. It’s a quick and easy way to make changes across a group of image files while leaving the originals intact. Here’s how to use Photoshop’s Image Processor to your advantage.
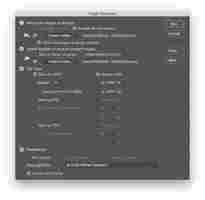
To open Image Processor in Photoshop, look under Scripts in the File menu and choose Image Processor. For photographers who use Bridge, the Image Processor is available there under the Photoshop heading of the Tools menu. In each case, a dialogue box opens in Photoshop, offering a straightforward look at four steps to process a group of images.
First is “Select the images to process.” Here you can choose to work on a group of images that are currently open in Photoshop or choose a folder of image files to work on. If that folder has folders inside it, be sure the “Include all sub-folders” checkbox is checked. You can also check “Open first image to apply settings” when working with RAW files in order to open the Camera RAW dialogue and make changes to one image that will be applied to the rest.
The next step is to think about where those images will be saved once they’re processed. You can save them in the same folder they started in, but a better option is to create a new folder and save them there. This way, you’ll have an easier time keeping originals and modified files separate—which is especially useful if there are any errors in your process or if you’d like to make changes and run the script again. If the original folder has subfolders that you’d like to maintain, click on “Keep folder structure” to maintain the hierarchy.
Advertisement Advertisement
Step three is to choose the type of files you’d like to save: JPEG, PSD or TIFF. Each choice includes options for resizing to fit particular pixel dimensions, as well as compression and quality settings. The JPEG option also includes a checkbox for converting the color profile to sRGB, which is particularly useful for images destined for the web.
The final step is preferences. You can click “Run Action” in order to apply an image as the last step. This might include image sharpening, watermarking, color or contrast adjustments. Really, anything previously saved as an action can be applied here.