How to use Photoshop’s Quick Selection Tool to Change a Background
10 Ways to Modify a Selection in Photoshop
Learning how to make a selection in Photoshop is an essential skill for any Photoshop user. In this tutorial, we'll show you ten ways to modify a selection in Photoshop.

By watching this video, you will be able to understand the connection between all the selection features Photoshop offers, including Feather, Contract, Expand, Border, Smooth, Refine Edge, Quick Mask, Color Range, Transform Selection and many more.
And if you need professional Photoshop add-ons that will save you a lot of time, don't forget to check out Envato Elements' huge library!
What You'll Learn in This Photoshop Tutorial
How to select in Photoshop: basic modifications How to save and load selections How to transform selections How to Quick Mask in Photoshop How to use Magic Wand, Quick Selection, Similar & Grow How to use Feather Selection in Photoshop How to Refine Edges How to Contract & Expand How to make a border How to select with Color Range
1. How to Select in Photoshop: Basic Modifications
To learn how to make a selection in Photoshop, first we'll go over the basics. The following selection options are considered basic modifications:
Add to selection (hold down Shift while using the following tools: Magic Wand, Lasso tools, Marquee tools) Subtract from selection (hold down Alt/Option while using the following tools: Magic Wand, Lasso tools, Marquee tools) Intersect selections (hold down Alt/Option and Shift together to intersect a new selection with a previous one) Select All (Control-A to select the whole canvas) Deselect (Control-D to deselect everything) Reselect (Control-Shift-D to reselect the previous selection) Invert selection in Photoshop (Control-I to deselect what was previously selected and select what was not selected) Move selection in Photoshop (hold down Space while still drawing the selection with Marquee tools to move it around) Perfect circle or Square (hold down Shift with the Elliptical or Rectangular Marquee tools while creating them) Draw selection from the center (hold down Alt/Option with the Elliptical or Rectangular Marquee tools while creating them)
Add to selection
Subtract from selection
Intersect selections
2. How to Save & Load Selections
Wondering about saved selections in Photoshop? Saving your selections can be useful if you need to come back to them at a later date. Saved selections in Photoshop are stored as Channels. They are essentially Pixel Masks not assigned to any layer. You can find these options under the Select menu.
Photoshop save selections
Naming saved selections
3. How to Transform Selections
This feature is essentially the Free Transform tool, which will only transform your selection but not the content of the selected layer(s).
This can be very useful when you need to create perspective distortions to shapes selected with the Marquee tools. This can be achieved by holding down Control while dragging one of the control points of the transform bounding box. You can also use Warp features to bend and reshape your selections with this feature.
Transform selections
Warp selections
4. How to Quick Mask
This is a very handy feature for making changes to your selections. You need to click on the icon at the bottom of the toolbar to enter Quick Mask mode or press Q. You can use the same keyboard shortcut to exit this special selection editing mode.
Once in Quick Mask mode, you will see your selection normally and everything else outside your selection with a red overlay. This setting can be changed by double-clicking on the icon in the toolbar. In this mode, you should work with the Brush tool and the Gradient tool to make fast and precise changes to your selections. Using black as your foreground color will remove areas from your selection, while using white will increase the area of your selection. Try using custom brushes to achieve special selections.
Quick mask mode
Quick mask options
5. How to Use Magic Wand, Quick Selection, Similar & Grow
First, let's talk about the magic selection tool in Photoshop. The Magic Wand is a classic Photoshop tool. It creates selections based on the similarity of neighbouring pixels. The magic selection tool Photoshop method can be achieved with two features from the Select menu. Similar will extend the selection by including similar coloured areas from around the whole image (not only adjacent pixels), and Grow will extend the selection only using adjacent pixels.
Now, let's see how to use the quick selection tool in Photoshop. The Quick Selection tool uses also the same sampling, but together with a very powerful brush method. With the Quick Selection tool, you can quickly sample several areas with a simple brush stroke, and you can customise the size of your brush to make precise selections.
Adding Similar pixels to a selection
Using the Magic Wand to select not only adjacent pixels
6. How to Use Feather Selection in Photoshop
The feather selection Photoshop tool will soften the edges of your selection. The pixel size of Feathering will define the size of the gradual softening around the edges of your selection. You can either assign a Feather to your selection tools (Marquee and Lasso tools) or add it to any selections created from the Select menu.
Adding Feathering from Select menu
Refine Edge Feathering with live preview
7. How to Refine Edges
This is a very powerful set of tools to modify your selections. Here you can use advanced selection modifications like Smart Radius, Decontaminate Colors, and many more. This option is the best way to improve your selections of complicated subjects like hair or fur.
Refine Edge dialog box
8. How to Contract & Expand
When learning how to use Modify in Photoshop, these are two popular options. They're under Select > Modify, and they do exactly what their name says. Contract will remove a set amount of pixels to the edges of your selection, and Expand will expand a selection in Photoshop by adding pixels.
Contract and adjust a selection in Photoshop
9. How to Make a Border
This is probably one of the least used modifications in Photoshop but nonetheless useful. This will create a selection ring with a specified size around your previous selection.
Border
10. How to Select With Color Range
This is another favourite Photoshop selection feature, which you can use to enhance a selection you've already created. You can find this feature in the Select menu. The way it works is similar to the Magic Wand, but in this case you have better control over the Tolerance, which is called Fuzziness in this case, and you also get better Preview options.
Adding Color Range
Color Range dialog box
5 Top Photoshop Add-Ons to Make Your Work Easier
We covered various methods to learn how to make a selection in Photoshop and how to adjust a selection in Photoshop. Now you know how to invert selection in Photoshop, how to make a selection, how to move a selection in Photoshop, and more.
But did you know there's a library with over 9,000 Photoshop add-ons available with unlimited downloads? That's Envato Elements' offer.
For a flat monthly fee, you can download as many assets as you wish—actions, brushes, and more. Here are just five useful add-ons you can get for your toolkit:
Wondering how to select in Photoshop using different criteria in layers? This is the tool you need! Smart Select allows you to define the conditions layers should meet and then automate the process of selecting them.
This plugin helps you when you need to cut a layer into separate layers, especially if you have lots of elements in there. It cuts any type of layer with just a click, using a variety of tools like guidelines, paths, or selections.
Don't compromise the quality of your images if you need to extend them. This plugin helps you to make your images larger by extending their edges—unlike scaling images up, there is no quality loss or blur, because only new pixel data is added.
Is there a faster way to edit many layers at once than with this add-on? You'll be able to resize, rotate, color, or rename multiple layers at once. You can also create or unwrap multiple Smart Objects, so it's a great one to have!
This particular plugin will round the corners of any shape by recalculating the path. This is very useful because Photoshop users without Illustrator can only round rectangles.
Become a Photoshop Expert With This Free Course and Other Resources
And if you're looking for a free course to learn the basics of Photoshop, you're in luck! Visit the Envato Tuts+ YouTube channel to watch this amazing course and more tutorials:
After learning the basics of how to use modify in Photoshop along with some other selection features, maybe you'd like to explore more awesome tutorials. Check out these resources before you leave!
Editorial Note: This post has been updated with contributions from Maria Villanueva. Maria is the Associate Editor of the Tuts+ Design channel.
How to Use the Quick Selection Tool in Photoshop
The quick selection tool in Photoshop selects textures in addition to colors, unlike other selection tools. Photoshop continually analyzes the image as you use the tool to choose pixels that are similar in texture, color, and pattern. With just a few clicks, the selection is precise.
You have more control over tiny regions you want to choose or deselect with the Quick Selection tool’s smoother edges.
I have over five years of Adobe Photoshop experience and am Adobe Photoshop certified. In this article, I’ll teach you how to use the Quick Selection Tool in Adobe Photoshop.
Key Takeaways
The quick selection tool is different than the magic wand tool.
Not every image will get the desired effect with the quick selection tool.
How to Use the Quick Selection Tool
Follow the steps below to use the Quick Selection Tool in Photoshop.
Step 1: Open Photoshop and a picture. In the toolbar on the left side of the screen, select Quick Selection. It is the fourth choice down and resembles a paintbrush drawing a dotted line. If a Magic Wand icon appears in its place, right-click it and then choose Quick Selection Tool.
Step 2: Make sure the Add to selection mode is selected at the top of the screen; it’s the same brush-and-dotted-line icon with a plus sign above it. By choosing this option, you add your selection each time you use the Quick Selection tool to click a photo rather than starting from scratch.
Step 3: Make sure to change your brush size down from the default, which mine is at 100, to about 20 or less, just to make sure we can be detailed and accurate and not be selecting the parts we don’t want.
Step 4: Select the desired area of the image by clicking. Click a different area or click and drag your mouse as if you were painting with a brush to broaden your selection. As you move the mouse, you can see the selection grow.
If you select something you don’t want, at the top of your screen you will see a Subtract option, go ahead and click that to remove the unwanted area.
And that’s the majority of how to use the quick selection tool! The Quick Selection Tool works best on photos with sharp edges and contrasty regions. These photographs will make it simple for Photoshop to make the right pick, with you occasionally just needing to make a few minor adjustments.
Bonus Tips
You can simultaneously choose and deselect numerous locations with the Quick Selection tool. With a single mouse swipe, you can actually choose four or five different parts of a picture.
It can be used to choose backgrounds, foregrounds, or any other area of a picture that you want to exclude.
Selecting the Auto-Enhance option in Photoshop can result in smoother, higher-quality selection edges (they often appear a bit blocky on their own), but you might notice that the Quick Selection Tool takes a little longer to work when Auto-Enhance is turned on. Unless you experience performance issues, I’d advise activating Auto-Enhance.
Final Thoughts
Any artist or photo editor must learn how to use the rapid selection tools in Photoshop and know when to use them. Luckily, it can be done quickly and simply.
Even while using any of the quick selection tools will need you to go back and perform another round of adjustments, they still wind up saving you time. The best way to learn Photoshop methods is to practice and make mistakes.
Any questions about How to Use the Quick Selection Tool in Photoshop? Leave a comment and let me know.
How to use Photoshop’s Quick Selection Tool to Change a Background
A Post By: Alex Morrison
It’s the question I get asked the most in my workshops and classes – “How do you change the background of an image?” Or “How can I cut my subjects out of an image and place them on a new background?”
Perhaps, despite your best efforts at placing your subjects in a pleasing, non-distracting environment, the situation made it impossible. Maybe you used your smartphone to capture a spontaneous moment and now the image needs a little background work? Maybe you want to cut your subjects out of the background to isolate them or use them on a website banner or other marketing material? Whatever the reason, this task has challenged every photographer, beginner or pro, since the invention of the camera! I’m going to show you how to use one of Photoshop’s most underrated tools for easily extracting your subjects from the background.
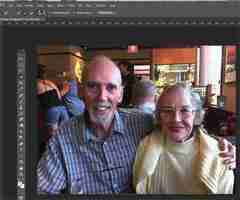
This photo (above) was a very spontaneous iPhone capture of my mom and dad, the photo itself isn’t great (lots of things wrong with it technically) but it has big sentimental value for me. It’s the last photo I have of my parents together. But it also has a busy background which typically causes problems for many photographers when trying to use Photoshop’s Selection Tools to remove it. In previous Photoshop versions, selection tools like Magic Wand and Lasso would get confused by the similar colors, and patterns of this type of background, making it a difficult and frustrating project. But with a relatively new selection tool it’s pretty straight forward, so this is a good example photo for learning the technique.
In this demonstration, you can make this a stronger image by removing the cluttered background to make it less like a snapshot and more like a portrait. The secret of any image editing is to use the right tool for the job. In this situation you want to use the Quick Select Tool to remove your subjects from an image and place them on a different background.
How to use the Quick Select Tool
In the past, you may have avoided most of the Selection Tools in Photoshop because they were not easy to use. The Quick Select Tool has changed all that. It has never been easier to make selections that don’t look like they were “cut and pasted.” There are two, or sometimes three steps.
Choose the Quick Selection Tool from the Toolbox palette:
It works like a Brush so you can change the size of the tool by using the [ – ] keys on your keyboard ( [ to make it smaller, and ] to make it larger). Give the tool a size that makes it easy to select your subject.
Step 1: Make your selection
Just drag the tool over your subject and stop when the “marching ants” get to the edge. The tool is smart and can detect the change in pixels so most of the time it will stop on the edge correctly. If it selects something that you don’t want it to, just click on the Alt key to switch to “deselect” mode and drag the selection back to where it should be.
Step 2: Refine the Edge
Once you’ve got everything selected as you want it, click on the Refine Edge button on the top menu. In this area, you’ll adjust the pixels around the edges of the selection. This will make the “cut” more smooth and realistic.
The refine Edge tool opens a pop up that looks like this:
From here you can select how you want to view your selection against a few background options. You can select the Mask overlay which you may be familiar with if you’ve used layer masks before. This view allows you to see the background as well as your selection. But you can also check it against a black background, which I like, so you can clearly see how your edge looks and if you have selected everything accurately. To change views, click the drop-down to get the View Options box. Scroll through these to get a feel for how they display your data. The Adjust Edge sliders give you many options to smooth, feather, and further refine your edge if needed.
For now, select Black & White view mode. Hover over the Black & White Box and click.
You should see something like this (below). You can see your edges very well against the black. You can see that the edges look okay, they are well defined, and not pixelated or blocky. But what about that hair? My poor dad with his fine and wispy (almost no hair), and my mom who had recently undergone chemo also has fine baby-like hair, making the hair selection task a bit of a challenge. But the Quick Selection Tool has a method for this too!
Click the Edge Detection Smart Radius box and move the slider to the right just a bit. watch how the edge around the hair change to be a bit more transparent. Be sure to watch the rest of your edges to make sure they don’t change too much.
Step 3: If needed, use the Edge Detection Brush
If you still need to get more transparency for hair, make sure the brush icon on the left is selected and carefully brush around where you need more transparency. You can switch between the View modes to see what is being displayed or removed. If you remove too much you can click and hold the Refine Edge brush to reveal the Eraser which lets you undo your brush strokes, much like a regular layer mask.
When you’re happy with your results, Look for the Output section at the bottom of the Refine Edge box, and click on Decontaminate Colors and select a small number as the amount, 2 is usually good, depending on your image. Change Output To: New Layer with Layer Mask.
This is what you should see now:
Your cluttered background is gone! You have a nice transparent background and all on new layer. This will be your main image.
Add your new background layer
Open the image you want to use as your new background, and using the Move Tool, drag the new background into your main image. Voila! You have a great new background layer and your subjects look very realistic and not like cut and paste paper dolls.
You may have to drag the new background layer under the subject layer – the one with the mask. I’ve deleted the original Background layer and replaced it with the scenery background and called it new background. You could also make any existing background layer invisible if you don’t want to display it.
Here’s a 100% close up look at the job the Quick Select tool and Refine Edge brush did on my mom’s hair (yes the image is a bit shaky at 100%, but I think you can see that took works pretty well to give you very realistic extractions, with the right amount of transparency and detail preservation).
The finishing touches
So for the final image, let’s balance the colors a bit and give this photo a nice warm tone, by using a layer mask and a warming Photo Filter.
And here is the final image:
What do you think? Is it better than the original? Was it worth the 10 minutes to edit and give it a new background? Just imagine, with a well captured image (not a shaky iPhone capture) think of all the new possibilities you will have if you master this process.
Why not give this nifty tool a try and post your results here – I’d love to see how you use this. If you have questions or problems, just let me know, I respond to my comments and questions regularly.