InDesign: Creating a Multiple Page Document
How to Design Web Pages in Indesign
1. Click the File menu’s “New” command, then click the “Web” item from the Preset control. Click "OK" to create the document.

2. Click the Rectangle Frame tool from the Tools palette, whose icon is a crisscrossed rectangle. Drag on the document to place the frame at or close to the top of the document, and spanning the width of the document. This frame will hold the header for the page—a background image overlaid with text that describes your site, for example.
3. Use the Rectangle Frame tool to create a frame under the header frame, and aligned with the document’s left edge. This frame will hold links for navigating to other Web pages.
4. Use Rectangle Frame to create a frame under the header whose left edge coincides with the navigation frame’s right edge, and whose right edge is the right edge of the document. This forms the frame for displaying body copy, such as teasers for articles on other pages of the site.
5. Press “V” to run the Selection tool, then click the header frame to select it. Right-click the mouse, then click “Content,” followed by “Graphics” to indicate this frame will hold graphical data.
6. Click the File menu’s “Place” command, then navigate to and double-click a picture you’d like to use in the header’s background. Drag the “Opacity” slider of the Effects panel left to about the 50 percent mark, to fade the picture enough so you can see text atop it clearly.
7. Press “T” to run the Type tool, then drag over the part of the header on which you’d like to add text that announces your site. Type that text, then press “Esc” when you’re done to release the Type tool.
8. Use the Type tool to make a text box inside the navigation frame, to hold the page’s navigation links. Click a color from the Colors panel to load that color for the text: blue is commonly used to indicated hyperlinked text. Then type your first navigation link in the text box (“About Us,” for example). Type the remaining links the same way. Use the Color panel to select black, then use the Type tool to type any non-hyperlinked text you want to follow the hyperlink: for example, you might type “Our mission, history and biographies” below the “About Us” link.
9. Use the Type tool and the Color panel to create hyperlink text for the page’s body content, as you did for the navigation frame. For example, first click a color in the Color panel that's similar to the color of the navigation frame’s hyperlinks. Use the Type tool to type a hyperlinked article title (“Increasing Productivity with Flex Hours," for example).
10. Click the black color from the Color panel, then type non-hyperlinked text that provides a teaser or summary for the article title. Choose specific fonts, colors or other characteristics for the body content, ensuring that the following criteria are met: First, the links for the body content should look similar to the links in the navigation frame. Secondly, the non-hyperlinked teaser text that describes the links should appear similar to the non-hyperlinked text in the navigation frame. Third, make sure that the body’s hyperlink text is clearly different from its non-hyperlinked text, as with the previously created navigation frame content.
What is a Parent Page in Adobe InDesign (How to Use It)
Page layout can be an enjoyable process full of creativity and satisfaction, but when you’re working on a document with hundreds of pages that all share the same layout, things can get dull very quickly.
Instead of putting yourself to sleep by positioning the same objects in the same places hundreds of times in a row, InDesign allows you to design page templates to save time.
Key Points
Parent pages are layout templates that contain repeating design elements.
A document can have multiple parent pages.
Parent pages must be applied to document pages to have an effect.
Objects from parent pages can be altered on individual document pages.
What is a Parent Page in Adobe InDesign
Parent pages (formerly known as master pages) act as page templates for recurring design layouts in your document.
For example, most of the pages in a novel contain the same basic content from a layout perspective: a large text frame for body copy, a page number, and maybe a running header or footer containing the book title, chapter, and/or author’s name.
Rather than placing these elements individually on every page of a 300-page novel, you can design a parent page that contains the recurring elements and then apply that same template across multiple document pages with just a few clicks.
You can create different parent pages for left and right pages or create as many different parent pages as you need to cover a range of layout situations.
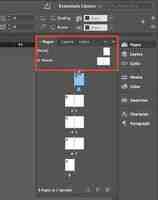
Parent pages are displayed in the upper portion of the Pages panel, as shown above.
How to Edit a Parent Page in InDesign
Editing a parent page works just the same way as editing any other InDesign page: using the main document window.
Simply open the Pages panel, and double-click the parent page you want to edit. If the Pages panel isn’t visible, you can display it by opening the Window menu and clicking Pages. You can also use the keyboard shortcut Command + F12 (or just press F12 if you’re using InDesign on a PC).
If your document uses facing pages, each set of parent pages will offer you a left page and a right page option, but they will both be displayed at once in the main document window.
In the main document window, add any recurring page layout elements that you want to include in the parent page layout template.
For example, you can create a small text frame in one corner and insert a special page numbering character that will update to display the corresponding page number on every document page that uses that parent page.
In this example, the page number placeholder character displays the matching parent page prefix when viewing the parent page itself but will update to display the page number when viewing document pages.
Any changes you make to a parent page layout should update instantly and automatically on every document page that has that same parent page applied to it.
How to Apply a Parent Page in InDesign
To make your parent pages change the contents of a document page, you must apply the parent page template to the document page. This process associates the parent page with the document page until another parent page is applied.
By default, InDesign creates a parent page (or a pair of parent pages if your document uses facing pages) named A-Parent and applies it to every document page whenever you create a new document.
You can confirm this by opening the Pages panel, where you’ll see that each page thumbnail in your document displays a small letter A, indicating that the A-Parent has been applied.
If you create another parent page, it will be named B-Parent, and any document pages using that template will display a letter B instead, and so on for each new parent page.
If your document uses facing pages, the indicator letter will be visible on the left side of the page thumbnail for left parent page layouts, and it will display on the right side of the page thumbnail for right side page layouts.
To apply a parent page to a single document page, open the Pages panel, and click and drag the parent page thumbnail onto the appropriate document page thumbnail.
If you need to apply a parent page to multiple document pages, or you don’t want to go hunting through the Pages panel to find the proper document page, open the Pages panel menu and click Apply Parent to Pages.
This will open a new dialog window allowing you to specify which parent page you want to apply and which document pages should use it.
You can enter individual page numbers separated by commas (1, 3, 5, 7), use a hyphen to indicate a range of pages (13-42), or any combination of the two (1, 3, 5, 7, 13-42, 46, 47). Click OK, and your layout will update.
Overriding Parent Page Objects in InDesign
If you’ve applied a parent page to a document page, but you want to adjust the layout on a single page (e.g., hiding a page number or other recurring element), you can still do so by overriding the parent page settings following the steps below.
Step 1: Open the Pages panel and double-click the parent page that contains the object you want to override.
Step 2: Switch to the Selection tool, select the object, and then open the Pages panel menu.
Step 3: Select the Parent Pages submenu, and make sure that Allow Parent Item Overrides On Selection is enabled.
Step 4: Go back to the specific document page you want to adjust and hold down the Command + Shift keys (use Ctrl + Shift if you’re using InDesign on a PC) while clicking on the parent item. The object will now be selectable, and its bounding box will change from a dotted line to a solid line, indicating that it can now be edited on the document page.
Creating Additional Parent Pages in InDesign
Creating new parent pages is extremely easy. Open the Pages panel, select an existing parent page, and click the Create new page button at the bottom. If you don’t select a parent page first, you’ll simply add a new document page instead.
You can also create a new parent page by opening the Pages panel menu and selecting New Parent.
This will open the New Parent dialog window, providing you with a few more options for configuring your new parent page, such as choosing an existing parent page layout to act as a base or adding a customized prefix instead of the default A / B / C pattern.
If you’ve started to design a document page layout and realize halfway through that it should be a parent page, open the Pages panel and make sure the correct document page is selected. Open the Pages panel menu, select the Parent Pages submenu, and click Save as Parent.
This will create a new parent page with the same layout, but it’s worth pointing out that you’ll still have to apply the newly created parent page to the original document page that created it if you want the two to be linked.
A Final Word
That’s just about all there is to know about parent pages and how to use them! There’s a lot to practice, but you’ll soon appreciate just how much parent pages can help you to speed up your workflow and improve the consistency of your layouts.
Happy templating!
InDesign: Creating a Multiple Page Document
About this Event

Free Event
Join UA Design Specialist, Kelsey Atchison, for a two-hour Adobe InDesign tutorial, where she will teach you to create a multiple page document in Adobe InDesign. This workshop will cover the basics of setting up master pages, multiple page layouts, text formatting on multiple pages and exporting files to a pdf.