Nesting Smart Objects for Multimask Effects in Photoshop
How to Edit a Smart Object in Photoshop (Detailed Tips)
Smart objects are super useful when you want to edit non-destructively in Photoshop. They allow you to resize images multiple times without losing image quality. Plus, they activate smart filters which allow you to come back and adjust filters after applying them.
Hey there! I’m Cara, and I’ve found smart objects to be useful countless times whether I’m editing for clients or for personal projects. They are helpful for making quick edits to a project as well as creating templates that can be used with other projects.
If you haven’t worked with smart objects much, you might not be aware of some of the handy tricks this feature offers. Let’s take a look at how to edit a smart object in Photoshop to learn all about them!
Note: the screenshots in the tutorial below are based on Photoshop CC for Windows. If you are using Photoshop for Mac or other versions, they will look slightly different.
Converting to a Smart Object
To show you how this works, I’m going to place an image inside the frame in this image.
Open your second image in Photoshop and choose the Move tool.
Click in the second image and drag up to the tab where your bottom image is open. Drop the image on top.
This image is too large but before we do anything, let’s convert it to a smart object. That way, as we resize and make adjustments we won’t lose any image quality.
Right-click on the layer you want to convert and choose Convert to Smart Object from the menu.
Notice the little icon that appears on the layer thumbnail, indicating it is now a smart object.
Resizing a Smart Object
The technique for resizing a smart object is the same as any normal object in Photoshop. Open the Transform tool by pressing Ctrl + T or Command + T on the keyboard. Grab the handles to resize and drag to reposition. Press Enter/Return to accept the changes.
Check out my post on what smart objects are in Photoshop to learn more about how smart objects help you keep the correct image resolution.
Placing a Smart Object
Now, we need to tell Photoshop how we want these two images to fit together. Because this is a rectangle, choose the Polygonal Lasso Tool from the toolbar on the left.
To be able to see what we’re doing, make the top layer invisible by pressing the eye icon to the left of the layer thumbnail.
Click in each of the four corners of the frame to make a rectangular selection.
Make the top layer visible again. Press Ctrl + G or Command + G to create a group. This allows you to apply a layer mask to restrict the photo to the frame but still be able to resize or move the photo within the frame. If you apply the mask directly to the smart object, it will cut the image.
Then press the mask button at the bottom of the Layer’s panel to turn the selection into a mask.
Notice you can grab the image with the move tool and move the picture around but it stays inside the frame? You can also resize the image however you please.
Editing the Smart Object
What if you realize you want to make some changes to the image inside the frame? You could use adjustment layers and clip them to the smart object layer as normal. Or you can edit the smart object independently and keep things tidier.
For example, right-click on the smart object layer and choose Edit Contents from the menu.
The layer will open up in a new document. Make whatever changes you like and close the document. When Photoshop asks you if you want to save the changes, say yes. When you go back to your working document, the changes will be reflected on the smart object.
You can do this as many times as you like. All your previous changes will appear every time you reopen the image with the Edit Contents command so you can adjust to your heart’s content.
Replacing the Contents of a Smart Object
What if you decide that you want to put a different picture in the frame? Do you have to go through everything all over again? You could if you like to waste time or you can simply replace the contents of your smart object.
Right-click on the smart object layer in the Layer’s panel and this time choose Replace Contents.
Browse to the image you would like to use as a replacement and click Place. The image will appear in the space and it may be larger or smaller depending on the actual image size.
Simply use Ctrl + T or Command + T to resize the image to fit. There’s no need to redo the mask or anything. The new image will stay inside the previously defined one.
Smart Filters
Another advantage of turning a layer into a smart object is the ability to add filters and adjust them later. When you apply a filter to a normal layer, it is a destructive edit. You can’t go back later and adjust the filter or even remove it.
The only way to edit the filter is to undo your changes, which is impractical or impossible after you’ve gone on and made other edits.
But, look what happens when you add a filter to a smart object. Go to Filter and choose whatever filter you would like to apply. Let’s go to Stylize and choose Oil Paint for this image.
The filter will appear like a smart filter under the smart object layer in the Layer’s panel.
You can double-click on the Oil Paint filter to reopen the options and make adjustments to the strength and style of the filter. You can toggle the filter visibility on and off using the eye icon or you can delete it by dragging it down to the trash can at the bottom of the Layer’s panel.
Filters suddenly become way more flexible!
The Power of Smart Objects
Smart objects can be a little confusing at first but once you understand their usefulness, you’ll realize how powerful this feature can be. They can save you tons of time by using them to create templates or by allowing you to adjust filters after applying them.
How much did you know about the hidden gem we call smart objects? Let us know in the comments below! And if you want to learn more about Photoshop be sure to check out more tutorials such as how to curve or bend an image in Photoshop.
How to Use Photoshop Smart Filters
How to Use Photoshop Smart Filters

You’ll walk away from this article knowing how to create Smart Objects and layers; how to apply Smart Filters; and how to use a Smart Layer Mask to make fine adjustments to your images. And you’ll do it all without losing any pixels!
Working with a Smart Object
Creating a Smart Object is easy. The most obvious way to do so is to choose File > Place, then locate the image you want to put inside your Photoshop document. You can also open an image as a Smart Object (File > Open as Smart Object). If you have an image on a separate layer, you can convert it into a smart object (Filter> Convert for Smart Filter). I explained in depth how to create a Smart Object in an earlier how-to, so if you’re rusty, check out that article.
For this how-to, however, I’ve done some of the work for you. Click on Figure 1 to download a file called photosafari.psd, which contains two Smart Objects, one visible, one not.
Figure 1. Click on the image below to download a Photoshop file with two Smart Objects.
Once you open photosafari.psd, take special note of the Layers palette (Figure 2). In it, you’ll see four separate layers, three of which contain images, and one text.
Figure 2. The Layers palette.
The TUSCANSTAMP layer is an Illustrator file, imported as a Smart Object. The layer named brunellobottles is a Photoshop file imported as a Smart Object. The small Smart Object icon in the lower right of the Layer thumbnail show you which layers are Smart Objects. To edit the smart object, double-click on the layer’s thumbnail (not the layer’s name), and the original image will open in an appropriate application.
Applying a Smart Filter
Applying Smart Filters feels like applying regular filters. It’s not the action of applying the filter that’s different; it’s what you can do after it’s applied to a Smart Layer.
In the Layers palette, select the TUSCANSTAMP layer. You’ll note that it has a regular layer mask already applied to it, so that it looks like it’s sitting behind the hilltop town, rather than over it. From the Filter menu, select Artistic > Sponge. The preview will open (Figure 3).Figure 3. The Sponge Filter preview.
Leave the settings as is and click OK. Now look at the Layers palette. It has a new sub-layer with a blank rectangle, and below that the sponge filter you applied (Figure 4).Figure 4. The Layers palette has changed.
In the Layers palette, double-click on the word Sponge. The original filter controls open, and you can make adjustments to the Smart Object here. For this exercise, really exaggerate the filter. Set the Brush Size to 1, the Definition to 24, and the Smoothness to 2 (Figure 5).Figure 5. You can change Smart Object attributes after the fact.
Next, note the small Slider icons to the right. These are the filter blending options, which will let you apply blend modes you’d find in the Layers palette, such as Multiply, Darken, Difference. But by adjusting them here, you’re applying directly to your Smart Object only. Double-click on the slider icons to the right and play around with the settings. I chose Dissolve, and pulled the opacity down to 52% (Figure 6).Figure 6. The Blending Options dialog box.
Now select what looks like a blank rectangle just above the Sponge filter in the Layers palette (Figure 7). It’s not really just a blank rectangle — it’s a Smart Layer Mask.Figure 7. Click on the Smart Layer Mask.
From the tool palette, select the Gradient tool. Using the default settings, drag from just below the word “MONTALCINO” to the top of the word “TUSCAN” (Figure 8). That tempers the sponge filter so that, with the help of the Smart Layer Mask, the filter only reaches halfway up the stamp.Figure 8. Use the Gradient tool to modify the Sponge filter.
Make sure the TUSCANSTAMP layer is selected and choose the Filters menu again. This time, select Pixelate > Color Halftone (Figure 9).Figure 9. You’ve just applied the Color Halftone filter to part of your image.
In the Layers palette, you’ll see the new filter appear above Sponge. Note that the filters only appear according to the Smart Layer Mask. Now for the real reason why this is such a great tool. Since these filters are all layer effects, you can use the layer controls to remove the filters, reapply them, and make them visible and invisible. And you won’t be touching the Undo command once — just click the eye icon to the left of each filter in the Layers palette.
Working with Smart Layer Masks
Now let’s take it one step further. If you recall, the photosafari.psd file has another Smart Layer with its visibility turned off.
Make the brunellobottles layer visible by clicking its eye icon in the Layers palette. From the TUSCANSTAMP layer, select the Smart Layer Mask, which is now labeled as Smart Filters (Figure 10).Figure 10. Select the Smart Layer Mask labeled Smart Filters.
Option + Command + Drag the Smart Layer Mask from the TUSCANSTAMP layer to the brunellobottles layer, in effect copying all the settings you made in the previous section onto the newly visible layer. This is how you can copy your settings from one layer to the next.Figure 11. All the tweaks you made earlier are now applied to the wine bottles.
While this may not be the prettiest image now, you can improve it with adjustments to the filters, masks, and blending modes. And more importantly, you can do it all day long, non-destructively, turning the effects on and off without worrying about making permanent changes to the original image files.
Nesting Smart Objects for Multimask Effects in Photoshop
0 SHARES Share Tweet
One of the biggest drawbacks to smart filters is that all filters applied to a single layer must share a common filter mask. Fortunately, there’s a workaround. To make a long story short, you nest one smart object inside another. To keep the long story long, read the following steps, in which I’ll employ a total of four smart filters—two masked, two not—to both smooth and sharpen the detail in a photograph.
[If you’d like to download the image used in this tutorial to practice these techniques, click here. We’ve also included a before and after for you to compare the results. All files are for practice purposes only.]
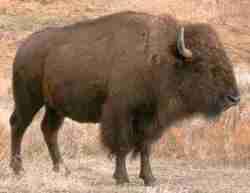
1 OPEN THE IMAGE TO BE SHARPENED
Let’s start things off with a photograph that requires sharpening. I captured this image with a Leica D-Lux 3 out the window of my car. In the course of touring the back roads of South Dakota’s Black Forest, we were suddenly surrounded by a few hundred mostly peaceful bison, and this guy in particular was close enough to touch (were I endowed with really stretchy Mr. Fantastic arms). The resulting image is soft with striated noise patterns and wandering colors. If I just set about sharpening him, I’d bring out the bad detail along with the good. Fortunately, smart objects provide a more selective if somewhat laborious approach.
Photo Credit: ©DEKE MCCLELLAND
2 CONVERT LAYER TO A SMART OBJECT
Photoshop provides a handful of commands that convert an image to a smart object. But for my money, the most convenient method is to click the little doodad in the top-right corner of the Layers panel and choose Convert to Smart Object. (It works for multilayer images, too.) Go ahead and rename the new layer something meaningful like “Bison.” Now your converted and named image is ready to receive nondestructive smart filters.
3 APPLY SMART SHARPEN
To sharpen the creature, choose Filter>Sharpen>Smart Sharpen. Then set the Amount to 350%, Radius to 4.0 pixels, and Remove to Lens Blur. After clicking OK, double-click the tiny slider icon to the right of the words “Smart Sharpen” in the Layers panel and change the Mode setting to Luminosity. This focuses the attention on the detail in the image rather than exaggerating the discrepancies between color channels—always a good idea when sharpening. Leave the Opacity set to 100% and click OK. Tip: Delete the empty filter mask because it just takes up room. When you do need a mask, it’s easier to create it on the fly, as you’ll soon see.
4 SMOOTH COLOR WITH MEDIAN
Sharpening did my bison some good, but it also brought out anomalous color patches in the fur. What’s needed is a generous pass of the Median filter. Choose Filter>Noise>Median, raise the Radius to a hefty 50 pixels, and click OK. As a rule, smoothing should be applied before sharpening so drag the Median filter below Smart Sharpen in the Layers panel. Double-click the slider icon to the right of “Median” in the Layers panel. (Photoshop warns you that you won’t be able to preview the effects.) Change the Mode to Color to smooth over the considerable coloring problems, and click OK to render the smoothing and sharpening effects together.
5 FIND BEST CHANNEL TO USE FOR MASK
Smoothing out the color works nicely inside the bizarrely (and inaccurately) multicolored bison, but it eliminates all hint of color in the background. What’s needed is a filter mask that exposes the bison and protects the grass. Turn off the Eye icon in front of the words “Smart Filters” in the Layers panel to restore the original image, which we’ll need to build a mask. Click the Channels tab and click the various channels to find the one with the highest degree of contrast between foreground and background. For most people and mammal shots, this is going to be Red.
6 EXAGGERATE CONTRAST IN CHANNEL
Duplicate the Red channel by dragging it onto the Create New Channel icon at the bottom of the panel. Double-click the name (in our case, Red copy) and call it “Mask.” When the mask is complete, the bison should be white and the background black. So press Command-I (PC: Ctrl-I) to invert the colors. Next we need to exaggerate the contrast. Choose Image>Adjustments>Levels. Raise the black point value to 70 and lower the white point value to 190 to draw out the bison from its background. Click OK to complete the effect.
7 LOAD THE MASK AS A SELECTION
Your mask isn’t going to win any awards for accuracy. And if you have some extra time on your hands, you could finesse it using the Dodge and Burn tools or the like. But this quick-and-dirty mask nicely highlights the areas of major color drift and fur detail, making it good enough for our purposes. To load the mask, press the Command key (PC: Ctrl) and click the Mask thumbnail in the Channels panel. Now you’re ready to apply the mask to the filters.
8 OPEN THE IMAGE TO BE SHARPENED
Click the RGB thumbnail in the Channels panel to return to the color composite image. Then click the Layers tab to return to the Layers panel. Turn on the Eye icon in front of the words “Smart Filters.” Then Control-click (PC: Right-click) “Smart Filters” and choose Add Filter Mask. Photoshop limits the Median and Smart Sharpen effects to the interior of the bison and protects the prairie grass in the background.
9 DELETE UNUSED CHANNEL
One of the great things about smart objects is that they make efficient use of file size. This particular image was 15.4 MB flat and 15.4 MB after the addition of the two nondestructive smart filters. It’s only when you start adding masks that the file size balloons. We have two masks, one alpha channel and the other a filter mask, so the file size has grown to 25.7 MB. The two masks are identical, so there’s no reason to keep them both. Go to the Channels panel and drag the Mask channel (not the italicized Filter Mask item) to the Trash. The file size drops to 20.5 MB.
10 OPEN SMART OBJECT IN NEW WINDOW
I’m glad to have brought back the colors in the grass. But I’m not so keen on limiting the sharpening effect to the animal. Plus we need to address the horizontal noise patterns at work in the shadow detail. This means applying a couple more filters, neither of which benefit from the existing filter mask. The solution is to create a nested smart object—a smart object inside a smart object—to accommodate the unmasked filters. Back inside the Layers panel, double-click on the Bison smart object thumbnail to open it in a new window (presumably called Layer 01.psb after the temporary file Photoshop creates to accommodate the smart object).
11 CONVERT SMART OBJECT TO SMART OBJECT
You’ll see the original, unedited version of the photograph on a standard Background layer, with all pixels available for editing. Bring up the Layers panel menu and once again choose Convert to Smart Object. Then rename the layer “You’re in the SO!” This way you’ll know where you are if you accidentally enter the smart object. While this adds to the complexity of the file, quite amazingly, it adds nothing to the file size. In fact, the Adobe engineers I talked to endorse this technique and told me there is currently no limit to how deeply you can nest smart objects.
12 APPLY REDUCE NOISE
To downplay the striated noise pattern, choose Filter>Noise>Reduce Noise. Then change the Strength value to 8, Preserve Details to 20%, Reduce Color Noise to 15%, and Sharpen Details to 0%, all of which conspire to smooth away most of the noise without altogether ruining the good detail. Make sure the Remove JPEG Artifact checkbox is turned off and then click OK to apply the filter.
13 APPLY HIGH PASS FOR EDGE CONTRAST
You don’t need the filter mask so drag it to the Trash in the Layers panel. Next we want to add a little bit of edge contrast, in part to sharpen the prairie grass but also to generally enhance the image detail. Choose Filter>Other>High Pass, set the Radius value to 20 pixels, and click OK. Double-click the tiny slider icon to the right of the words High Pass in the Layers panel. Drop out the grays by changing the Mode setting to Soft Light. Then reduce the Opacity value to 50% and click OK. The result is just enough sharpness to offset the effects of the Reduce Noise filter.
14 ENJOY THE RESULTS AND FLEXIBILITY
Close and save the nested smart object. Moments later, you’ll see the meticulously sharpened result thanks to a combination of four filters working nondestructively aided by two smart objects, one nested inside the other. It takes some effort to sharpen an image with this degree of control and accuracy, but the results are worth the effort. And you can modify the filter settings without fear of harming the quality of the image. Smart objects aren’t perfect, but with some planning and slightly more patience, you can establish flexible compositions that permit you to apply filters and adjust their order and settings in any way you see fit.