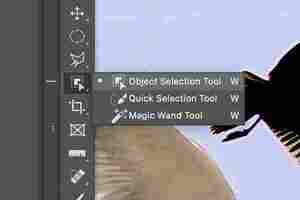
Photoshop’s Object Selection Tool
5 Quick Selection Tools in Photoshop
Photoshop is the leading image editing software worldwide. Released more than 30 years ago, it still keeps its leading positions among experienced designers and beginners. It’s the number one choice for everyone working in the web design niche. It’s also the essential tool for every online marketing specialist, blogger, content maker, etc.

It may seem to be difficult to handle at first. However, once you learn a little bit more about its functionality, you’ll know that building high-quality visual content is easier than it seems. The quick selection tool in Photoshop is a great example of tools that make your life easier.
What makes Photoshop so popular is its vast choice of photo editing functionality. Photoshop (PS) provides impressive versatility, making it easy to modify the whole image or any selected element. By means of quick selection tools, highlight a certain part of a picture and modify it according to your requirements. If you spend some time learning how to use the quick selection tool in PhotoShop and all its benefits, you’ll know how to remove background in PhotoShop, adjust brightness, work with contrasts, and handle many other image settings.
Among many other things, PhotosShop quick selection lets you easily change backgrounds. For example, you have an awesome picture and you like everything about it except for the background. Using PhotoShop fast selection, you can get rid of the imperfect background and put the subject of your photo on another background. You can choose a different color or PhotoShop effect for it. You can also put the subject of your image on a popular location background, or anything else that you choose.
PS provides several features that let you highlight objects on images and edit backgrounds. Depending on the composition of the picture that you’d like to edit and your skills, you may use the quick selection tools in PhotoShop that we discuss in this guide. Let’s learn more about their features and how each of them works.
Where can I find selection tools in PhotoShop?
As the name implies, a selection tool in PhotoShop lets you choose what specific elements of an image you’d like to edit. It’s easy to find the 5 main selection tools in the sidebar of your working area, which include:
Rectangular Marquee - lets you choose rectangular, eclipse, or other image portions.
Lasso - draw a custom form of a selected area around an object.
Magic Wand tool works similar to Lasso, but it’s more applicable to areas featuring edges that are clearly defined.
5 Most Popular Quick Selection Tools in PhotoShop:
Quick Selection Tool 1: Magic Wand Tool
PhotoShop Magic Wand tool lets you alter one part of an image, and leave other parts intact. It’s commonly used for removing the photo’s background layer and leaving other objects in place. It will come in handy when you’d like to display one object in different settings, put against multiple backgrounds.
This is the easiest way to make a selection but is only effective if the background you are selecting is one solid color. The tool will work best if you work with an image featuring a solid object placed on a blank background. The best example is a simple product shot.
To select an element, first, make sure you work with a layered image. Right-click on the Background layer, and choose 'Layer from Background.' Now simply choose the Magic Wand tool, and click on the background.
With the background layer selected, you can now delete it, and place your new background beneath the object's layer.
Quick selection tool 2: The Pen Tool
The first thing that you should know about the Pen Tool in Photoshop is that it’s not a pen. It’s a selection tool that selects objects while converting the path(s) that you have drawn on an image into sections. In PhotoShop, a path is a straight or curved line that goes from one point to another. Let’s see how it works.
This selection method works best if you have a smooth, curved object, with hard edges.
Select the Pen Tool then click, drag in the direction of the edge, and release. Carry on along the edge of your object until you meet up with the path again.
Now choose the Direct Selection Tool. You can use this tool to tidy up your path by clicking on the anchor points and moving them, or adjusting their angle. Once your path is finished, right-click on it and choose 'Make Selection'.
With your object now selected, you can invert the selection and delete the background.
Quick Selection Tool 3: Color Range
Selections don’t always deal with choosing objects or people. When it comes to changing the color of certain elements of an image, the color range tool comes into play.
If the object you are selecting has a contrasting color to its background, you can use the Color Range method to make complex selections like a water splash, easily.
Go to Select > Color Range, then use the colour picker to click on the object. In the example, I clicked on the whitest part of the splash.
Clicking OK will make the selection, then all you need to do is copy the selection and paste it into another image.
Method 4: Quick Select Tool and Refine Edge
The Quick Selection tool in photoshop is great for making simple selections fast, then you can tidy up the selection using the Refine Edge controls.
Drag the Quick Selection brush over the object you want to select - you can decrease the size of the brush to select smaller details. Hold down the alt key to alternate between adding or subtracting from the selection. When you've made the best selection you can, go to Select > Refine Edge.
Now you can use the Refine Edge tool to draw along the edges of the selection. Use a large size for leaves, and a smaller brush to trace along harder edges like the tree trunk. You can also tweak the Adjust Edge sliders to smooth, feather, or harden the edge.
When you're happy with the adjustments, click OK. You can now copy your selection, and paste it onto a new background.
Quick Selection Tool 5: Color Channels
If you want to make a selection of something complex like hair, using channels can be an easy way of doing it.
First click on the Channels palette.
Click on each of the layers to see which has the greatest contrast between the background and the hair. Then duplicate the layer with the best contrast.
With the duplicated layer selected, go to Image > Adjustments > Brightness/Contrast, and bring up the brightness and contrast as high as you can without loosing any strands of hair. Ideally you want the background to be fully white, and the hair fully black.
Now use a black brush to fill in the rest of the models body, and a white brush to whiten any darker areas of the background.
When you're done, go to Image > Adjustments > Invert to invert the image, then cmd/crtl click on the layer thumbnail to make the selection
You can now hide the layer, and go back to your original RGB layer.
Now you can copy your selection and paste it onto a new background.
Bonus: Select Object Tool
The latest PS versions offer a wider choice of tools that let you highlight parts of images and modify them in a number of ways. The Select Object tool is one of such handy alternatives. With its help, you can select any object in your visuals. Once you draw a rough selection around a selected object, PS shrink-wraps selected edges of your subject.
Hope this photoshop tutorial for beginners will make it easier for you to learn PhotoShop basics.
And if you aim to become a pro in Photoshop here are a couple of cources we checked out and can recommend:
Do You Know These 10 Photoshop Selection Tools?
Share:
When it comes to localized image editing, Photoshop is probably a photographer’s best choice among different post-processing software. The beauty and power of this platform lies within the gazillions of tools (such as Photoshop selection tools!) and editing options it offers. Yes, it can be overwhelming for certain people, but when it comes to versatility in manipulating images, Photoshop has a clear advantage.
Among these powerful tools is the ability to select areas of an image for more precise handling. If you've ever tried dodging or burning a part of an image only to see that you actually included an area you didn't want to include, then you know selective editing is important. It also works best if you wanted to change the brightness, contrast, and other characteristics of a certain area instead of the whole picture. This is where selection tools are most useful.
The good news is that Photoshop gives you more than a handful of options from quick and easy selection methods to more complex ones that can please even the most meticulous of pixel-peepers. If knowing just a couple can be helpful enough, how about getting acquainted with 10 different selection tools?
So launch Photoshop now as you read this and follow along!
Photo by Mikaela Shannon
The most obvious selection tools in PS are found in the toolbar which is located together with your brushes, pens, and cloning tools.
1. Marquee
The first one from the top of the toolbar is the Marquee tool. The Marquee tool is the most basic selection tool available in Photoshop. To use it, just click and drag around an area you want to select.
You can choose between rectangular, circular, single line row or single column row marquee options by holding down the button and selecting your chosen marquee tool.
2. Lasso
Since the marquee tool is limited by a frame, circle, or line, it’s unavoidable to select more that what you actually want to select. To solve this problem, you can use the lasso tool. It works like the marquee tool except that it gives you the ability to move around areas freely without restriction. This allows you to avoid areas that you don’t want to include. To do this, just click and drag the pointer around an area you want to select.
A variation of this is the polygonal lasso tool which is a freehand selection tool that works similar to the pen tool but for selection purposes. The selection is restricted to polygonal outlines but is easier to use than the lasso tool because you don’t have to drag the pointer around. Instead, just click on different points along a path that you want to select. It allows you to select freely based on the points.
3. Magnetic Lasso Tool
The Magnetic Lasso Tool is a very useful outlining tool as it is more precise than the other lasso tools. It follows lines and outlines like a magnet which makes it easier to select elements with contours.
Just click on the first point and move the pointer along the path or outline you wish to follow and finish the selection by going back to the original point.
4. Magic Wand
The magic wand is used to select an area based on a specific color. It is best used when selecting areas where color is varied but you want to select a specific color area. This makes selection faster when dealing with contours and sharp edges that are normally difficult to reach and takes time to select using the freehand tools.
This tool is used by simply clicking on a certain color in a desired area you want to select. Magic Wand and Quick Selection share the same button space. Click and hold the icon to reveal the two options.
5. Quick Selection
The quick selection tool works similarly to the magic wand. It selects areas based on color and tone. Just click on an area you want to include in the selection and Photoshop will automatically determine the area you want selected.
But the beauty of this tool lies in its ability to extend to other areas that you choose to include. You can choose to include or remove certain areas using the add to selection and subtract a selection options in the tool options, respectively. It definitely makes selections quick and easy.
Aside from the selection options in the toolbar, there is a section in the Photoshop menu that is fully dedicated to selection – the Select sub-menu. Sadly, not too many take time to check the tools there. In fact, the selection tools in there are quite useful when combined with other selection tools. Here are some:
6. Color Range
Hidden under the Select sub-menu is one of the most useful selection tools available in Photoshop – Color Range. Color range works similarly with the magic wand too. But instead of a limited selection based on a specific area, Color Range universally includes areas in the selection given a specific scope of colors you choose from within the image.
Multiple color selection and limitation is also available by using the add and subtract eye dropper options.
7. Inverse
Accessible through the Select sub-menu, Inverse is used only with a pre-existing selection. It automatically selects the area that isn’t selected initially and deselects the pre-existing selection, therefore inversing the process. If selecting an area is more difficult than selecting the areas around it, you can use inverse by selecting those areas outside and choosing to inverse the selection later. This makes the process faster.
Just look at the example below. Because the background has an even tone compared to the subject, you can choose to select the subject using another tool first and then simply use the Inverse tool to select the subject. Ctrl + I is a quick keyboard shortcut that you can use to invert selection.
8. Grow
Again, accessible through the Select sub-menu, Grow is a selection option also used with a pre-existing selection. Grow simply extends the selection based on the current selection, usually based on color and tone.
The example below shows that the selection expanded to cover a wider area but still within the confines of its tone and color. It further expanded when you use to Grow tool one more time. You can repeat the process until your desired area is selected fully.
9. Similar
Similar is also accessible through the Select sub-menu, also works with a pre-existing selection and is much like color range where it extends the selection to the whole image given the specific color and tonal range of the existing selection.
Let’s say you've selected a patch of clouds in the sky, you can extend the selection to include the other clouds which would probably have the same color and tonal range using Similar. Take note however that it will also include areas in your frame that are of similar color and tonal range even if they aren't clouds. Like Grow, this process can be repeated as desired.
10. Refine Edge
When you need to be meticulous about the edges of a selection, you can use this tool to manipulate or customize the contours of the selection given in the Refine Edge options.
It takes a lot of practice and a little getting used to before being able to fully understand using this tool but it is indeed helpful in making your selection more precise. Accessible through the Select sub-menu.
New Tool – Object Selection Tool
Object Selection Tool was introduced in Photoshop CC 2020 and it can be found in the Select and Mask dialog.
With this tool you can trace around any object you picked in two ways – using Rectangle or Lasso. Rectangle allows you to make a rectangular marquee while Lasso allows you to draw freehand. Object Selection Tool does a great job determining what you’re trying to select because of its impressive AI.
This tool is like a Magic wand and Magnetic lasso mix, powered by Adobe’s prestigious AI engine called Sensei. To learn more about it, watch the video below:
Tips and Tricks on Object Selection Tool
These tools are simply the most convenient selection tools available in Photoshop. There are also other techniques available in Photoshop where you can maximize your selections for more effective image manipulation.
Each tool and technique has its edge in terms of speed or its ability to be precise. Knowing what to use given your specific need will definitely be an advantage.
Further Resources On Photoshop Selection Tools:
Photoshop’s Object Selection Tool
Over the years, Photoshop has continually introduced new and improved selection tools, taking us from the basics such as the lasso and magic wand to the likes of Quick Mask, Color Range and Select Subject for better, faster more accurate selections.
In late 2019, Adobe introduced the Object Selection tool as part of the Select and Mask controls, but with its new 2022 update, Photoshop has now moved the tool front and center in the toolbar, sharing a slot with the magic wand.
So what’s the Object Selection tool and how does it work? It’s one of those tools that seems too good to be true—the kind of miraculously automatic things that only work in image editing on TV. Simply click on the Object Selection tool and then—automatically—Photoshop examines the image to identify what it believes to be distinct objects. After a few seconds of processing, it highlights image elements as you hover over them with the mouse.
Anybody who has used Photoshop throughout the years knows that while it’s going to work really well, the Object Selection tool isn’t going to automatically be perfect right out of the gate. But it’s still pretty darn good! So, to make it even better, you can use the Object Selection tool to hone in on exactly the objects you want to isolate. Simply click on any object in the scene and Photoshop will attempt to define its edges and select it or click and drag to surround the object you’d like the app to examine. Obviously, this works best with well-defined objects easily distinguishable from one another as well as the background, but the tool works surprisingly well even in crowded, cluttered frames.
For drawing selections around objects, first click in the tool options at the top of the window to choose between a rectangular marquee or a freehand lasso. Then just click and drag around the object Photoshop should examine.
Advertisement Advertisement
Object Selection is one of the brilliant new tools powered by Adobe’s Sensei artificial intelligence. And while it works wonders on its own, the selections it creates can be modified, refined, expanded and subtracted just as with any other selection tool. Shift-click or control-click with the Object Selection tool, as well as with a marquee tool or a lasso, and you can add to the selection. Likewise, you can option-click to subtract with any of the selection tools at your disposal and mix and match until you’re happy with the result.