Prepare your InDesign Work for Print (Part Two)
Solved: Booklet Printing in Wrong Order
I work for a commercial print shop, and we print booklets all the time on our C75 digital press. I have a 24-page booklet created in InDesign. By 24-page I mean the pages number 1-24 including covers, printing on 6 sheets of 11x17 paper, 2-sided, which we booklet-fold and saddle-stitch. Document page 1 has the spread for 24/1; page 2 has 2/23; page 3 has 22/3; page 4 has 4/21; etc. This is how I always layout a booklet. But when I print this booklet two-sided and set it to booklet fold (outside) and staple center (saddle-stitch), the pages come out in the wrong order.
The booklet ends up in this order:
1, 22, 21, 20, 19, 18, 17, 16, 15, 14, 13, blank(23), blank(2), 12, 11, 10, 9, 8, 7, 6, 5, 4, 3, 24
Pages 22 and 23 are blank, so it's hard for me to tell which is which. I think I have it correct above, but it could be 2 then 23.
The thing I don't understand is that the booklet is mostly printed in opposite order, but not completely. The outside of the covers print where they belong, but the insides print in the middle of the booklet. And every other page in the book prints in reverse order.
I've printed this booklet before with no troubles. I'm thinking there must be some little step I've forgotten, or some setting that got changed I overlooked, but I keep going over it and it never prints right. I literally print booklets every week, so it seems odd I'd forget something, but I don't know what else it could be.
Thoughts on what I might have missed? Is it a printer thing or operator error?
3 Useful Booklet Printing Solutions For Mac Users
Learn how to arrange pages to print booklets on your Mac, either for free or using a paid app.

Whether you need to print a booklet for a work or school project, or you just want to use less paper when printing out a large document, you can do so from your Mac. It can just be tricky to format and plan the booklet properly for the printing.
Or is it? Here are several apps and methods that can make creating and printing booklets on your Mac incredibly easy. Read on to see what options are out there and use your favorite the next time you need to print a booklet.
1. Printing a Booklet in Preview and Pages
You can absolutely print booklets in the built-in Preview and Pages apps on your Mac. Doing so just necessitates manually rearranging the pages of a PDF or Pages document.
To do this manual rearrangement, you need to understand how booklets are formatted and bound. Booklets are printed double-sided, with one half of one side of a piece of printer paper being one page of a booklet.
Each piece of paper therefore has four pages on it, and they’re folded in half. These folds are overlaid so that they can be stapled or sewn together to let the pages be flipped through like a book.
For this to work, the pages have to be arranged and printed on the pieces of paper in an order that results in the pages being in numerical order when put into booklet form.
As a hopefully illustrative example, the printing arrangement on an eight-page booklet looks like this:
Pages 8 and 1 on the first side of the first sheet of paper.
side of the sheet of paper. Pages 2 and 7 on the second side of the first sheet of paper.
side of the sheet of paper. Pages 6 and 3 on the first side of the second sheet of paper.
side of the sheet of paper. Pages 4 and 5 on the second side of the second sheet of paper.
You can create the content of a booklet in Pages or Preview in any order you like, and simply move the pages into the proper printing arrangement later. It’s just important to make sure your total page count is a multiple of four.
To rearrange pages of a document in Preview, select View > Thumbnails, then click and drag the pages in the thumbnail window into any order you wish.
To rearrange pages in Pages, it must be a Page Layout document. Start in that format, or click File > Convert to Page Layout to change it. While in Page Layout, select View > Page Thumbnails and click and drag the thumbnails into their new printing order.
To print a booklet from Preview or Pages, click File > Print or press Cmd + P, which is the Mac keyboard shortcut for printing. Hit the Show Details button, if available.
In Pages, change the Pages dropdown menu to Layout, and change the Preview dropdown to Layout in Preview. Set the Two-Sided dropdown to Booklet, then hit Print.
As you can see, making booklets with these built-in programs is very possible—it’s just not that easy because you have to arrange the pages yourself. A task which gets harder the more pages your booklet has.
If that doesn’t intimidate you, great. If it does, you may want to check out some of the programs below, which do the page arranging for you. Just know they’ll cost you money, while this method is free.
2. Make Your Booklet in Create Booklet 2
As we said above, arranging pages into the proper order to print them as a booklet can be difficult, particularly if you have a long booklet to print. Create Booklet 2 makes this process incredibly easy though by doing all the arranging for you.
Upload pretty much any file into Create Booklet 2 and the app will rearrange the pages for you into the right order for printing right away. Before you print you’ll be able to edit your booklet or even make a booklet right in the app.
This convenience comes with a price, though. At $19.99, Create Booklet 2 is moderately expensive. But with so many template and customization options in an easy-to-use interface, the price might be worth it to you for the incredible convenience Create Booklet 2 offers.
Download: Create Booklet 2 ($19.99)
3. Use Booklet for Booklet Creation on a Mac
A much cheaper option for an app that arranges booklet pages for you is Booklet. At just $0.99, Booklet doesn’t have as many features as Create Booklet 2. But it still arranges pages for printing perfectly, which might be all you need.
Booklet can only arrange PDFs, but thankfully there are sites like PDFBear, which make converting files to PDF format very easy. Booklet can handle documents with right-to-left languages as well as left-to-right ones, so lots of booklets are possible with it.
You can also alter page orientation and add page numbers to a file in Booklet. Its editing options are limited overall, but you’re still avoiding the major headache of page arranging for a very low price. Sometimes a basic program is all you really need.
Download: Booklet ($0.99)
Print Booklets on Mac Your Way
It’s good to know you can print booklets with apps already in place on your Mac. But it’s also good to know that there are apps out there that make printing booklets really easy, and a lot less time consuming.
Whatever method you choose, based on price, time, or faith in your own skills, we hope our guide to useful booklet printing solutions for Mac helps you with your future booklet printing endeavors.
Prepare your InDesign Work for Print (Part Two)
How to Prepare Your InDesign Work for Print: Part 2 of 2
tutorials Beginner, Quick Tips, Skills How to Prepare Your InDesign Work for Print: Part 2 of 2 How to Prepare Your InDesign Work for Print: Part 2 of 2
Have confidence exporting and sending your InDesign work to print with Part Two of our essential guide.
Consider everything listed here and in Part One, and there’s no need to fear sending your work to the press. Here in Part Two we’ll take you through:
Why you should export to ‘Reader’s Spreads’
How to accommodate for trimming and binding
Choosing paper weights and finishes
How to export and package your InDesign work
Asking for a proof and providing a mock-up
How to pick the right printing method for the job
1. Why you should export to ‘Reader’s Spreads’, not ‘Printer’s Spreads’
If you’re creating a document with multiple pages, such as a book, for sending to print, you might notice from existing examples of printed books that a page in the first chapter of a book is often physically connected to a page in the last chapter, forming a single spread.
Unlimited Downloads: 1,000,000+ InDesign Templates, Mockups & Design Assets by
The printed book has been put together by the printer using ‘Printer’s Spreads’. This is when the printer rearranges the order of the pages in order for the book to be bound.
Your job, however, is not to export your ‘print-ready’ file set up as Printer’s Spreads. It’s much simpler, both for you and the printer, if you set up your document as ‘Reader’s Spreads’, how the reader would actually view the document, page 1, then page 2, then page 3 etc.
Let the printer do their job (they’re pretty good at it, after all) – they will be able to arrange your print-ready file in the way that will work best for them to print and bind.
As a bonus, you’ll spare everyone a whole load of confusion at the press when you try to explain why page 2 is sat opposite page 15 (even more confusing if you haven’t included page numbers on your design!). This little parrot is just really confused about your attempt at Printer’s Spreads…
So don’t even go there – just export the file in the same page order that you’ve been working on in InDesign.
You should also include any blank pages that feature in your multi-page document, whether it’s a few pages at the beginning of a book, or the reverse side of some pages in an annual report. Sure, they don’t contain anything that needs to be actually printed, but including them in your exported file will help your printer understand the structure of the document, and accommodate for any blank pages you want included in the final print product.
2. Accommodate for trimming and binding
Once your design is printed, it will be trimmed. The excess parts of the paper (including the Slug and Bleed) will be cut away, leaving your final layout intact, up to the trim edge.
You should be aware that trimming errors can and do happen (printers are only human after all), but you can minimise the visibility of any slight trimming errors by doing two things. Firstly, as we mentioned over in Part One, you should include a Bleed.
Unlimited Downloads: 1,000,000+ Fonts, Mockups & Design Assets by
A bleed is an extra space around the perimeter of your layout that extends past the edge of the page(s). You should always include a bleed if any elements (e.g. images, colored backgrounds) on your layout will cross the edge of the page (also known as the trim edge).
The second thing you can do to minimise trimming errors is to make your Margins lovely and wide. Margins that are narrow will appear even more narrow if the trim is out by a millimetre or two. So make sure you give your document generous margins (at least as wide as the InDesign default width of 12.7 mm). If in doubt, make them wider – while also minimising the visibility of a poor trim job, wide margins will also give your layouts room to breathe and make them look instantly more attractive.
3. Choose the right paper weight and finish
When you first start to draft your design on the computer, consider what sort of material your design will be printed on. Different paper weights and finishes can dramatically effect your final print result, and you should have a good idea of the sort of ‘look’ you’d like to achieve before you commit the work to print.
Design by Rita Neves
Firstly, you should choose a suitable Paper Weight (and I don’t mean a nice weighty stone that keeps your desk papers together). Paper comes in a large range of different ‘weights’, measured in GSM (Grams per Square Meter), which will effect how thick the paper feels. Thicker papers tend to be of better quality (and are therefore usually more expensive). You should feel confident selecting an appropriate paper weight that’s going to suit the item you’re printing (and your budget!).
Here are our recommendations for paper weights:
If you are printing a newspaper a low GSM would be suitable, something between 35 and 55 GSM.
Flyers or low-market brochures might need a slightly heavier paper, around 110 to 160 GSM.
Magazine covers tend to be on the heavier side, from around 180 GSM for a mid-market title, edging up to over 250 GSM for a high-end glossy.
For a sturdier card weight, like a business card, you should be looking at upwards of 350 GSM to give a luxurious, weighty feel.
You also should know a bit about Paper Finishes. Your printer will ask you to provide a combination of paper specifications for the job – your desired weight and finish. Finishes fall into two main categories – Coated and Uncoated.
Uncoated paper is a suitable choice for printing letterhead, stationery or lower-quality leaflets and flyers. The feel of the finish is smoother and stronger than standard copy paper.
Coated paper falls into two sub-groups – matte-coated and gloss-coated. Matte-coated gives a smooth, unglossy finish and can give your print documents a modern, pared-back look. Gloss-coated paper is smooth and with a slightly reflective finish, giving your documents a glossy, high-end look. Because the ink sits on the surface of the coating, rather than absorbing into the paper, colors appear more vibrant and rich.
This parrot would love to be printed on gloss-coated paper if possible:
4. Exporting and Packaging your InDesign files
Once you’ve completed your InDesign work, and feel ready to go to print, you can export your design as a print-ready file. In theory this print-ready file is suitable for going straight to press.
It’s a wise idea to get in touch with the printer first and see if they have a preferred format for print-ready files. Most printers would probably prefer a Press Quality PDF (Portable Document Format) version of your design, but they might also accept files in other CMYK-compatible formats, such as high-resolution (minimum 300 dpi) JPEG or TIFF files.
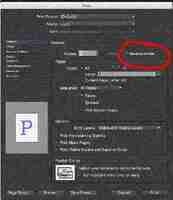
To export your InDesign document, go to File > Export on the main menu and choose Adobe PDF (Print) from the Format drop-down menu in the Export window.
In the Export Adobe PDF window that opens, choose [Press Quality] from the Adobe PDF Preset menu.
You should also make sure to export your print-ready file with the Bleed included. If you’re exporting to a PDF format, you can check the option in the Export window to include a bleed.
You can also choose to include Printer’s Marks in your exported print-ready file, which includes trim and crop marks, center marks, and page information. These can be really useful to the printer when preparing your work for the press.
If your printer has requested the original InDesign, or ‘native’, files, this is because this gives the printer the freedom to re-export the file if they need to make any minor technical adjustments. You will need to Package your InDesign file before you send it. Check out this quick and simple tutorial on how to package your files.
5. Provide a mock-up and ask for a print proof
You can’t expect your printer to be a mind-reader; they can only work from what they have been given, in terms of the print-ready or native (e.g. InDesign, Photoshop etc.) files, as well as from your instructions given over email, phone or face-to-face in person. Before you commit to the print run, there are two things you can do that will really help your printer to complete the job in the way you want it to.
The first thing you can do is to create a physical mock-up of the document you are sending to print and share this with your printer. This is especially useful if your document has multiple pages or complicated elements like folds and die cuts, that might not be immediately obvious looking at the print-ready digital file only.
There’s no problem with your mock-up being a bit rough-and-ready, printed at home or at the office – just make sure it shows the final layout of the document clearly, and be sure to incorporate essential info like page numbers, for example. It might also be useful to indicate where pages should be printed on one side or both sides.
Once you’ve shared you mock-up with the printer, and handed over your print-ready file(s), ask if the printer can give you a professional print proof for checking and sign-off, before proceeding with the full print-run. Most printers will offer a proof at no extra cost to the agreed quote for the full print run, and you’d be amazed at how many errors and mistakes can be suddenly glaringly obvious when down on printed paper! Rectify the file if you need to, get a second proof if you have the time, and give the go-ahead for the full print-run only when you’re happy.
6. Pick the right printing method for the job!
Before you select the printer you’re going to use to print your designs, you should know a little about the main print services commercial printers use. The print process can differ depending on the printer, with some championing more traditional offset printing and others singing the praises of digital printing. Commercial printers generally fall into two camps (though some offer both services): Digital Printing or Offset Litho Printing.
Offset printing is a very common commercial printing process, suitable for high volumes. The image to be printed is burned onto a plate and then transferred (offset) from the plate to a rubber blanket, before transferring to the printing surface. Image quality in offset printing is high and the process is cost-efficient at high volumes, so it’s a popular and usually pretty safe choice.
Digital printing is less mechanical, so it takes less time to prepare for printing. As a result, turn-around times for print jobs are quicker, and printing at low-volumes is also better-value. The jury’s still out on whether image quality is quite as good as that offered by the offset printing process.
Either printing method could be suitable for your job, depending on your project’s requirements. Shop around your local area and check out what different printers are offering, in terms of price and quality, for each print method.
7. You’re ready to print…
…In this two-part tutorial (find Part One here) we’ve taken a look at some of the key things you need to think about when preparing your InDesign documents for print. Use the following as your essential checklist when you prepare and send an InDesign document for print.
Remember to include a Bleed in your InDesign document
in your InDesign document Optimise colour for printing by using CMYK (and Spot Colours) only
Check the legibility of type by printing a sample and asking others to read it
Ensure all the images used in your design are high-resolution (more than 300 DPI)
Export your InDesign file as ‘Reader’s Spreads’
Accommodate for trimming errors by including a Bleed and increasing the width of margins
and increasing the width of margins Think about which paper weight and finish will suit your print project
Export and package your InDesign work ready for sending to the printer
Provide the printer with a mock-up for multi-page or folded documents and ask for a print proof
Pick the right printing method for the job (Digital or Offset Litho)
If you check off every item in this list you’re guaranteed to have no nasty shocks when the printer drops off that delivery box. And you’ll make this colourful, print-friendly macaw very, very happy…
Check out Part One of this tutorial to find out more about preparing your InDesign work for print. For more handy InDesign tips and tricks head over to our beginner InDesign tutorials page.