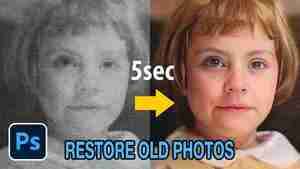
RESTORE Old Photos INSTANTLY with Photoshop’s NEW Neural Filter (VIDEO)
How to Repair and Restore Damaged and Lost Photos in Photoshop?
How to Repair and Restore Damaged and Lost Photos in Photoshop?

Read time 7 minutes
In the early ‘90s, people didn’t have the privilege to save copies of their photos in digital media storage devices such as flash drive or memory cards. Back then, photos were captured mostly by professional photographers inside their studio. Cameras that time used to have rolls/negatives of images which were eventually printed out in the physical format. Those printed images were then kept safe in photo albums for future generations to cherish the memories. However, printed photos don’t last long; either they fade, speckle, or crack with time.
With digitalization technologies, now we are able to capture high-resolution graphic images, take backups on storage locations, and print images in the desired file size and format. Moreover, with raster graphic editors like Adobe Photoshop, we can even restore damaged photos in their original health. Photoshop offers a wide range of format support and considered to be the best JPEG repair tool for windows systems.
Recover Distorted Images Using Photoshop
In this write-up, we will discuss some significant features of Adobe Photoshop that will help you recover and restore your old damaged photos, even if they are cracked or crippled.
Photoshop is one of the most prominent tools used worldwide to fix distorted images. Developed and maintained by Adobe, Photoshop application is integrated with features like Noise reduction filters, Lab color mode, and several retouch & repair tools that can help you fix pixel density, reduce color and luminance, and correct flaws like spots, blemishes, and red-eye from your photos.
Some common features and functionalities of Photoshop that can be used to fix your damaged or distorted images are listed below.
Lab Color Mode – This mode is specifically used to reduce luminance noise, brightness issues, and grey dots from your images.
This mode is specifically used to reduce luminance noise, brightness issues, and grey dots from your images. Retouch and Repair tools – Photoshop has numerous repair tools integrated within, that can help you fix every single detail of your broken image.
Photoshop has numerous repair tools integrated within, that can help you fix every single detail of your broken image. Noise Reduction – The noise reduction feature fixes details like spots, grains, shadows, luminance noise, banding, and other irregularities in your image files.
We will discuss all the above-mentioned features in a more detailed manner.
Photoshop – Lab Color Mode
Like other color modes provided by Photoshop, such as RGB and CMYK, Lab Color Mode is also a widely used color model that allows users to specify any given color by putting numeric values across various channels.
Lab Color Mode is specifically designed based on how human beings see color and contrast in real-life images. With this mode enabled, you can fix brightness, colored spots like black, white & grey, and many other issues causing color disorientation in your images.
The following are the steps to enable Lab Color Mode in Photoshop and thereby reduce luminance noise from your photos.
Launch Adobe Photoshop. Load the required image you want to alter. Go to Image >> Mode >> Lab Color
Select Layers and drag the current image to the Create New Layer icon in order to create a copy of the original layer. Now, go to the Channels tab and drag the current image to the Create New Channel icon in order to create a copy of the lightness channel. The Channels tab offers two channels, the Lightness channel (for brightness) and channels a & b (for colors). Select the Lightness channel and modify the values accordingly to reduce luminance noise.
Photoshop – Retouch & Repair tools
Photoshop is integrated with several retouch and repair tools that can help you rebuild the image with quality and fix imperfections in your old and blemished photos. Irregularities such as red-eye, spots, scratches can be easily fixed using the retouch tools.
Professional photographers are very fond of using this feature to enhance the quality of the images taken from their digital cameras.
Some of the prominent retouch and repair tools provided by Adobe Photoshop are the Healing Brush tool, Spot Healing Brush tool, Red Eye tool, The Patch tool, Clone Stamp tool, etc.
We will demonstrate the use of one of the retouch tools here to give you a proper understanding of how the tools function.
Consider using the Healing Brush tool to fix imperfection from your image file. Here are the steps one should follow in order to use the Healing Brush tool in Photoshop.
Click on the Healing Brush tool icon. Click the brush sample and set values for desired brush options – Mode, Source, Aligned, Sample, and Diffusion.
Keep the mouse pointer on the desired area to set the sampling point. The existing pixel contents get blended with the changes made.
Noise Reduction Filters in Photoshop
The Noise Reduction functionality in Photoshop eliminates spots, grains, red dots, halos, shadows, luminance noise, banding, etc. from your image files.
Adobe Photoshop provides two modes to alter or reduce noise in images, namely, Basic and Advanced. Typically, users do not get the expected results in basic mode. Therefore, it is always recommended to use the advanced approach to reduce noise and fix other bugs and disorientation from your images.
In order to use the Noise Reduction feature in Photoshop, follow the steps given below:
Go to the toolbar menu located at the top bottom corner of the interface. Then, select Filter >> Noise >> Reduce Noise. Then, zoom in & out over the area of the image via the +/- button located just below the image preview. Select Basic from the right-hand side pane.
Set the values accordingly – Strength, Preserve Details, Reduce Color Noise, and Sharpen Details sliders. Preview the results and click the OK button located at the top of the interface to save the changes.
Now, if the source file gets corrupt during the process or you come across a situation where the final image gets damaged or corrupted for any reason, what will you do?
Well, it’s common to have corruption issues in image files. If you had kept a backup of your source file, then you can easily retrieve the data back, but what if the final image is the only copy you left with, and its unfortunately corrupted. In such scenarios, you must seek resources in the form of third-party repair tools to fix corruption from your images or if you have a specific format corruption issue, you can opt to free methods available online to repair your image files. For instance, suppose you have an entire folder of corrupt JPEG files then you must seek resources in form of free methods to repair corrupt JPEG files.
Kernel Photo Repair tool is a popular alternative to repair corrupt and damaged photos. The tool is embedded with robust algorithms and is capable of restoring images irrespective of their file size and format.
How to Restore Old Photos Using Photoshop – 8 Steps Guide
Picking up different pieces

Step 1
In case of extremely messed up pictures, it may be almost torn into different pieces and such projects demand extensive skills for successful completion. Put together the pieces to the best of your abilities and scan it.
Step 2
Use the Lasso tool to select each piece and copy-paste them on separate layers. Hide the actual original image.
Step 3
For all layers, a mask has to be created and using a sharp brush mask off the actual image’s edges. Though 23px Chalk Brush is recommended, it’s up to the preference of professionals or photo editing company doing the restoration work.
Step 4
Before proceeding to masking, setup a layer underneath the one on which we will work and fill in a deep color. This is to assist visually regarding how and where to mask.
Step 5
Along edge of image, start masking and get rid of all things around it. This is very vital step for all those questing how to restore old photos.
Step 6
Continue with the same process for all other pieces to get things in as much detail as possible. There is no need for any white border or ripped paper in the picture. This should be considered during the process.
Puzzle
Step 1
Putting puzzle together is the easiest way. Take enough time and make attempts to match edges of different pieces together. Don’t scale or distort the pieces for making it fit as it can be damaging for the authenticity of final output.
Step 2
Move, rotate and do everything possible to match to the best possible extent so that all pieces are brought together without the overlapping of content. It’s something very crucial.
Step 3
After having all the section in proper place, create a group and create a duplicate of it for safe-keeping.
Step 4
After that, merge this group on the top; cover up the other one. Then proceed to the next photo restoration steps.
Rips and cracks
Step 1
Now the actual photo restoration process starts. Get rid of all tears and scratches creatively using the Clone tool.
Step 2
Make use of clean sections for repairing the areas where it is damaged. Don’t create repetitive patterns as it can look unreal.
Step 3
Treat the sections as separate items that need repair. Zoom in and change the size of brush based on the need and comfort offered.
Step 4
Eliminate tears and in this phase don’t proceed with the deeper details. Just work on the easily perceivable obvious damage.
Step 5
Now work on the wrinkles and bends on the scanned photo. Reflections and shining should also be treated separately. Clone away the damages; this can take hours but it’s worth the time you invest.
Repairing important areas
Step 1
It’s in this phase that you work on the complicated sections skipped earlier. If any entity in the photograph is completely damaged, you may ask the client for any other picture of that particular entity. This is what normally the companies offering photo restoration services do.
Step 2
Fixing human faces is a process that has to be done with extreme care. Set brush size as very small and go for pixel by pixel to clean the entire area. Minor details can still be left for upcoming phases.
Bends and shadows
Step 1
Turn the image into black and white now. Recover the contrast and shades and then into convert it to sepia. Apply an adjustment black and white layer attached to the restoration layer.
Step 2
Duplicate layers and hide originals for safe-keeping. Merge duplicate layers.
Step 3
Use Color Range Tool with which selection of bends shining off from the paper at darker sections and returning environment lights can be done.
Step 4
After selection, a Feather of nearly 5 pixels can be applied.
Step 5
Burn Tool should be selected and make sure of needful setting in the top bar. Using a big and soft brush, burn until the areas match with the rest of shadow area.
Crop and heal
Step 1
Crop the image but try to retain the content to maximum possible level so that restoring old photos in Photoshop don’t make things worse by removing wanted content.
Step 2
Get rid of unwanted spots using Spot Healing Brush. This tool may not be that handy in the earlier phases but at this point, it’s very effective.
Step 3
Identify the spots that are a part of damage but don’t tamper the actual details; be careful.
Step 4
Now paint the details if you don’t have any other choice. For that use brush tool with 1px brush size. Make use of details already available to judiciously carry out this process.
Noise reduction
Step 1
Make use of Reduce Noise Tool for getting rid of minute specks and particles over the picture. If you are concerned on how to restore old photos in Photoshop effectively, this is one of the tools that you should master.
Step 2
Make a replica of working layer. Then apply needed settings. Make sure not to overuse this tool so that only unwanted noise is eliminated.
Final detailing
Step 1
Use very small size of Spot Healing Tool to remove the dust and small specks that may still be there.
Step 2
Work on the human face to remove particles which stand out and show. Then check for any missing details carefully by zooming out and in.
Step 3
Sometimes, issues may be found that demand you to use Brush Tool or Clone Tool again. If so, don’t hesitate and go for it.
Following the above steps is just an overview of how to proceed. Steps to be taken can fluctuate slightly or severely based on the level of damage to the image.
Countless techniques are adopted by a typical photo restoration company to work on damaged pictures. However, only those who have a proper plan and shrewd working methodology only succeed in delivering high-quality old photo restoration.
RESTORE Old Photos INSTANTLY with Photoshop’s NEW Neural Filter (VIDEO)
Photoshop’s Neural Filters have revolutionized the way we edit images, enabling us to accomplish tasks in an instant that used to require very advanced skills. And there’s an amazing new kid on the block, the Photo Restoration Filter, that delivers magical results.
If you’re like most photographers, you have boxes of old photos—many of which look pretty bad. And because family and friends consider you an “expert,” you’ve probably been asked to repair their scratched and faded photos too.
Thanks to Adobe, you’ll be able to maintain your so-called expert status, even if retouching damaged photos isn’t really your thing, simply by watching the tutorial below from the PIXimperfect. Internationally acclaimed expert Unmesh Dinda has over four million subscribers on his instructional YouTube channel, and he demonstrates how to repair old photos with a few quick clicks.
In just 12 minutes Dinda explains how to access Photoshop’s new AI-powered Photo Restoration Neural Filter, and demonstrates how it works. He also reveals a few limitations and provides the workarounds required.
All that’s necessary to get started is to open Photoshop’s Neural Filters panel, turn on the Photo Restoration option, and make sure the Enhance Face box is checked. If your goal is to both repair and colorize a b&w image, simply check the Colorize box too. Once you’ve done that, the magic begins.
As you’ll see from Dinda’s before-and-after images, simply doing the foregoing instantly creates a wonderful starting point, and you may want to stop there. But there’s more you can accomplish almost as easily with a few quick adjustments.
The key to going beyond automatic default settings is understanding how to use a few sliders, and Dinda discusses the pros and cons of different options. He also explains what you need to know for eliminating ugly scratches
After watching the video and experimenting with a few old “hopeless” photos, and marveling at the dramatic results, head over to Dinda’s YouTube channel where you’ll find more tips and tricks.
Then check out the tutorial we posted from another image-editing expert, explaining how easy it is to use Photoshop’s powerful Blend If tool to fix landscape photos that need work.