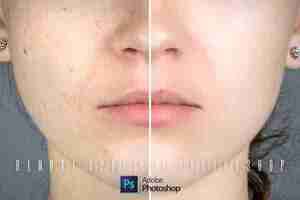
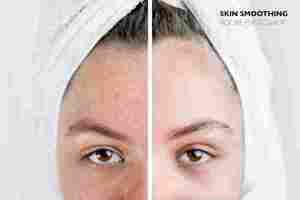
Skin Smoothing: Removing Acne and Blemishes in Adobe Photoshop
How To Remove Spots in Photoshop Quickly in 2022
In this quick tutorial, we’ll talk about the best tools in Adobe Photoshop to remove unwanted dust spots and blemishes in your images.
Let’s be honest. No matter how great the composition is, the moment you notice a few unwanted spots in a photo, you can’t see anything else but those annoying dots. It is really frustrating.
Luckily for you, there are many easy and quick ways to deal with this nightmare in Photoshop.
So, if you are tired of dust spots ruining your photos, here you will learn how to fix this issue with two different methods.
There are many alternatives for photographers to get rid of blemishes in post-processing. If you usually do all your editing in Lightroom, you might already be familiar with the Spot Removal Tool and the Visualize Spots feature. In case you don’t know how to get the best out of this tool, you can check this article from the Adobe website.
However, if you want to explore more options to retouch your pictures using Photoshop, there are many useful functions to choose from: the Healing Brush Tool, Spot Healing Brush Tool, Clone Stamp Tool, and Patch Tool.
For this article, we will focus on two simple tools for a quick and easy process:
Both of these options are perfect for removing dust spots, scratches, and some skin imperfections in a few clicks. Nevertheless, if you want to do high-end skin retouching, you should use more complex techniques, such as Frequency Separation. There are many tutorials online to learn how to master advanced editing techniques for portrait photography, but here we will only focus on quick solutions.
Let’s go with the first one:
How to remove spots using the Spot Healing Brush tool
When to use this tool: the Spot Healing Brush is perfect for removing a minor blemish or mark instead of an object in an image. In simple words, this tool grabs sample pixels from a surrounding area to cover the spot and the photo.
To use it, open your image in Photoshop and do the following steps:
First of all, remember that you should always work with separate layers for non-destructive editing. Click the Add New Layer icon in the Layers panel or press Control/Command + Shift+ N to add a blank layer.
On the left-hand toolbar, click the Spot Healing Brush. It is the band-aid icon with a circular shape behind it. If you’re already set to the Spot Healing Brush tool, you can simply press the J key.
Then, on the top tool options bar, select “Sample all layers” and also set the brush type to “Content-Aware“.
3. Click on the spots you want to remove
Lastly, you just have to click on the spot to clean it and Photoshop does all the magic. For this part, you should use a brush size slightly larger than the blemish you want to remove. And, to remove larger elements, drag your mouse, “paint” over the area until it is completely covered, and release the mouse.
And that’s it! Now you have a dust-free image with practically no effort.
Note that this method works great for blemishes, but sometimes you will need to clean the photo a little bit more with additional features.
How to remove objects and spots using the Patch Tool
When to use this tool: the Patch tool is useful to clean small spots but also large objects seamlessly. It fixes imperfections in a selected area using samples from another part of the photo that you choose. What’s great about it is that you can use it with any selection tool.
This tool might sound similar to the Clone Stamp, but it works differently. Instead of cloning content, it blends texture, light, and color. It is like an improved Healing Brush because it allows you to select rather than use a brush. It is the perfect way to get rid of distracting elements without leaving a visible sign behind.
Here’s how you use it:
1. Create a new layer from all visible layers (or duplicate the background layer)
Unlike the Spot Healing Brush and the regular Healing Brush, you can’t use the Patch tool in an empty layer. However, you can merge copies of all your visible layers into a new one by pressing Control/Command + Shift + Alt/Option + E. That way, you can remove any spot you want even though you already have several layers of work.
Alternatively, you can add a new layer from a copy of your original photo by pressing Control/Command + J.
The Patch Tool is located in the left-side toolbar in the same group of features as the Spot Healing Brush. If you don’t see it, right-click on the Spot Healing Brush icon to see the other options.
Make sure to use the Patch tool in Normal mode and to select Source on the top tool options bar.
3. Draw a selection around the area you want to fix and drag it
Draw a selection as you would do with the Lasso tool. It doesn’t have to be perfect, though. Just surround the spot you want to fix.
Next, all you have to do is dragging the selection to copy data from a different part of the image. Release the mouse afterward, and ta-da! You will be impressed with how well this tool works.
Whether you want to remove camera sensor dust, skin imperfections, or distracting objects, Photoshop offers incredible features to help you out. Now, all you have to do is practice!
To train your retouching skills, you can download free images on sites like Pexels or Unsplash.
If you found this article helpful, check our Photo Editing section for tutorials and useful links to download the best software for photography. We also comment on popular programs to try out, so you might want to stop by.
Thank you so much for reading!
How To Remove Acne & Blemishes In Photoshop
As much as we want to embrace our flaws, sometimes you may want to touch up a few areas in your photos. On the other hand, if you’re a photographer who has been requested to edit out blemishes from a client’s portrait, knowing exactly how to do so is an important skill to have.
In some situations, there are a few minor blemishes that need to be touched up and this can be done in a matter of seconds. However, some images require more attention than others. Luckily, either way, it’s easy to remove blemishes in Photoshop with a few basic adjustments.
Before I touch on the different techniques to use, let’s first take a look at the best tools for removing acne and blemishes in Photoshop.
Video Tutorial
Best Tools For Removing Acne In Photoshop
When removing acne in Photoshop, the three best tools include the Spot Healing Brush, the Healing Brush, and the Clone Stamp tool. Using these three tools alone or together will help you expertly clear up your image.
1. Spot Healing Brush Tool
The spot healing brush is found on the toolbar as the default healing tool in Photoshop. You can also access this tool by pressing J.
The spot healing brush works similar to the normal brush tool as you can increase (]) and decrease ([) the brush size. The brush then works by simply clicking on areas of the image you would like to retouch or clicking and dragging to retouch larger areas.
The spot healing brush automatically samples an area close to where you are retouching to replace the selected pixels. Photoshop does this by automatically blending the luminosity, shading, and texture of the area directly surrounding the spot or area you have painted over.
The spot healing brush tool is a quick and easy way to clear up minor blemishes or isolated spots on the image. The tool works well to cover up these areas without too much effort. Since you don’t need to give a reference point or sample area for Photoshop to copy, it is done automatically by the program.
When using the spot healing brush tool, you can change the hardness of the brush depending on how much feathering effect you want. The softer the brush is set, the easier the area will blend with the surrounding area.
Settings For The Spot Healing Brush Tool
The spot healing brush tool allows you to choose between Content-Aware, Create Texture, and Proximity Match.
Generally, the Content-Aware option provides the best results as Photoshop searches for the best sample area to replace the pixels with.
The Create Texture option works by generating a textured pattern based on the surrounding pixels. This option often creates a blurred look on the retouched area when using this option on skin tones.
The Proximity Match option uses the pixels directly surrounding the selected area to replace the pixels. This option works when the blemishes are isolated from each other.
Lastly, select Sample All Layers when you are editing an image that has multiple edits on different layers. This will retouch the area while keeping note of the edits that have been made on the image already.
The problem with the spot healing brush is that you have less control over the pixels that replace the area you are covering up. When using the Spot Healing Brush, you can’t choose the color, luminosity, and shading that is used to replace the pixels.
Having no control over the sampled pixels may cause errors in the retouching process. For instance, if you are trying to retouch an area on a subject’s face that is close to their hairline or eyes, Photoshop may use the texture, color, and shading of the wrong area to replace the pixels. This will create the opposite effect of what you are aiming for.
Ultimately, the spot healing brush should be used for clearing up minor blemishes or acne in areas that have clear sample areas next to the spot you are retouching.
2. Healing Brush Tool
When an image requires more in-depth retouching, the healing brush tool is a good option to use. You can access the healing brush tool from the toolbar by clicking and holding on the spot healing brush tool until additional options appear.
The healing brush tool works similar to the spot healing brush tool in that you can click on or brush over the areas you want to retouch. The main difference between the two tools is that you need to select the sample point that Photoshop will use to replace the selected pixels when using the healing brush tool.
When the healing brush tool is selected, you won’t be able to simply click on the area that needs retouching. Photoshop requires you to select a source point to use as a sample when fixing up other areas. Photoshop then blends the sampled pixels into the area you are retouching.
To select a source point, hold Alt (Win) or Option (Mac) while clicking on an area of the image. When selecting a source point, it is best to sample an area as close to the blemish as possible. This will keep the area similar in tone, luminosity, and shading.
Once you have selected the source point, release the Alt/Option button and the cursor will look like a regular brush again. You can increase (]) or decrease ([) the brush size to retouch larger areas.
If you are retouching multiple areas of an image, you can continue sampling new locations before painting over the new area you want to retouch. It is good to constantly reset your sample location to get the best results when removing blemishes.
Settings For The Healing Brush Tool
When retouching parts of the image with the healing brush tool, there are a few settings to choose from in the Options bar.
Firstly, the Mode options specify how the new pixels will blend into the area that you are retouching. When touching up acne, it is recommended to use Normal or Screen for the best blend.
You can then choose the Source which refers to the sampled pixels. Choose Sampled to select a sample point from the image. The pattern option allows you to choose a pattern as the sample point, this would be more for creative use rather than skin retouching.
The Aligned option controls whether or not your sample area moves locations as you brush. When unchecked, your sample location will remain the same regardless of where you paint.
When Aligned is active, your sample location will move with your brush but at an equal distance to the original sample.
The Sample option gives you the chance to select whether the sample point should include the current layer, the current layer and below layers, or all the layers. Select All Layers when you have made various edits to the image using multiple layers in later stages of your project.
The Diffusion option determines how quickly the new pixels adapt to the surrounding area. When retouching images with grainy textures, set a low diffusion value. When the image you are retouching is quite smooth, set the diffusion value higher.
The healing brush tool can be used across two images. For example, let’s say you want to use a sample point from a second image to use on your main image. To do this, select the healing brush tool, and sample a point on one image.
Then, move to the other image, and brush over the areas to replace.
Note: When using the healing brush tool on two images, make sure the images are set to the same color mode for the tool to work.
3. Clone Stamp Tool
The clone stamp works as the name suggests, as it copies an area of the image and pastes it over another part of the image. The clone stamp can be used to duplicate objects in an image or to cover up blemishes. The clone stamp can be selected from the toolbar or by pressing S.
The clone stamp works similarly to the healing brush tool since you choose a sample point by pressing Alt (Win) or Option (Mac) then paint over areas you wish to remove. However, the clone stamp doesn’t blend the sampled pixels into the new area. Instead, you paint an exact copy of your sample.
Ultimately, the clone stamp copies and pastes the sampled pixels to a new area of the image. The clone stamp also allows you to select any type of brush to use when cloning. The tool is not limited to the default brush tool like the healing brush tool.
Being able to change the brush gives you more control over the area you are cloning such as to clone uniquely shaped objects. The clone tool can be used to correct blemishes and acne on the skin, but the tool won’t work on any adjustment layers.
The clone stamp should be used with care when retouching skin tones as the different highlights and shadows on the skin can be hard to copy and paste correctly. This could lead to bright or dark spots that look out of place.
Settings For The Clone Stamp Tool
You can choose between various settings when using the clone stamp by changing them in the Options bar.
As I just mentioned, the clone stamp gives you the ability to change the type of brush you are using which is helpful when you want to clone specific shapes. When using the clone stamp to retouch acne and blemishes, it is best to use a soft brush as this will blend the pixels well.
You can change the Blend Mode to change how the brush blends the pixels and adjusting the Opacity will change how transparent the cloned pixels are when placed on the new area.
The Flow option determines how slowly or quickly the pixels are released when retouching areas. When using the clone stamp to retouch blemishes, the flow should be set at 100%.
Check the box next to Aligned to let Photoshop continuously sample pixels based on the first sample point. Uncheck the aligned option to use the original sample point each time you retouch an area.
The clone stamp tool offers additional options in the Clone Stamp panel. One of the main options here is that you can set up to five sample points. You can switch between these sample points while using the clone stamp to speed up your workflow. Select a stamp icon and create a sample point, it will then be saved until you exit Photoshop.
How To Remove Blemishes & Acne With The Spot Healing Brush In Photoshop
When the image has a few blemishes or spots to retouch, the spot healing brush tool is your best option. The tool will do most of the work for you, while automatically setting the right sample point and blending the new pixels to the area you are retouching.
To use the spot healing brush tool, start by opening your image that has minor blemishes to correct. Then create a new layer by clicking the New Layer icon at the bottom of the Layers panel. This will allow you to edit the image non-destructively.
Once your image is open, select the Spot Healing Brush Tool from the toolbar or press J.
When the tool is selected, set the Hardness of the brush to anything below 30%. Use 0% if you are going to drag the brush around areas of the image and increase it if you are going to click on single areas to retouch.
In the Options bar, make sure to select the Content-Aware option next to Type and check the box next to Sample All Layers. This will ensure that any edits you have made to the image will be taken into account and allow you to paint on a separate layer from the image.
Once the settings are correct, adjust the brush size by pressing [ to decrease the brush size and ] to increase the brush size. You can also adjust the brush size in the Brush Options panel.
Now either click on the acne in the image to retouch the area, or click and drag over larger areas to retouch a few spots at once. The tool will automatically replace the areas with well-blended pixels from the surrounding image.
How To Remove Acne & Soften Skin In Photoshop (Full Workflow)
In some cases, you will need to use a few tools to retouch acne and soften the skin. Use this method when the photo requires more retouching than covering a few blemishes. As always, first, open your image that needs retouching in Photoshop to begin.
Part 1: Removing Acne & Blemishes
Once your image is open, create a new layer by clicking on the New Layer icon at the bottom of the Layers panel.
Then select the Healing Brush tool from the toolbar by clicking and holding on the spot healing brush icon, before choosing the tool from the menu.
Once the Healing Brush tool is selected, make sure the Mode is set to Normal, the Source is set to Sampled, and, the Sample is set to All Layers. These settings can be changed in the Options bar.
Then, use the Healing Brush tool to clear up most of the acne in the image. To do this, hold Alt (Win) or Option (Mac) and select a clear area of skin nearest to the blemish you are retouching. Then click on the blemish or paint over an area to clear a few spots at once.
Clear up small areas at a time, to ensure the sample point remains close to the blemishes you are retouching.
Keep repeating these steps by moving onto another area to sample close to the blemishes.
Repeat these steps until you have removed all the acne. The skin will still be quite red in areas, but this will be fixed up in later steps.
To keep your Layers panel organized with the multiple steps this process requires, rename the layer by double-clicking on the layer in the Layers panel and adding a suitable name.
Part 2: Softening Skin With Frequency Separation
Once you have retouched most of the acne using the Healing Brush tool, the next step is to soften the skin with frequency separation.
Step 1: Duplicate And Merge The Layers
To do this, select both layers in the Layers panel and press Control + J (Win) or Command + J (Mac) to duplicate the layers.
With the two duplicated layers selected, press Control + E (Win) or Command + E (Mac) to merge the layers. Then with the merged layer selected, press Control + J (Win) or Command + J (Mac) to duplicate the merged layer.
You should be left with two new duplicated layers above the background layer and the Spot Healing layer you created earlier.
Rename the two new layers with the bottom of the two layers called “Blur” and the top layer renamed to “Texture”. Then hide the top layer by clicking on the eye icon next to the layer’s thumbnail so the box is empty. Now click on the Blur Layer to select it.
Step 2: Add A Gaussian Blur
Add a blur to the Blur layer by navigating to Filter > Blur > Gaussian Blur.
When the Gaussian Blur window opens, click on the box next to preview and add enough blur to soften the skin by adjusting the slider at the bottom of the window. Be careful to not overdo the blur as this will make the image look unrealistic.
Click OK, when you have added the right amount of blur for your image.
Step 3: Add Texture Back Into The Image
Next, turn on the Texture layer visibility by selecting the box next to the layer thumbnail. Then click on the Texture layer to select it.
Once the Texture layer is selected, navigate to Image > Apply Image.
Once the Apply Image window opens change the following settings before pressing OK:
Change the Layer to the Blur layer
to the Blur layer Set Blending to Subtract
to Subtract Set the Scale to 2
to 2 Then, set the Offset to 128
to 128 Lastly, make sure the Opacity is set to 100%
Once these settings have been applied, the image should be completely gray with only a light outline of the face visible.
Change the blending mode of the Texture layer by selecting the Mode dropdown menu in the Layers panel and choosing Linear Light.
Step 4: Smooth The Red Areas On The Skin
Next, click on the Blur layer again and select the Lasso tool from the toolbar or press L. The Lasso tool is used to create a rough selection on an image.
Adjust the Feather amount of the Lasso tool to anywhere between 10 and 20 pixels in the Options bar.
Make a rough selection around a red area of the skin using the Lasso tool, by clicking and dragging around the area you wish to select.
Then navigate to Filter > Blur > Gaussian Blur and use the slider to smooth the skin. Be careful to not add too much blur that makes the area look unrealistic. Select OK, when you have the right amount of blur added.
Press Control + D (Win) or Command + D (Mac) to deselect the area. Then use the Lasso tool to select the next area and repeat the step above to add the Gaussian Blur. Repeat this process with all the red areas on the skin. This will smooth the redness and reduce any oiliness on the subject’s face.
Part 3: Smoothing Redness Using The Brush Tool
The last stage of the editing process to retouch acne is to smooth the redness with the regular Brush tool.
For the last stage, create a new layer on top of the rest by selecting the New Layer icon at the bottom of the Layers panel.
Select the Brush tool from the toolbar or by pressing B, and set the Blend Mode to Lighten and the Opacity to anywhere between 10% and 40% on the Options bar.
Next, select a skin color from the image to use as a sample point by holding in Alt (Win) or Option (Mac) while clicking on the area of the face. This should be a spot that is not red as this color will be used to brush over the red areas. Release Alt/Option, and then brush over the red areas.
Make sure to brush over the areas nearest to your sample point. Then re-sample a new area to brush over the red areas near the new sample point. Keep repeating this as many times as you need to brush over all the red areas on the skin.
Keep sampling and brushing over the red areas until the skin is smooth and has a soft glow. The skin will now be clear without any acne or blemishes but still look realistic in terms of texture and color.
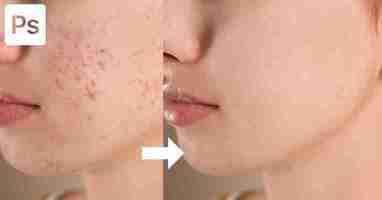
Before
Although you can use simple tools like the Clone Stamp or Healing Brush tools, a full skin retouch often requires a bit more work such as frequency separation and brush blending. It may seem like a lot to remember at first, but with time it can all be done in just a couple of minutes, and the results you get are always worthwhile!
Happy Editing!
Skin Smoothing: Removing Acne and Blemishes in Adobe Photoshop
Conclusion
Skin Smoothing is a great filter to have, however I’m not entirely happy with the end results all the time. These filters are more a quick fix than a replacement for hand edits however as technology gets better that is a very distinct possibility. Again as said in the beginning, this filter is a step-up from the Snapchat filters that revolutionized the platform. As you can see in the acne image, a harsh line is created at the bottom as an error from the AI. Check out our other articles on the 22.0 update: Neural Filters, Sky Replacement, and Pattern Preview.