Spice up your Halloween costume with electroluminescent lights
If you’ve ever wondered how to work those crazy lights and wires into your costumes, here’s a simple guide! By the end, you’ll realize EL work is easy, affordable, and freakin’ awesome.

Without further ado, for your viewing pleasure:
Spice up Halloween costumes with electroluminescent lights!
Choosing Your EL Product
First, ask yourself: what do you need for your costume? An outlined design, a few stripes, a logo? Once you have your vision in mind, consider the main three types of electroluminescent products:
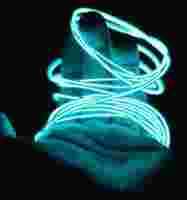
1. EL wire : the single-strand original.
You’ll see EL wire used more often than not. Why? Simplicity, simplicity, simplicity! Wire forms difficult shapes with ease, attaches to costumes readily, and holds up when cut for soldering!
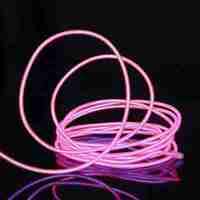
For our Halloween cosplay project – the Fortnite Drift skin – we used pink EL wire purchased on Amazon.com for just $7 a strand. There are plenty of other affordable options in multiple colors!
2. EL tape : a wider light strip.
EL tape looks bright and colorful when used on a costume.
The problem? It’s m uch harder to use! Unlike the EL wire, you cannot easily bend the tape in any direction. Also, it is virtually un-solderable: if you cut off a piece, bid the lost end farewell.
3. EL panel : it’s a square, Benny, a square!
Sorry, we needed to reference “The Sandlot.”
EL panels are much wider than tape or wire. They can be cut into shapes or masked :
Purchasing
Remember: lighting can become complex. If you’re new to EL lights or looking at a large project, map out your design on paper first, and then decide what is required.
Once you’re ready to buy, order those lights!
Top 5 apps to prepare you for Halloween
How Does it Work?
The full EL package looks something like this. There are three parts we want to address:
1. Battery pack
Most EL products use a standardized battery pack that runs on two AA batteries . They often have four settings installed: off, on, slow blinking, and fast blinking.
2. Connector clippy doodad (CCD)
Thanks to the CCD, you can disconnect the EL wire and battery pack in a jiffy. This helps for battery replacement, light attaching, and soldering work.
3. EL portion
Finally, as expected, you have the electroluminescent component: wire, tape, or panel. ‘Nuff said!
Guide to carving the perfect pumpkin for Halloween
Attaching EL
Battery
Before attaching your lights, remember to place the battery in a convenient location… a pocket, perhaps? It has to stay somewhere all Halloween night, and you probably don’t want it dangling in midair!
If you can’t comfortably wire the lights through your costume, you may need to visit our section on “soldering” below!
The wire
From our experience, there are two routes for attaching EL: sewing , and glue .
Sewing works great on clothing because it securely holds wires in multiple locations. Movement can easily break glue, but thread will secure the lights without breaking in the event of a costume dance battle.
Glue (whether hot, super, or epoxy) works better on hard surfaces. It’s far easier to use than thread, and should remain strong on hard materials that won’t shift. When you don’t need thread, use glue!
Although… for our Drift costume, we used both !
Fishing line couldn’t keep the wire formed properly, so we started using Gorilla Glue. After that, we secured everything with fishing line for the long run. So far? No problems whatsoever!
Darth Vader cosplay. from r/StarWars
Soldering
At this point, hopefully, you’re finished! The wire has been attached and strung, everything is in place…
But sometimes that’s not the case!
You may need/want to lengthen the battery wire, or extend the EL lights to another place without sending the light itself through your costume. To do so, you’ll have to employ the magic of soldering.
Into the darkness
Okay, it’s really not that bad! Soldering just means connecting wires with “solder,” a metal that has an unusually low melting point. For this part of the project, you’ll want something like a soldering iron kit.
From: Amazon
This kit will provide the wire cutters to strip the electrical wires, the iron to melt the solder, and a mount so you can leave the sautering iron up while working the wires together.
You may also want:
From: Amazon
From: Amazon
These heat shrink tubes go over the recently sautered wires for their protection.
With your materials in place, it’s time to learn how to solder!
There you have it: soldering is soldering. You attach one wire to another.
However, it may be hard to find those wires with EL wire. There are a number of layers:
Let’s travel from the outer shell to the center:
1. Pink plastic. This layer both protects the underlying components and adds the color.
2. Clear plastic. The clear plastic layer insulates the outer wire.
3. Outer wire. The one poking up in the picture.
4. Phosphor. Under the clear plastic, there’s a layer of phosphor excited by the central wire. You’ll need to scrape this away in order to solder the central wire.
5. Central wire. The main attraction: in our picture, it’s at the very end of the EL wire.
This may take some experimentation on your first try, so give yourself an extra half-inch. First use wire cutters to strip the pink plastic (be warned, it’s pretty tough). Then, slice the clear plastic away until you can pull the outer wire away. Finally, head to the end of the EL wire and strip the phosphor away from the central wire. The result should look something like the picture above.
Guess what? You now have two wires ready! Solder them to extension wire and protect the result with heat shrink tubing. It’s a wrap!
(And again, don’t try to solder EL tape or panels. We destroyed two pieces of tape and received multiple electrical shocks before learning that lesson.)
Conclusion
EL lights take costumes to the next level. Before we discovered the glory of electroluminescence, we always wanted to be the cool kid at the party with a light-up costume but assumed the process for using lights would be too hard. But no longer!
Try out some EL light for your next costume, and Happy Halloween!