The Best Photoshop Tools for Removing Objects in Images
A Guide for Beginners on Photoshop Tools- MAPSystems
Photoshop is one of the most powerful tools for designers and photo editors. In this article, you will come to know about the common Adobe Photoshop tools and uses. We have explained about Photoshop for editing the images, as it is the most extensively used tool. Here, you will get a basic concept about the different tools present in the toolbar in Photoshop software, the contents in the menu and the palettes you find on the right hand side of the screen.
When you open Photoshop, you will come across the toolbar along the screen’s left.
‘Default Tool’ is the one that is originally displayed as icon within the toolbar. It is not necessary that the default tool would always be displayed by Photoshop. The tool which you had selected last will be displayed. If you choose ‘Single Row Marquee Tool’ from the fly-out menu, it would be displayed in place of the default ‘Rectangular Marquee’ tool. You will have to follow the steps mentioned above for accessing the ‘Rectangular Marquee’ tool from ‘Elliptical Marquee’ tool icon’s flyout menu.
If you, for example, apply the aforesaid method on the icon of ‘Rectangular Marquee Tool’, you will get a fly-out menu carrying ‘Elliptical Marquee Tool’, ‘Single Row Marquee Tool’, and ‘Single Column Marquee Tool’. You can choose the desired tool.
For viewing and accessing them, you need to hold on the icon after clicking it. You can also right click on the icon (for Windows OS) or Control Click it (for Mac OS). A fly-out menu would appear displaying all available sub-tools.
A unique icon represents each tool in Photoshop CS6 toolbar. Apart from visible tools, other tools are available too. If you want to view them, you need to click on the small arrow of any tool icon’s bottom right corner. Majority of tools have different sub-tools under them.
The ‘Move and Selection’ tools are situated on the top of tools panel in Photoshop. The ‘Crop and Slice’ tools sit beneath them. ‘Measurement’ tools come next. After that, you will come across different tools for ‘Retouching and Painting’ followed by ‘Drawing and Type’. The ‘Navigation’ tools are located at Toolbar’s bottom.
The tools’ icons in Toolbar are neatly organized although at the first glance, they may seem to have random listing. But it is not so as grouping of related tools are done in logical manner.
The Photoshop toolbar appears as a single, long column by default. You can lessen the height of the column by making it double once you click the icon of ‘double arrows’ located on top. If you click the icon again, the Toolbar would again assume single column format.
There are different ways of customizing the Photoshop toolbar.
After clicking on dots, you can view the tools which have been removed in the dropdown. If Toolbar’s setting is default, you have to access the ‘Customize Toolbar’ window after clicking on the ‘Edit Toolbar’. From here, you can choose the tools which will be visible on the Toolbar. You can move rarely used tools away from default Toolbar to ‘Extra Tools’. For this, start by clicking on the tool to be moved out of Toolbar column and then drag the same to ‘Extra Tools’ column. You can restore the tools by dragging them back to Toolbar column from Extra Tools.
If you are not able to figure out some tools in the Photoshop CC 2018 Toolbar, you need to click on the 3 dots situated at Toolbar’s bottom (located above background and foreground color squares). This will also help you in customizing the tools appearing in the Toolbar in Adobe Photoshop.
For making Photoshop CC 2018 Toolbar appear in 2 columns, you need to navigate to the Toolbar’s top for clicking on the 2 triangles. This will make the tools appear in 2 columns. For toggling back the Toolbar to single column, click again on the triangles.
If you want to move the toolbar of Photoshop CC 2018 to other on-screen position, you have to navigate to the Toolbar’s top. Over here, after clicking on the vertical line series, you can drag the toolbar to any location on screen. The Toolbar would no longer be anchored to its default spot.
In Photoshop CC 2018 Toolbar, just beneath the 3 dots lie 2 color squares. Colors of the squares will differ. One square is placed atop the other. Upon clicking on arrows placed on right and top of squares, respective colors of the squares get switched over.
Top color is foreground color whereas color of underlying square is the color of background. Each of these colors can be changed after you double-click on any color square. The Color Picker window will show up from where you can adjust the color.
The foreground color will be used for painting by default whenever you would use the Brush Tool. If you use the Eraser tool for removing a portion of any non-layered picture or move/ delete portion of any selection, the background color will be visible through removed section of the image.
Here are several important photoshop photo editing tools and their functions that every photo editors must be using.
Crop tool
The cropping tool is a valuable feature of Photoshop, using which you can eliminate any unnecessary element from the image. You can simply leave out an element that you feel unnecessary in the picture. When you prepare an image for printing or posting online, you need to change its size, or remove the empty spaces from it. It comes handy in these cases. This is one of the most important photoshop editing tools that the editors should be using.
Healing brush In order to remove small specs and scratches in the image, you can use the healing brush tool. It works like a paintbrush and allows the users to make the image more perfect. The healing brush comes useful while removing blemishes in Photoshop. The users can copy a part of the image that seems to be perfect over the scratches and specs. As a result, these elements are eliminated from the image and blend the sections accurately. The areas that are replaced will look natural when you use this tool properly. Therefore, nothing in the image will look out of place.
Move tool Using this, you can simply move certain objects around the canvas in a given layer. This is one of the most important Photoshop functions. You need to drag after clicking on the canvas in order to use the tool. When you drag the layer in Photoshop will move along, according to the movement of your mouse.
The Marquee Tool It is one of the most useful photo editing tools in photoshop. It comes with simple features, and can perform a number of tasks. You can select particular areas of any image using the tool, copy them, cut and crop the areas. You can choose four different shapes with the tool. These are ellipse, rectangle, single column and single row.
Pencil and Paintbrush This is one of the extensively used photoshop elements editing tools. You can choose different types of paintbrushes in Photoshop. The users may choose a standard paintbrush, or use airbrush styles in the process. The brush tool enables the users to paint different types of shapes.
Clone stamp Using a clone stamp, you can create a sample part of a particular image and paint other areas using it. This is an important tool, used for image editing. You can simply select the colour from one area and use it to paint another area.
Pen tool In case you are interested in drawing vector graphics, you can use the pen tool. This is one of the most commonnly used photoshop tool for beginners. You can also use this in creating various paths.
The Hidden Tool The Toolbar hosts many tools, each of which is visually depicted through an icon. Apart from tools that meet the eyes, a number of other tools are also available. Using them you can further improve your image editing skill. It can be made apparent by clicking and holding on a given icon. Alternately, you can right click in Windows or Control click in Mac on the icon to view and access extra tools. A menu would fly out displaying the additional tools that you can work with. Some of these are being discussed below.
Lasso This free-form selection tool has to be dragged around the desired objects on the canvas for selecting them. Clicking on the tool icon will let you access other sub-tools. The polygonal lasso allows selecting objects on the canvas by clicking on strategic areas for creation of interlinked points in polygonal shape. The magnetic lasso behaves like regular lasso and additionally carries out edge detection for spontaneously snapping to them.
Patch Tool This facilitates drawing of a freeform outline around the defective region to select the same. The defect can be repaired subsequently by getting the selection outline dragged over the region whose texture you prefer.
Eyedropper You have to click the desired area of the canvas with eyedropper tool for sampling the color on the clicked point. It would automatically convert the foreground color to the color which was sampled by clicking canvas part.
Eraser Tool The functions exactly as the paintbrush. The difference lies in the fact that instead of painting, it erases the portion over which it is moved.
Type Tool You can type in horizontal manner with this. The hidden tools under the ‘Type tool’ offer additional functionality of typing in vertical manner as well as creation of text masks in horizontal or vertical direction.
Hand Tool Clicking and dragging around the Photoshop canvas is facilitated by this. This would be ineffectual if the complete canvas sits flush with the screen. After zooming in, you can easily move around using this. It also proves handy when the image is so big that it fails in fitting the screen at normal level.
Rotate View (R) You can visualize and subsequently edit a picture from various angles by using the ‘Rotate View’ tool which actually reorients the canvas at desired angle.
Zoom Tool Just click at a particular point on the Photoshop canvas and then zoom out or in using this. When you normally use this, it is programmed to zoom in only. For zooming out, you need to press down the option key and then start using the zoom tool in normal mode.
Color Selection The colors that you have working with on Photoshop canvas can be managed using ‘Color selection’ tools. Foreground color is the color that sits on the top and would be used by brushes. Background color is in the back and is used when anything from the background is removed or extended. Shortcut functions can be accessed by clicking on any of the 2 smaller icons that sit on the top. One icon, that sits on the left, is represented by a black square atop a white square. Click on it would result in setting of the colors in background and foreground to defaults. Clicking on another icon in the shape of double headed curved arrow would result in swapping of the colors in background and foreground. When you click on any color in the background or foreground, a color picker would pop up which can be used for setting the color that you exactly need.
Dodge Burn, Sponge You can lighten the areas in the picture by retouching and painting over them with Dodge tool. You can darken the areas in the image by painting over them with Burn tool. Color saturation can be increased or decreased over selected regions of image by painting over with Sponge.
Magic Wand tool When you click on an area with this tool, the spot gets selected and other similar areas. Generally, it is used to eliminate backgrounds from the photos. In case you are willing to do photo clipping using photoshop, you will find this feature useful.
Shape tool Users can use the shape tool to create rounded triangles, circles, vector rectangles, polygons, circles, custom shapes and lines. When you design shape masks in your photos, you will find this tool handy.
3D material drop It is extensively used in 3D modeling. It is necessary to have knowledge on the photoshop editing techniques, which will enable you to integrate the necessary changes in the images. You can create a sample from one area of your image and use it in other areas to create similar features, like 3D layer or mesh.
Smudge, sharpen and blur tools These are among the important photo retouching tools in photoshop, and all of them work like the paintbrush. However, they create different effects on your image. If you are willing to blur a particular area, you can use the blur tool. The sharpen tool can be used to sharpen the area, while you can use the smudge tool to smear the surrounding areas. In case you are integrating blended colours in your image, the smudge tool will come extremely beneficial.
4 Photoshop Tools Every Photographer Should Know
A Post By: Suzi Pratt
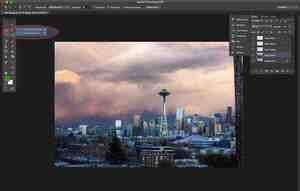
When it comes to photo-editing programs, one of the most popular among both amateur and professional photographers alike is Adobe Photoshop. While it can appear more complex than Lightroom, and certainly takes more time to learn all of its tricks, Photoshop offers four post-processing tools that come in handy for retouching images. These tools are pretty easy to locate and implement, and in this article I’ll show you how they work, specifically while retouching the image of the Space Needle in Seattle (below). I have the privilege of having this view from my home office, but the problem is that if I take a photo using anything but a telephoto lens, I get telephone pole remnants and wires in my otherwise pretty cityscape image.
Here are the four Photoshop tools I use to retouch my Space Needle images. There are of course other ways to retouch this image to achieve the same or even better results, but these are quick and easy methods that also highlight essential Photoshop skills.
Before we do anything to modify Photoshop images, the first thing to note is that within Photoshop, you can cause permanent changes to the pixels and details of your photos if you’re not careful. This is why you always want to make sure you are performing nondestructive editing so that you don’t overwrite the original image data.
There are several ways to do this in PhotoShop. For the tools I’m about to show you, the best technique for nondestructive editing will be to work within an adjustment layer or retouch on a separate layer. You can create a new layer by clicking on the New Layer icon on the bottom of the Layers panel. Repeat this every time before you employ a new editing process on your image and be sure to double click on the layer and rename it to help you remember what editing process you did on that layer.
1. Spot Healing Brush
First of all, let’s tackle those thin, yet annoying, power lines in the upper left corner of the image. To start, we’ll use the Spot Healing Brush. One of three image healing tools that Photoshop offers, this brush creates a seamless repair to your image by replacing unwanted textures of the image with good textures from another area.
To use it, head over to the Tools panel and select the Spot Healing Brush. It will be grouped together with other healing and patching tools. Be sure the Sample All Layers option is checked on the upper Options bar, as well as Content Aware (Photoshop versions CS5 or later) or Proximity Match (Photoshop CS4 or earlier). Next, zoom into the image’s problem area and click (or click and drag) on the areas you want to replace or heal. To adjust the size of the brush, press the left ([) and right (]) bracket keys on your keyboard. If you make a mistake, just hit Ctrl+Z (on Windows) or Command+Z (on Mac) to undo. In this example, I clicked and dragged the Spot Healing Brush across those thin power lines to erase them.
In this example, I clicked and dragged the Spot Healing Brush across those thin power lines to erase them, which is the quickest way of using it. However, be careful when attempting to spot heal in large chunks particularly near high-contrast edges, since some areas can appear improperly blended. For the sake of accuracy, a more effective approach could be using the spot healing brush to heal smaller chunks of the image, rather than attempting to heal the entire area in one go.
Other important settings to be mindful of are the Size and Hardness of the brush, which can be adjusted per the settings panel pictured below. Since the Healing Brush automatically blends pixels, it’s best to choose a higher Hardness value for best results.
2. Clone Stamp Tool
Another alternative way to getting rid of the power lines is to use another Photoshop essential: the Clone Stamp tool, which is used for pixel-to-pixel cloning. Like the Spot Healing Brush, this tool can be used to replace unwanted areas of an image, but unlike the Healing Brush, it won’t do automatic content-aware blending. The Clone Stamping is best used to duplicate an item or pattern, remove a brand logo, or remove power lines, which is what I’m going to do in this example.
To use the Clone Stamp tool, first create a new layer and then select the Clone Stamp tool from the tool bar. This tool works similarly to the Spot Healing Brush, but before you begin clicking away, position your cursor over the area you want to clone from and Alt-click (on Windows) or Option-click (on Mac) to define and sample the source of the clone. Be sure to re-sample and re-define as many clone sources as needed to provide a seamless cloning result.
Be sure to re-sample and re-define as many clone sources as needed to provide a seamless cloning result. To make sure the result appears realistic, it is important to zoom in and make sure the same pattern is not being cloned over and over again. Per the same settings as the Spot Healing Brush, be mindful of the Size and Hardness settings that you choose as these will determine how accurately the Cloning Tool samples and clones layers. When cloning an area with lots of patterns and details, it’s sometimes best to work with a low Hardness value and low cloning opacity for smoother results.
3. Magic Wand
Next, let’s get rid of the remnant of a telephone pole in the right hand side of the image. The easiest way to eliminate it would be a simple crop, but another way is to select and replace it using the Magic Wand Tool. This is one of Photoshop’s oldest selection tools and it causes many a photographer joy or suffering. The Magic Wand is incredibly easy to use, requiring just a click of its icon in the tool bar, followed by clicking on the area of the image that you want to select. Here’s where things can get complicated. The Magic Wand selects pixels based on tone and color, which means it has the tendency to select more areas of the image than you initially want. The simplest way to fix this is to play around with Tolerance in the Options bar. If the Magic Wand is selecting too much of an area, simply input a smaller value of Tolerance and then reselect the area.
4. Content-Aware Fill
After the proper area of the telephone pole is selected, it’s time to fill in that area. Hit Shift+Delete on the keyboard, and the below pop-up box will appear. Make sure Content-Aware is selected, then press OK; Photoshop will then sample pixels in the surrounding area and fill in the selected area accordingly. The results may not be perfect, and this is where the aforementioned Spot Healing Brush and Clone Stamp tools can come in handy to make the filled in area more seamless.
The final retouched image can be seen below. Using the Spot Healing Brush, Clone Stamp, Quick Selection and Content-Aware fill, the telephone lines in the upper left corner have been removed, as well as the remnant of the pole on the right-hand side.
In this brief tutorial, I’ve introduced several very important tools that all photographers should be familiar with, but it’s also important to note that I haven’t explained every possible use of them. There are many other practical and creative ways to use these tools, and I encourage you to do further research to learn more about them. But for the sake of doing quick edits and getting familiar with the tools, these are approachable ways to get started.
The Best Photoshop Tools for Removing Objects in Images
One of the most “magical” things about Photoshop is how it lets you easily remove unwanted objects and other distractions from your images with just a few clicks. There are, however, several handy tools in Photoshop that can zap annoying logos on clothing or erase ugly telephone wires in no time.

In the below tutorial, Aaron Nace from Phlearn explains how to use four of them: Content-Aware Fill, the Healing Brush, the Spot Healing Brush, and the Clone Stamp Tool. In the video at the bottom of this post, Nace shows you how to easily harness their power while removing a logo from a piece of clothing in a portrait.
“Like many other tasks in Photoshop, removing objects and distractions from your photos will usually require a number of different tools to make it happen,” Nace says.
“Let’s take a look at some of the most useful tools in Photoshop for removing unwanted things from a photo. Let’s try and remove this logo from the subject’s shirt. Since it’s on a relatively simple background (a plain white fabric with a bit of texture), we can use automated tools to take care of most of the work.”
You can follow along and try these four Photoshop tools as Nace explains by downloading the free sample image here.
Advertisement Advertisement
#1 Content-Aware Fill
“While Content-Aware Fill does a solid job of realistically removing the logo, zooming into the image reveals some strange repeating patterns and textures that make it obvious the image was edited,” Nace notes.
#2 The Healing Brush
“After using an automated removal tool, it’s common to need to refine that area using more manual methods,” he adds. “This is where the Healing Brush comes in.”
#3 The Spot Healing Brush
“Our typical go-to tool for object removal is another automated powerhouse. The Spot Healing Brush allows you to simply paint over top of an object and Photoshop will do its best to remove it by automatically sampling color and texture from the surrounding areas.”
#4 The Clone Stamp Tool
“When working around lines and edges, there’s no better tool than the Clone Stamp Tool.”
Advertisement Advertisement